Booklore is a free, self-hosted, multi-user digital library with Kobo and KOReader sync, EPUB, PDF, and manga readers.

Booklore is a multi-user e-book library server that allows you to build your own e-book library site for free and share it with family and friends.
booklore-app/booklore: Booklore: A self-hosted, multi-user digital library with smart shelves, auto metadata, Kobo & KOReader sync, BookDrop imports, OPDS support, and a built-in reader for EPUB, PDF, and comics.
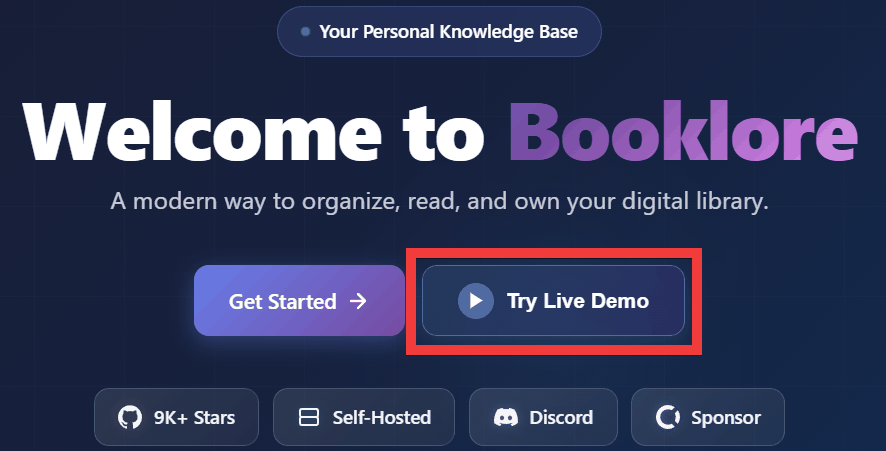
Welcome to Booklore | Booklore
https://booklore.org/

◆Demo site
Click “Try Live Demo”.
The demo username and password will be displayed, so make a note of them and click 'Launch Demo'.
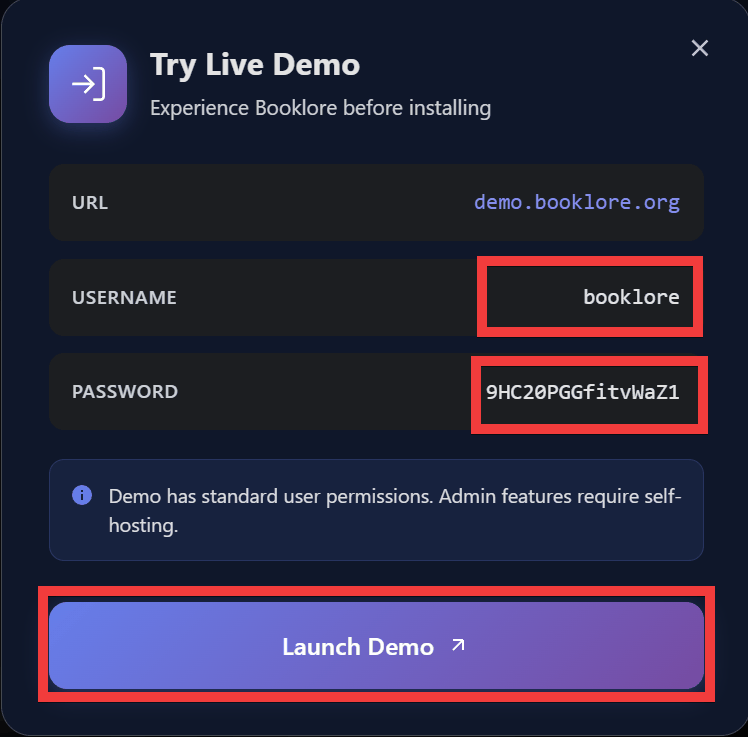
The login screen will appear, so enter the username and password you noted down and click 'Sign In'...
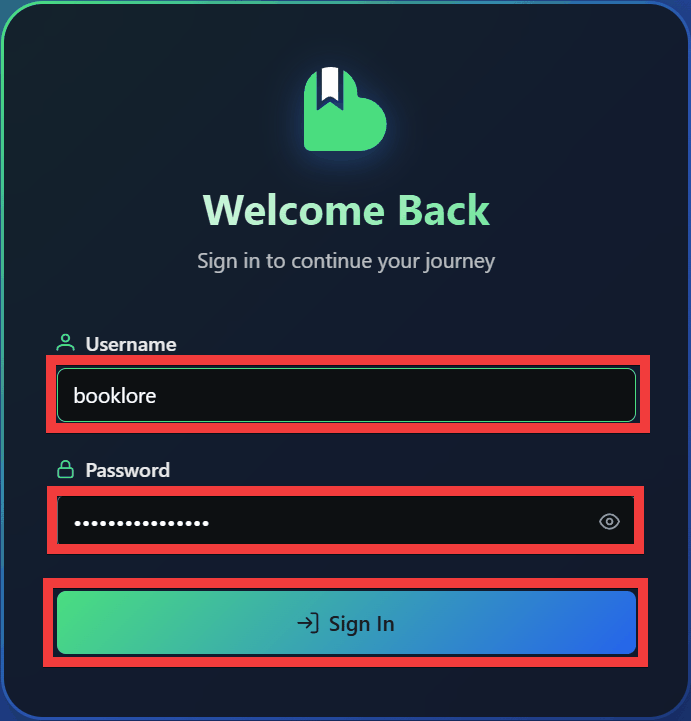
You can log in to the demo site.
◆Installation method
This time, we will build an environment where Docker and Caddy can be used with Ubuntu on a Google Cloud VM instance. Create a booklore folder and move it to it.
mkdir booklore && cd booklore
Create a .env file and write the following contents. Change 'DB_PASSWORD' and 'MYSQL_ROOT_PASSWORD' to any string you like.
 # BookLore Application Settings
 APP_USER_ID=1000
 APP_GROUP_ID=1000
 TZ=Asia/Tokyo

 # Database Connection (BookLore)
 DATABASE_URL=jdbc:mariadb://mariadb:3306/booklore
 DB_USER=booklore
 DB_PASSWORD=ChangeMe_BookLoreApp_2025!

 # Storage type: LOCAL (default) or NETWORK. Set to NETWORK if using NFS/SMB - this disables file reorganization features to prevent data corruption.
 DISK_TYPE=LOCAL

 # MariaDB Container Settings
 DB_USER_ID=1000
 DB_GROUP_ID=1000
 MYSQL_ROOT_PASSWORD=ChangeMe_MariaDBRoot_2025!
 MYSQL_DATABASE=booklore
Create docker-compose.yml.
 services:
 booklore:
 image: booklore/booklore:latest
 # Alternative: Use GitHub Container Registry
 # image: ghcr.io/booklore-app/booklore:latest
 container_name: booklore
 environment:
 - USER_ID=${APP_USER_ID}
 - GROUP_ID=${APP_GROUP_ID}
 - TZ=${TZ}
 - DATABASE_URL=${DATABASE_URL}
 - DATABASE_USERNAME=${DB_USER}
 - DATABASE_PASSWORD=${DB_PASSWORD}
 depends_on:
 mariadb:
 condition: service_healthy
 Ports:
 - '6060:6060'
 volumes:
 - ./data:/app/data
 - ./books:/books
 - ./bookdrop:/bookdrop
 healthcheck:
 test: wget -q -O - http://localhost:6060/api/v1/healthcheck
 interval: 60s
 retries: 5
 start_period: 60s
 timeout: 10s
 restart: unless-stopped

 mariadb:
 image: lscr.io/linuxserver/mariadb:11.4.5
 container_name: mariadb
 environment:
 - PUID=${DB_USER_ID}
 - PGID=${DB_GROUP_ID}
 - TZ=${TZ}
 - MYSQL_ROOT_PASSWORD=${MYSQL_ROOT_PASSWORD}
 - MYSQL_DATABASE=${MYSQL_DATABASE}
 - MYSQL_USER=${DB_USER}
 - MYSQL_PASSWORD=${DB_PASSWORD}
 volumes:
 - ./mariadb/config:/config
 restart: unless-stopped
 healthcheck:
 test: [ 'CMD', 'mariadb-admin', 'ping', '-h', 'localhost' ]

interval: 5s
 timeout: 5s
 retries: 10
Launch Booklore.
docker-compose up -d
If the Booklore container won't start, I was able to resolve the error by correcting the folder permissions.
 docker compose down
 sudo chown -R 1000:1000 ./data ./books ./bookdrop
 docker compose up -d
Next, to communicate via HTTPS, edit the Caddy configuration file 'Caddyfile' and replace 'booklore.example.com' with the domain name you have prepared and save it. If you do not need HTTPS communication, you can access it by entering 'http://[server IP]:6060' in your browser.
 booklore.example.com {
 reverse_proxy 127.0.0.1:6060
 }
Restart Caddy.
sudo systemctl reload caddy
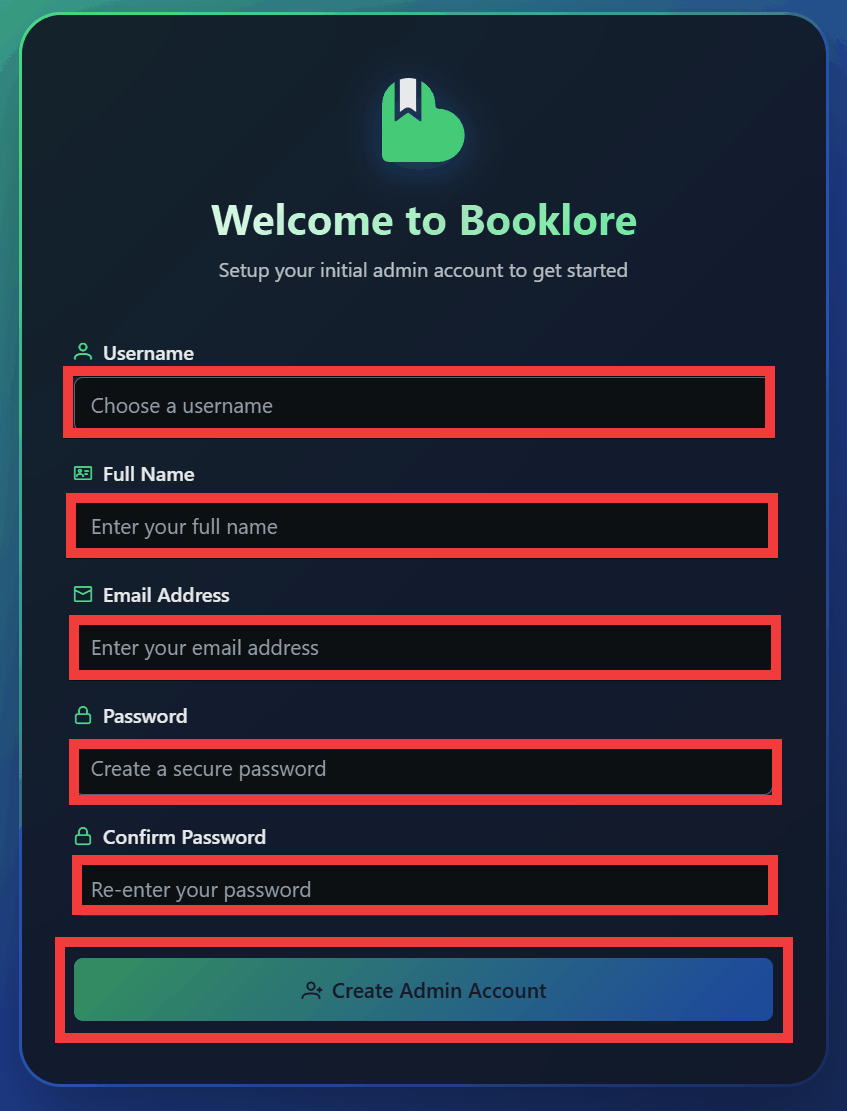
When you access the domain name you prepared in your browser, a form for creating a Booklore administrator will be displayed, so enter your user name in 'Username', your full name in 'Full Name', your email address in 'Email Address', your password in 'Password' and 'Confirm Password' and click 'Create Admin Account'.
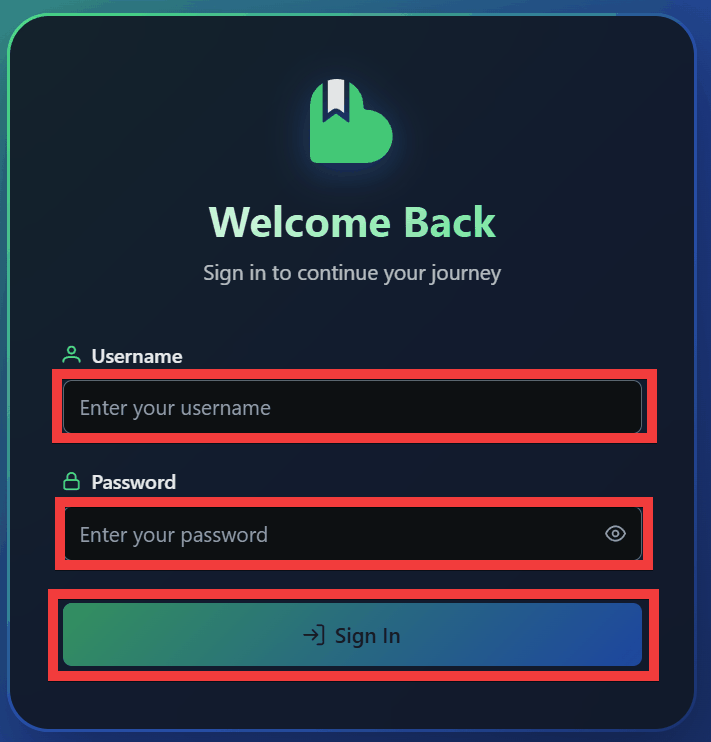
Once the administrator account is created, a login screen will appear, so enter your username in 'Username' and your password in 'Password' and click 'Sign In'.
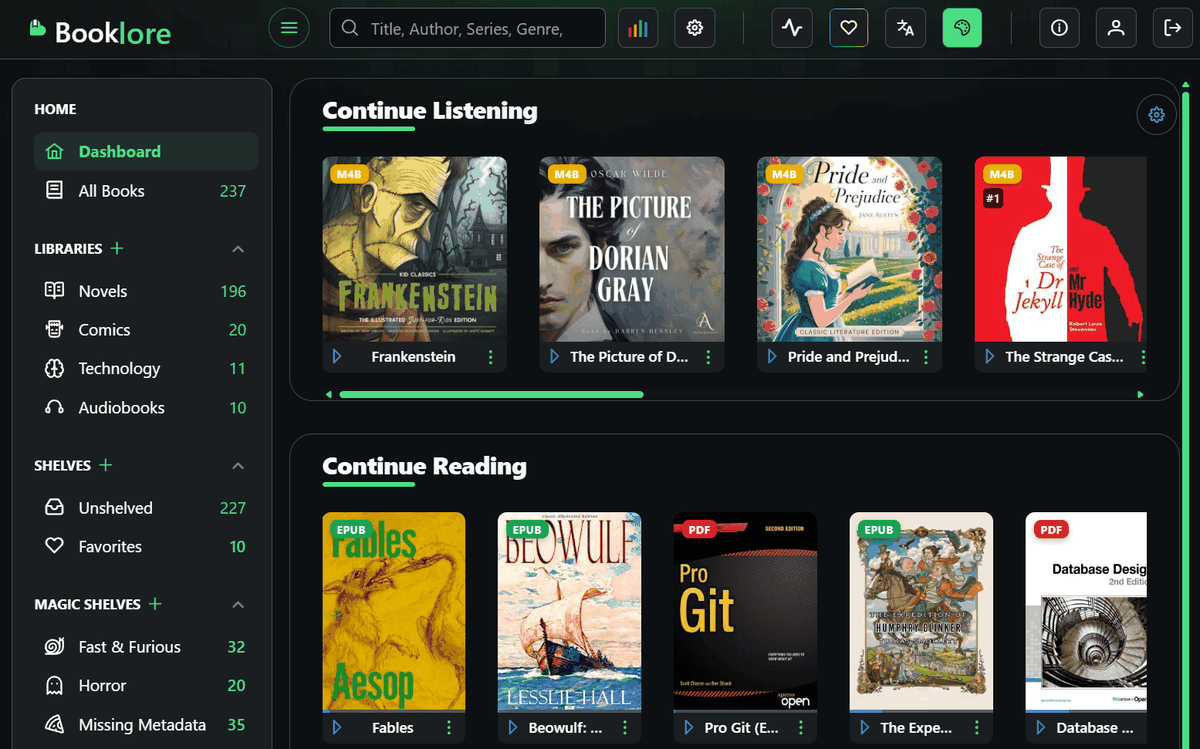
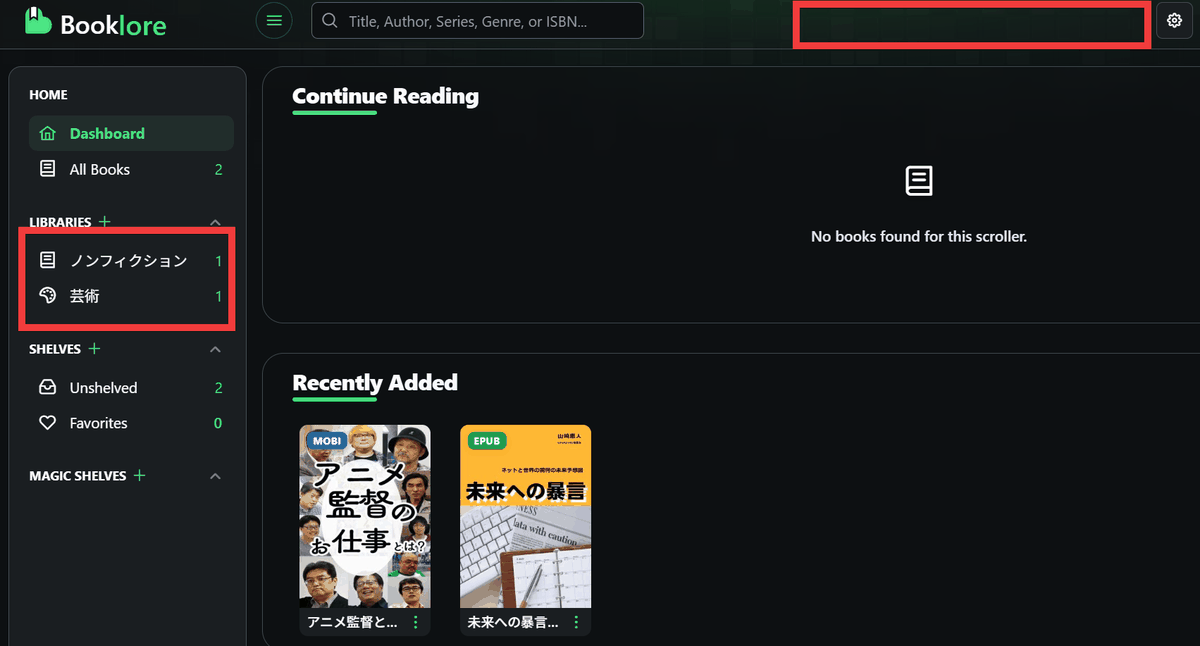
After logging in, the BookLore homepage was displayed.
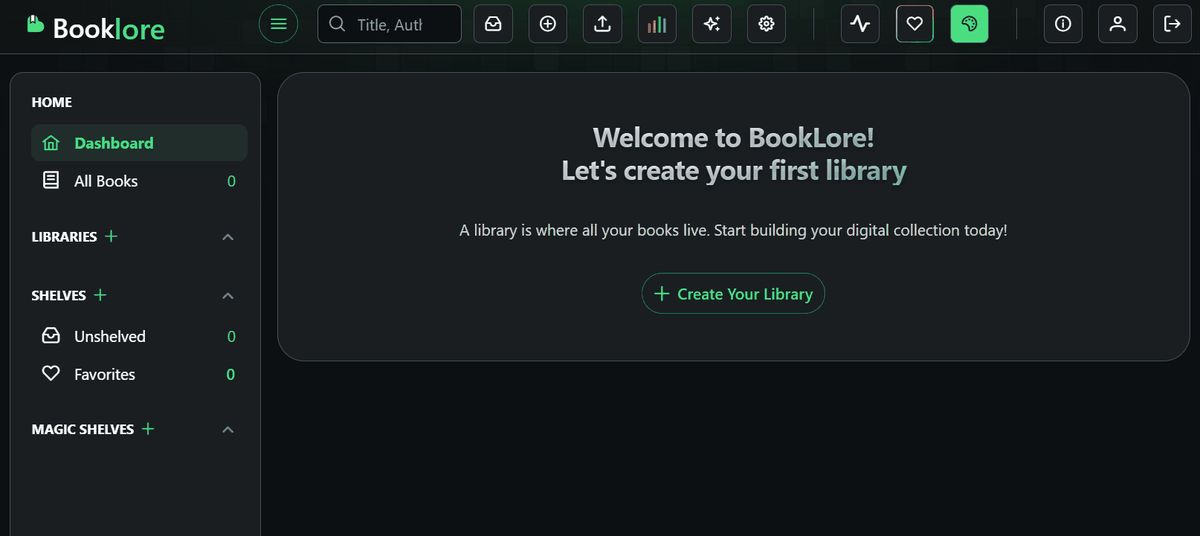
◆Main features of Booklore
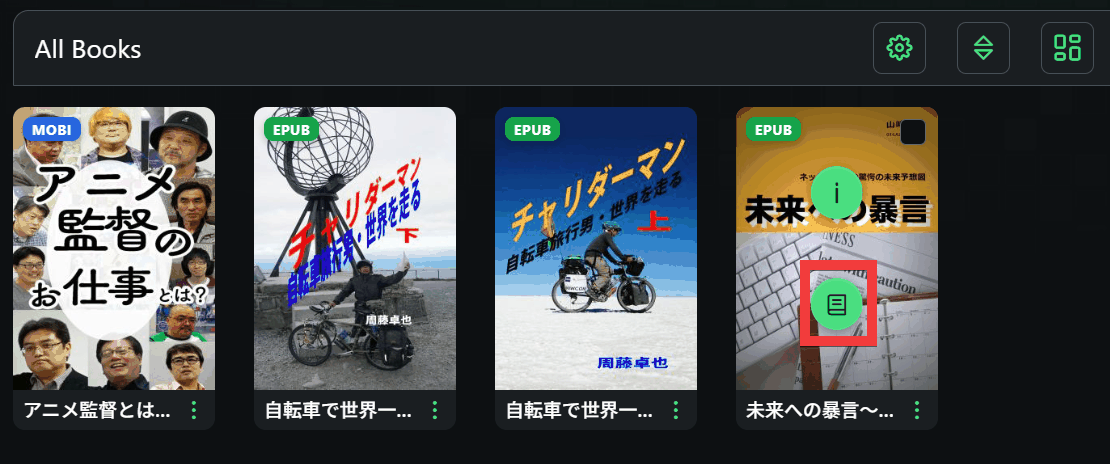
To verify the functionality, we registered the following GIGAZINE e-books.


・How to register
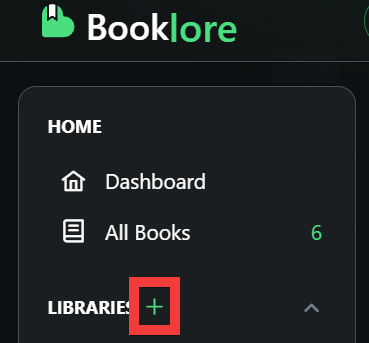
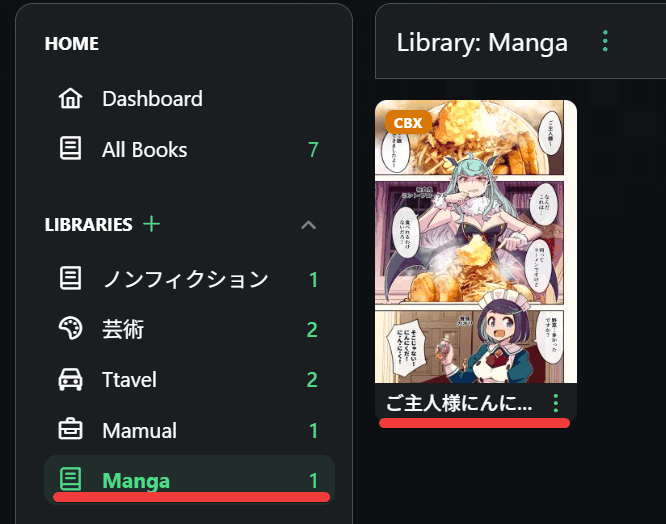
First, click the '+' button next to 'LIBRARIES' in the side menu to create a 'library' to store your e-book files.
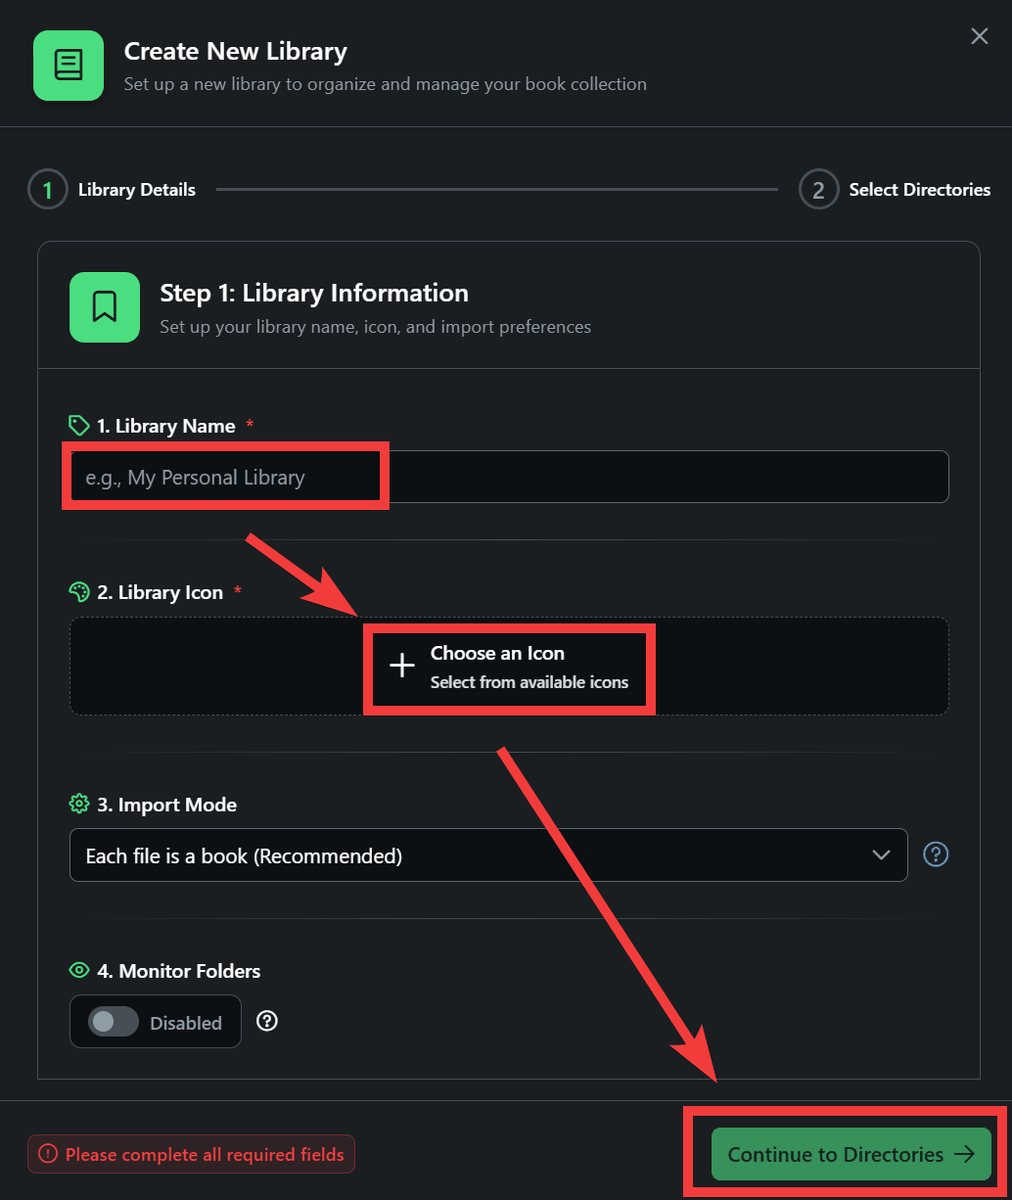
Enter the library name in 'Library Name', click 'Choose an Icon' in 'Library Icon', select the icon you want to use from the list of icons that appears, and then click 'Continue to Directories'.
Click 'Add Book Folder'.
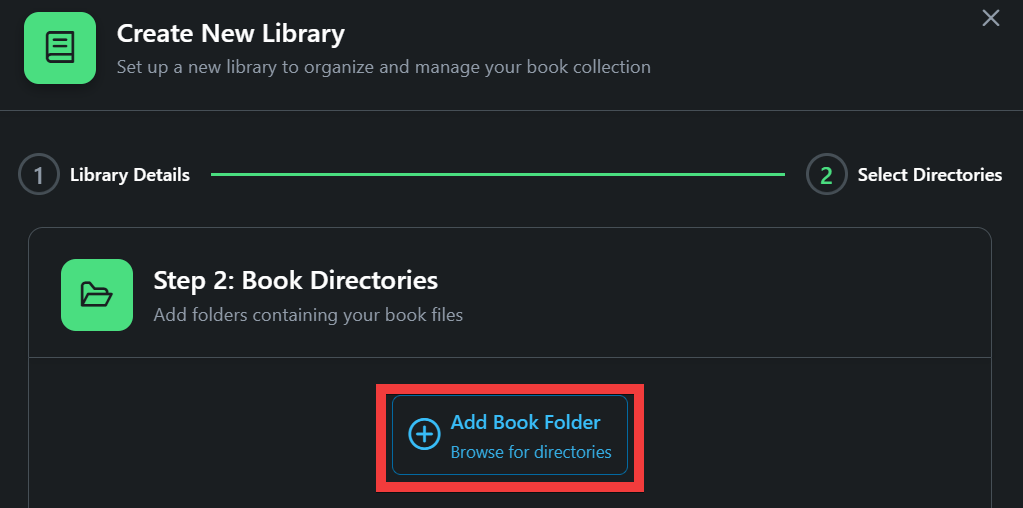
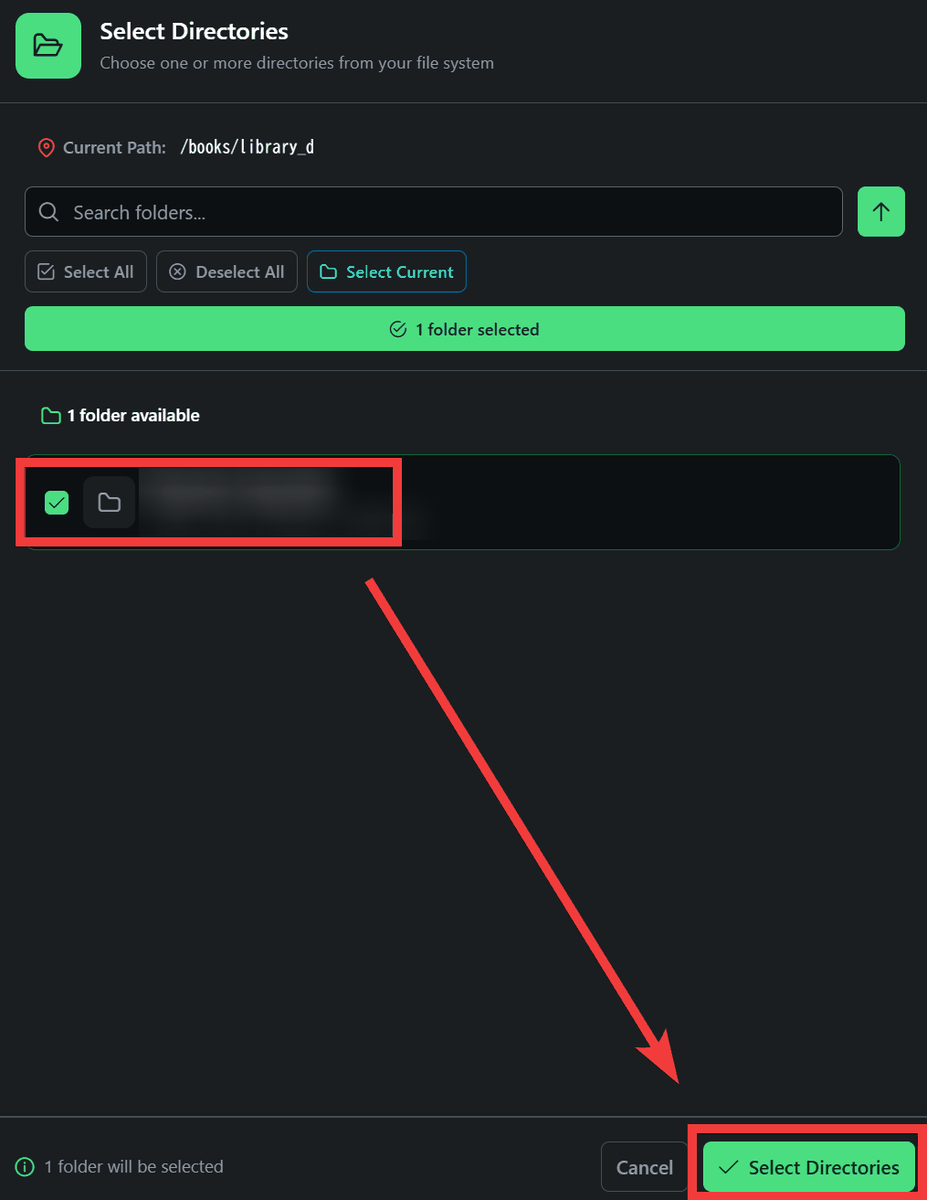
Select the directory to store the files belonging to the library you are creating, check it, and click 'Select Directories'.
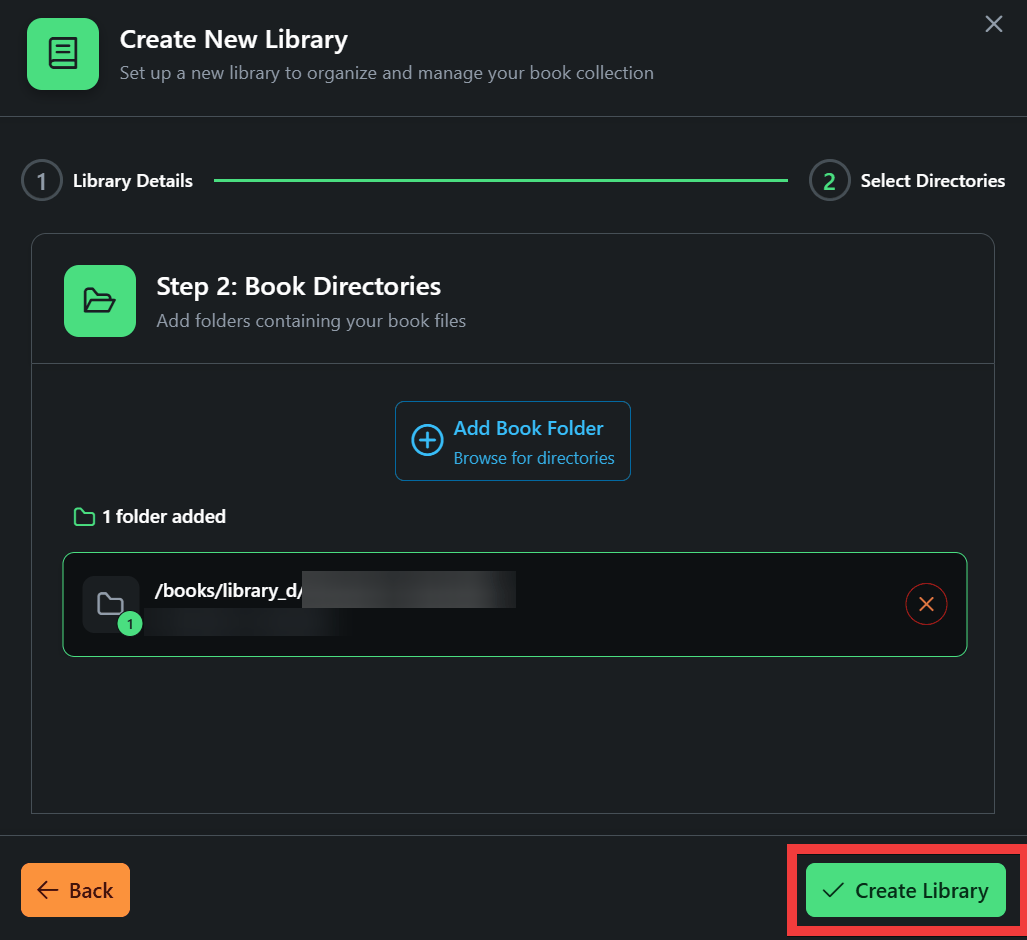
Click 'Create Library' to create a library.
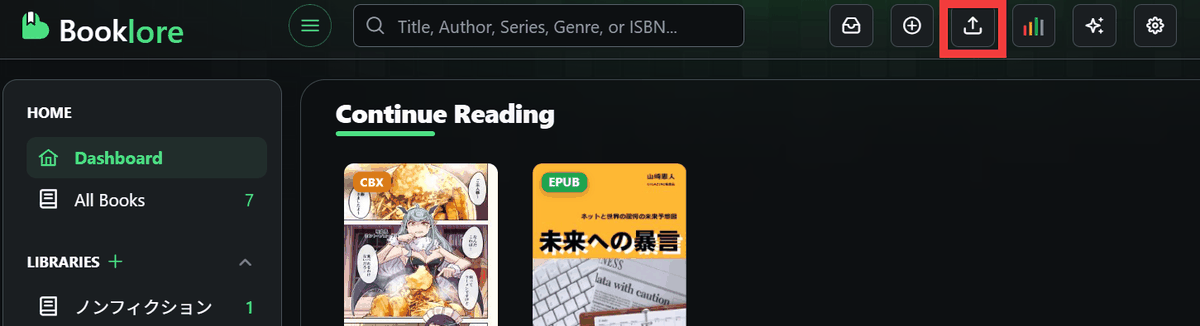
Click the 'Upload' icon in the top menu to upload a file.
The upload dialog will appear, so select the library you want to save to in 'Library' and select the path to the directory you want to save to in 'Subpath'.
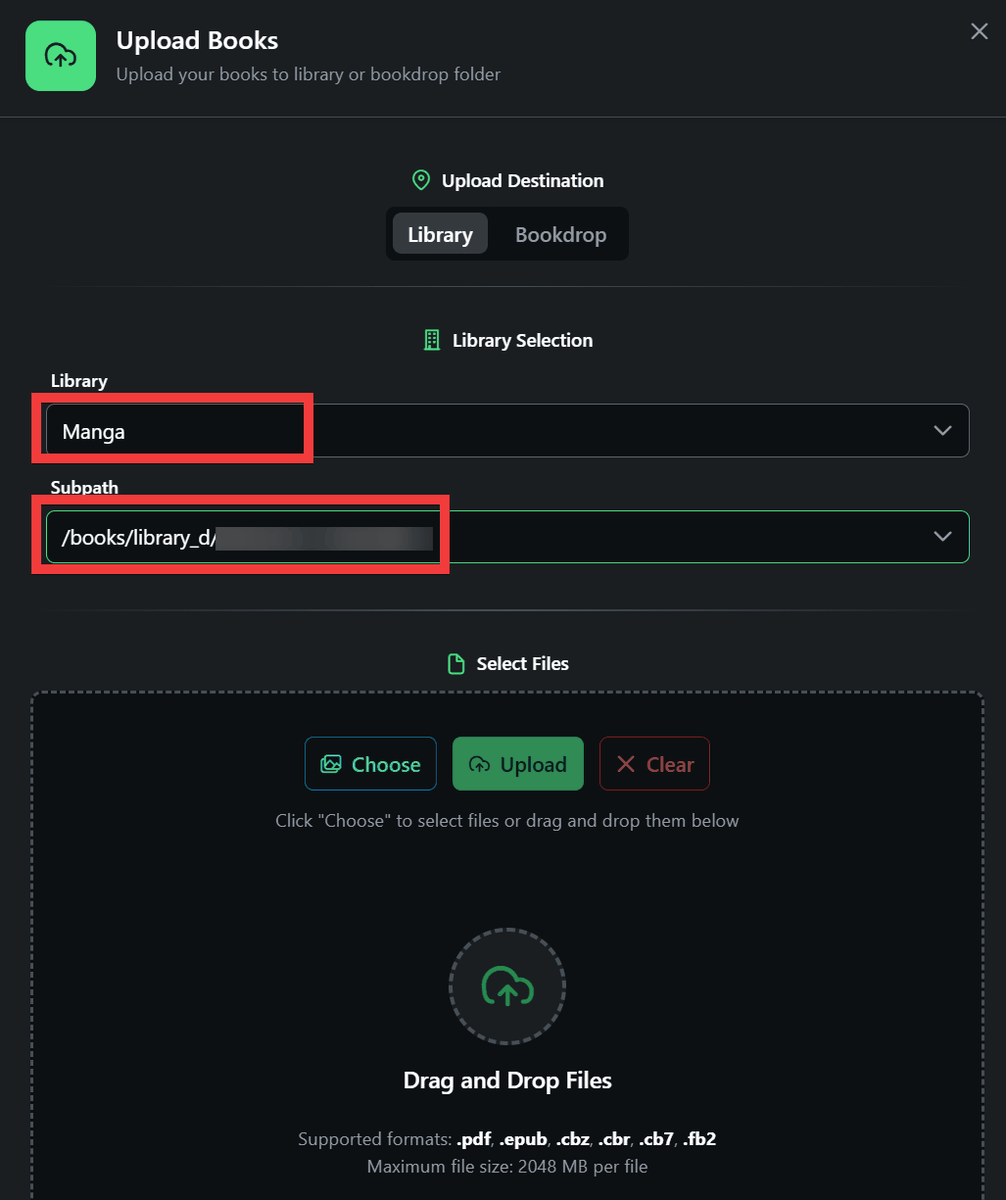
Drop the files you want to upload into the 'Select Files' area and click 'Upload' to begin uploading.
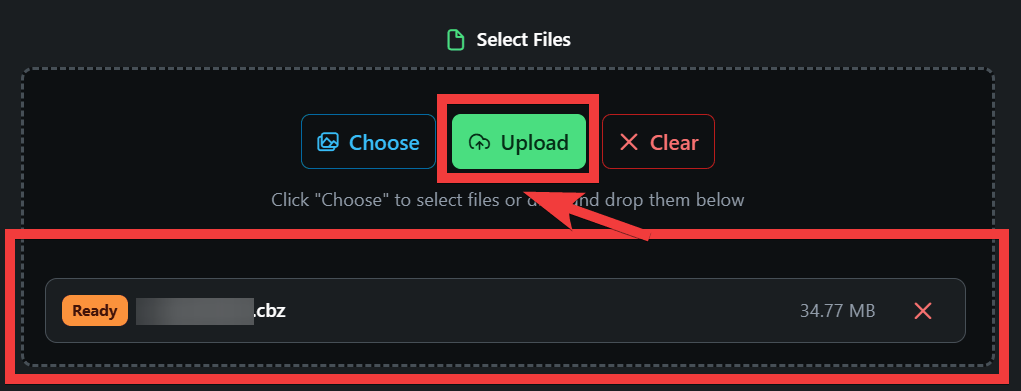
After the upload was complete, I waited a little while and it was automatically recognized and displayed in the list.
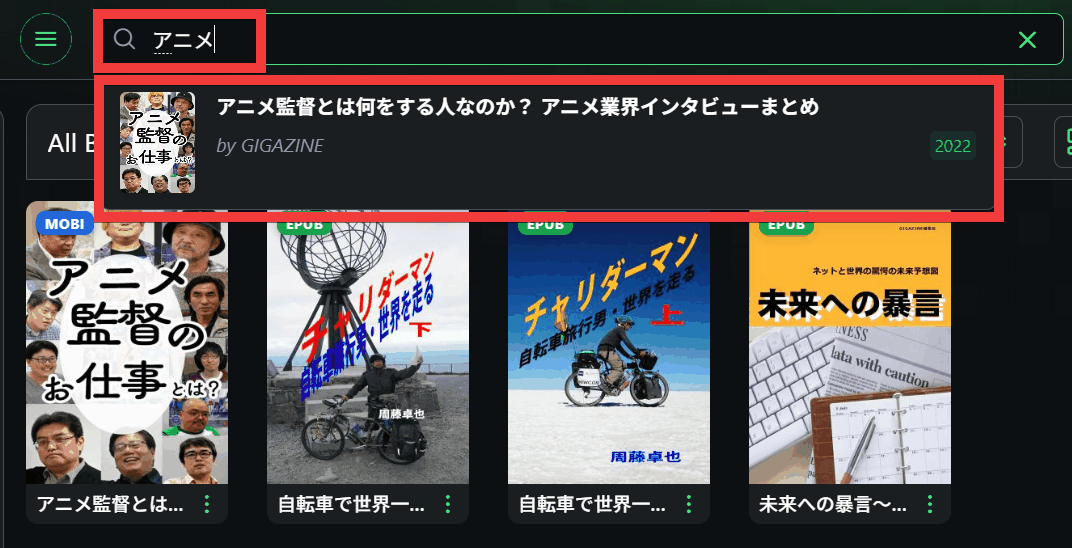
・Japanese search
Search characters are valid from two characters and partial matches are possible. If there are any books that match your search terms, they will be displayed below the search box.
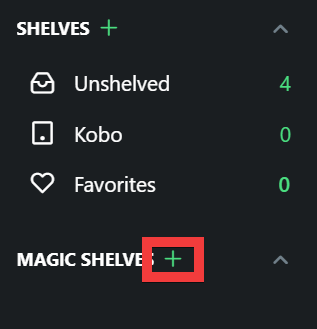
Dynamic collections
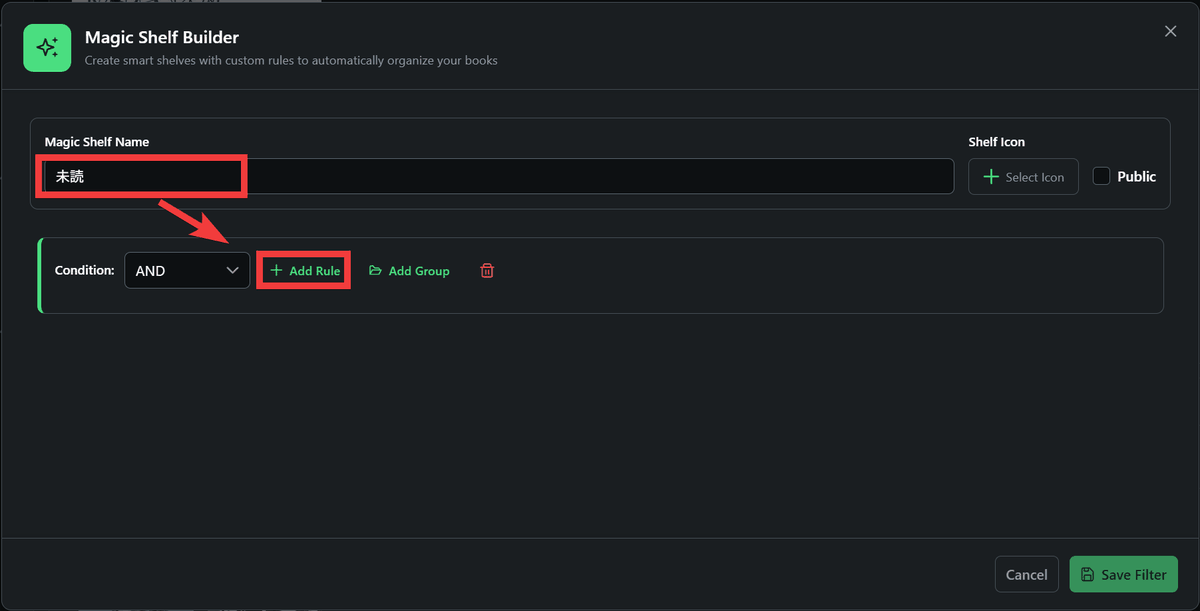
Dynamic Collections is a feature that automatically shelves books that meet certain conditions. Click the '+' button next to 'MAGIC SHELVES.'
Enter the collection name in 'Magic Shelf Name' and click 'Add Rule'.
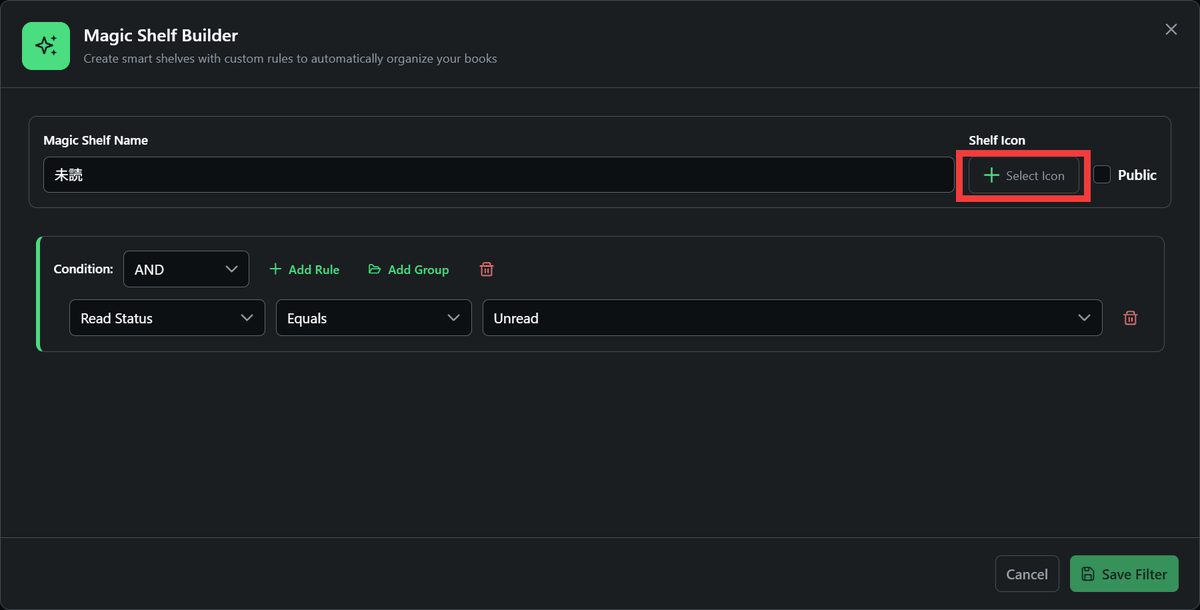
Click 'Select icon' to select an icon.
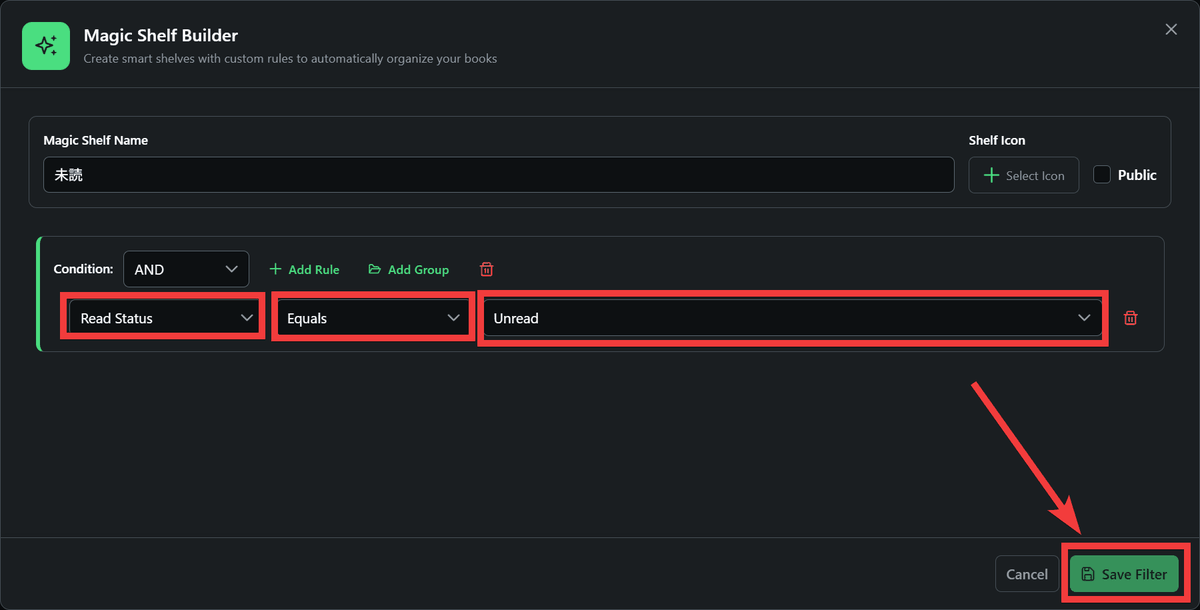
On the left side of the search criteria settings field, set the conditions as 'Read Status,' 'Equals,' and 'Unread,' and click 'Save Filter.'
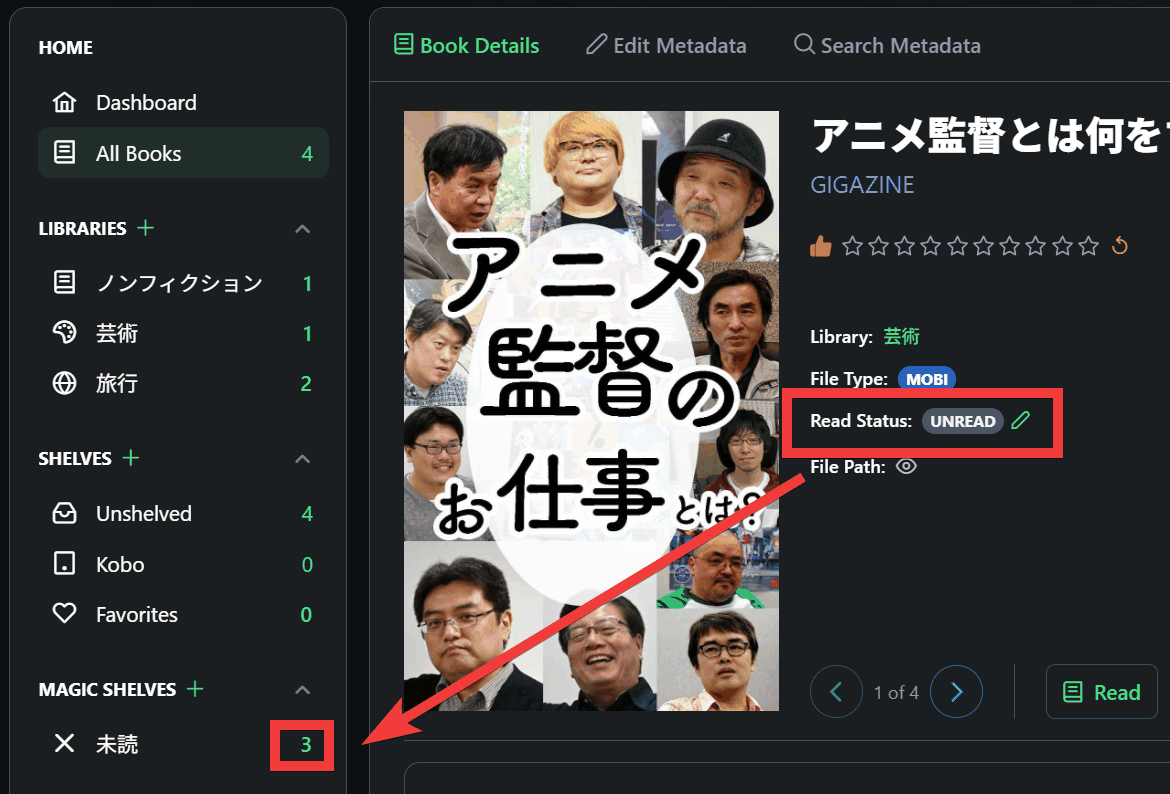
Books with a 'Read Status' of 'UNREAD' will automatically appear in the 'Unread' collection.
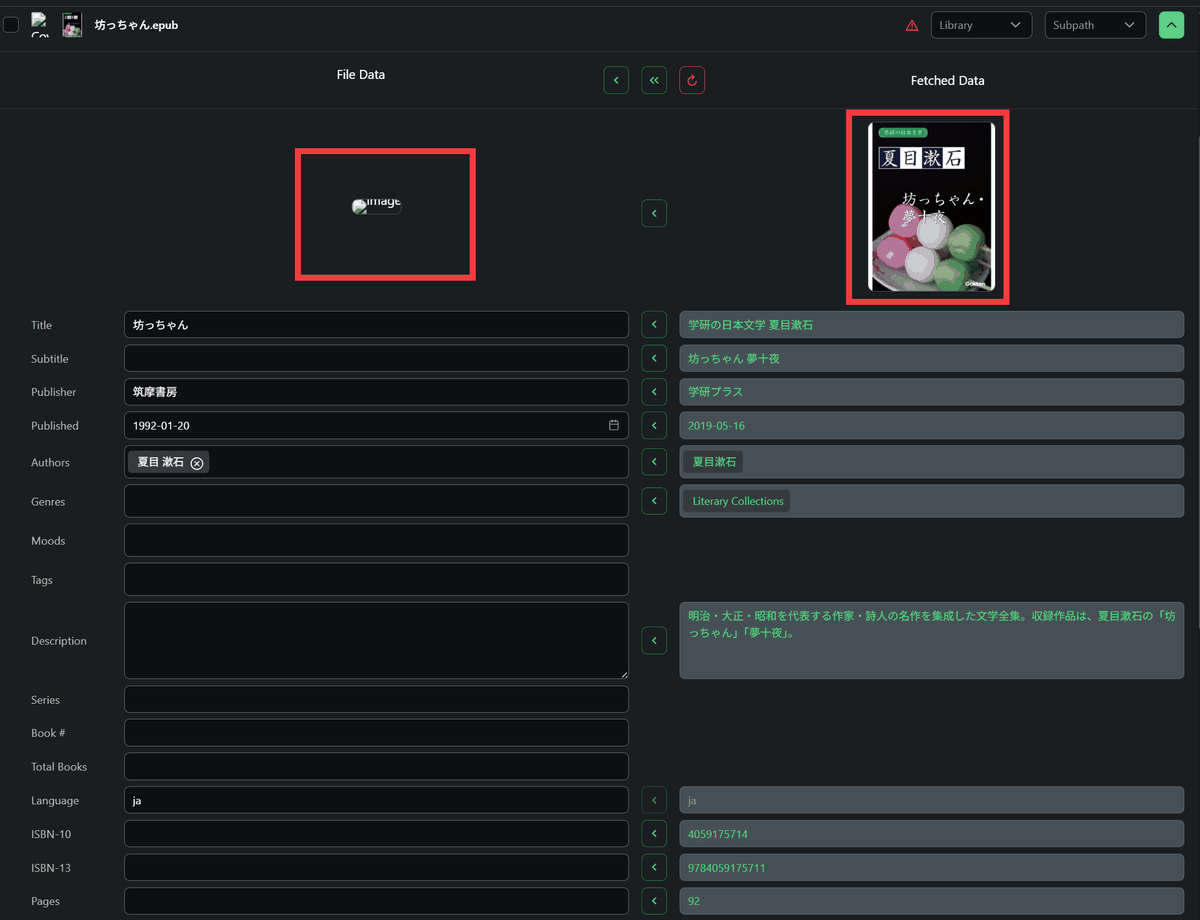
- Automatically obtain cover and reviews
It can automatically retrieve metadata such as e-book covers, summaries, and reviews from
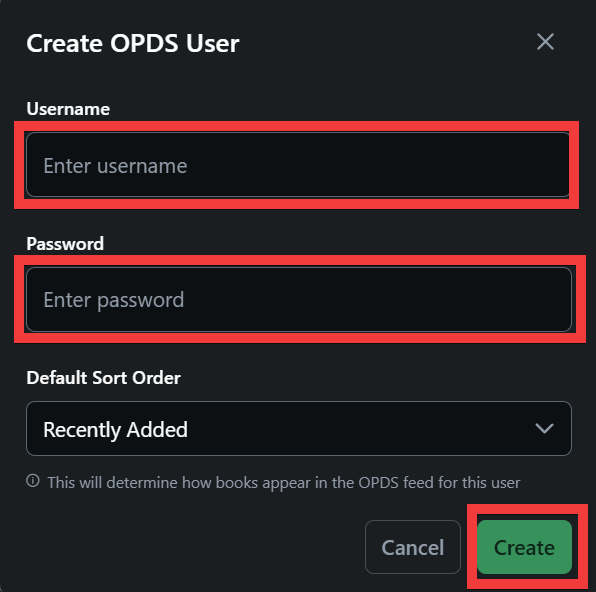
・OPDS server
By setting up an OPDS server, you can read Booklore e-books on

To create a user for OPDS, enter the username in 'Username' and the password in 'Password' and click 'Create'.
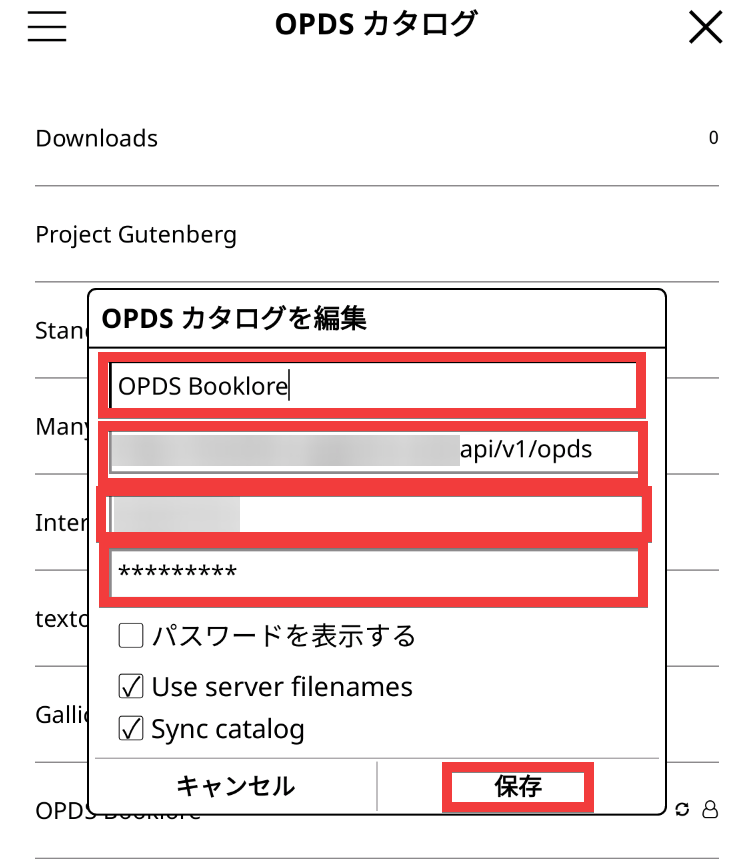
Register the OPDS catalog in KOReader. Enter a name, OPDS catalog URL, OPDS user ID and password, and click 'Save.'
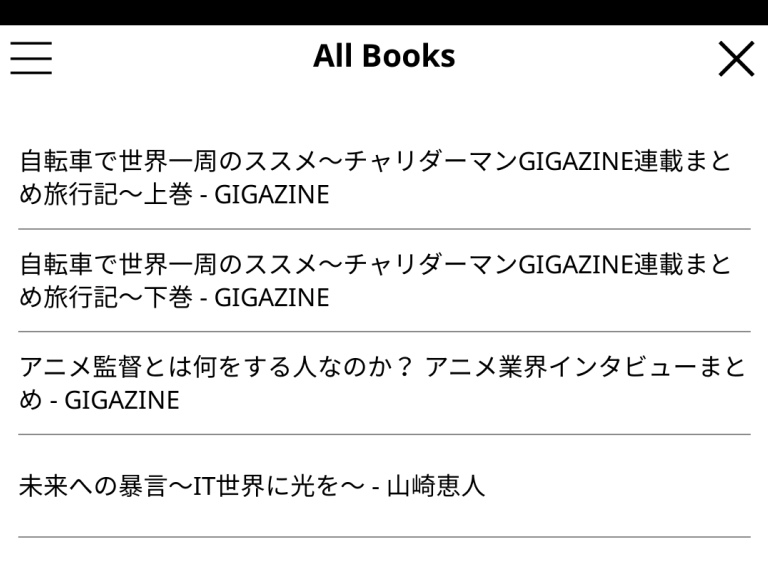
Once synchronization was complete, the e-books registered in Booklore were displayed in KOReader.
・Read e-books on Booklore
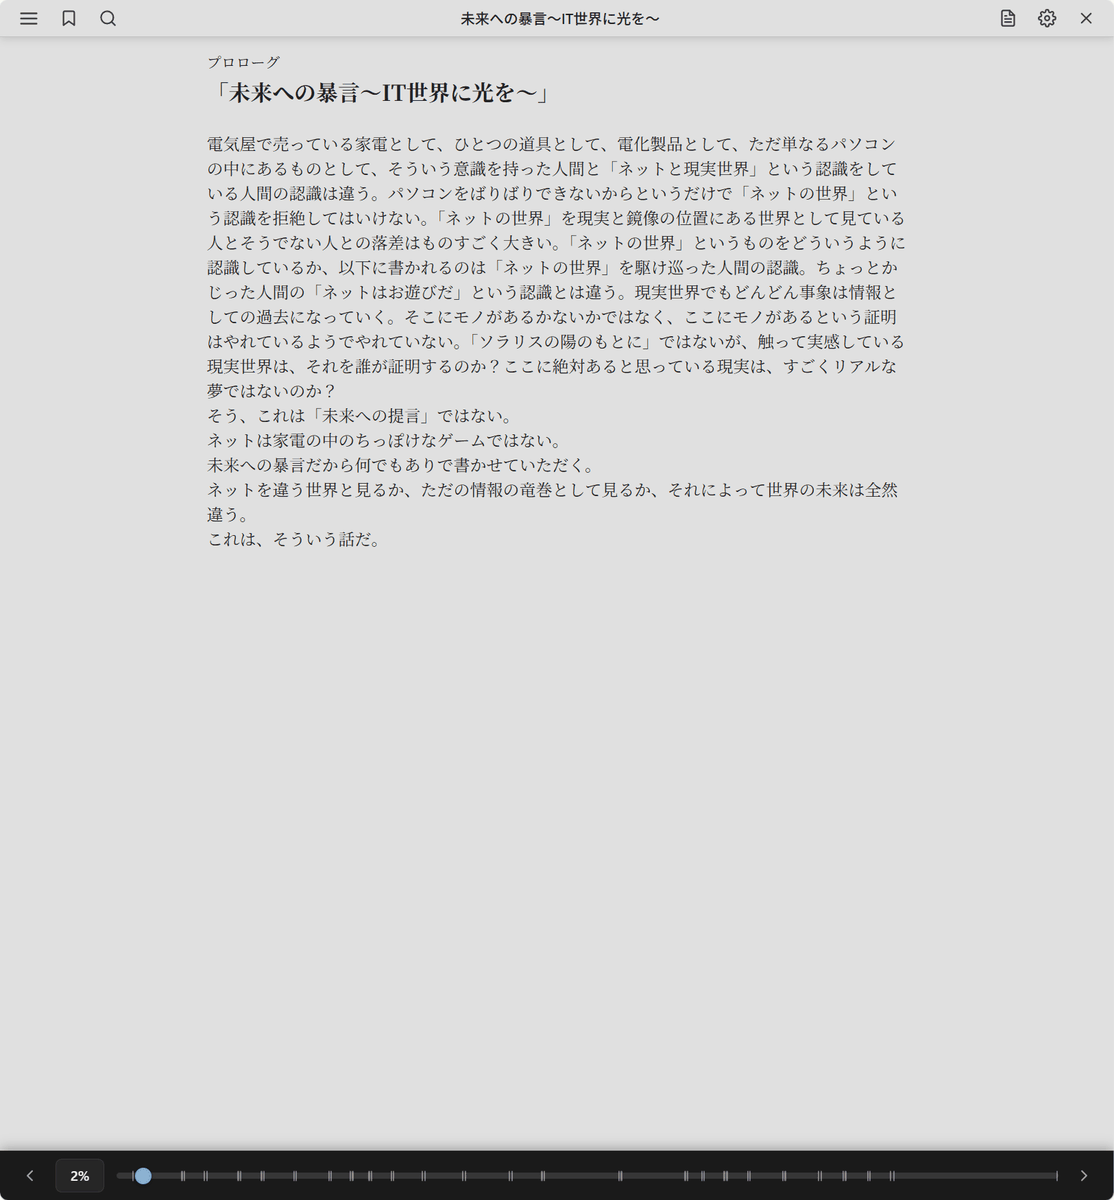
Booklore allows you to read e-books in your browser, and you can highlight, bookmark, add notes, etc. Hover your cursor over the e-book you want to read from the book list and a 'book' icon will appear, so click it.
You will be in viewing mode and can read the e-book.
When you drag the text, a menu will pop up, and you can add a highlight by clicking the marker icon.

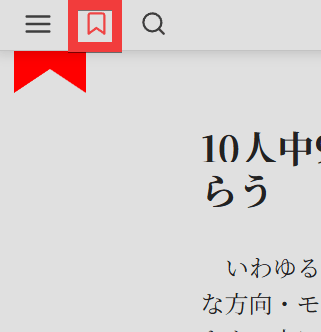
To bookmark a page, click the 'Bookmark' icon in the menu at the top of the screen.
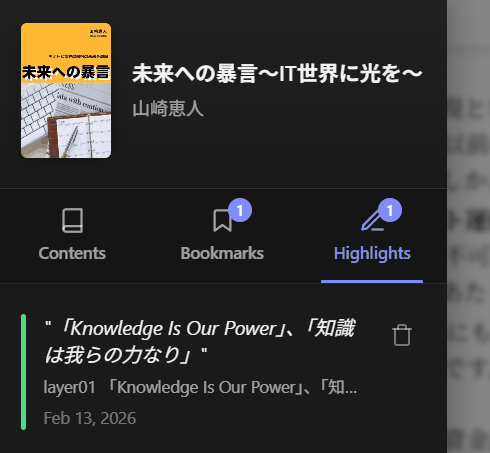
To see a list of your saved highlights and bookmarks, click the menu icon at the top of the viewing screen.
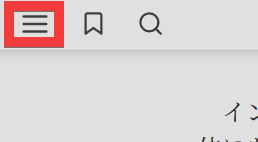
The list will appear in the left sidebar.
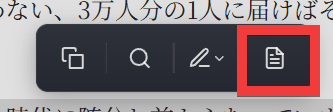
Click the 'Document' icon in the pop-up menu that appears when you drag a document...
A dialog box for entering notes will appear, so enter your notes in 'YOUR NOTE' and click 'Save Note' to save them.

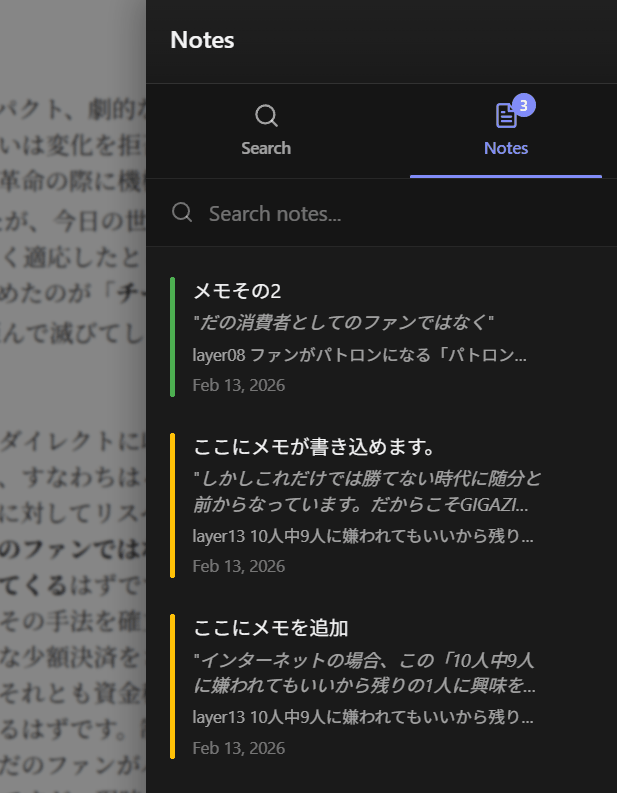
To see a list of notes, click the 'Documents' icon at the top of the viewing screen.

A list of your notes will appear in the sidebar on the right.
The PDF could only be viewed and did not have features such as bookmarks or highlights.

You can also view comics in CBZ format. Just like PDF, you can only view them.

- Sync between different devices
Regarding syncing reading positions between different devices, in this review, I was able to update the reading position on KOReader for Android to Booklore, but I was unable to update the reading position on Booklore to Android. It is also not currently possible to sync bookmarks or highlights.
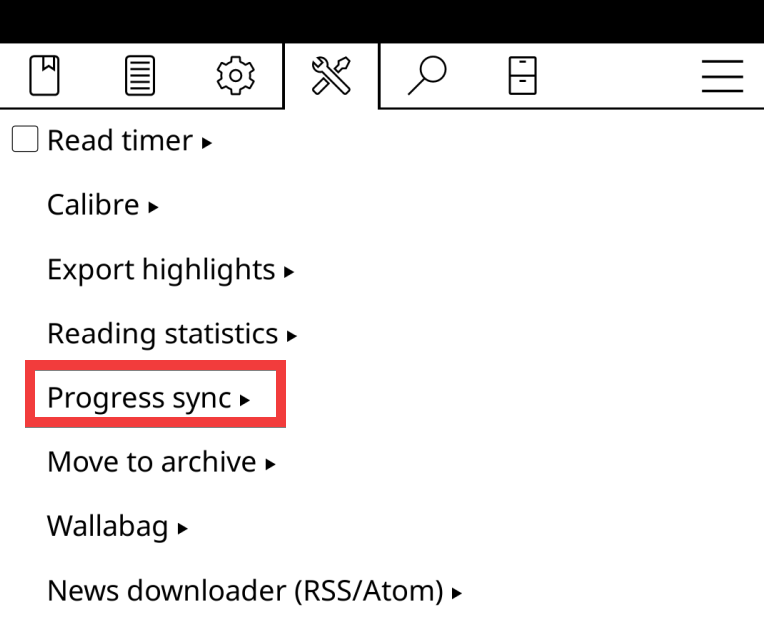
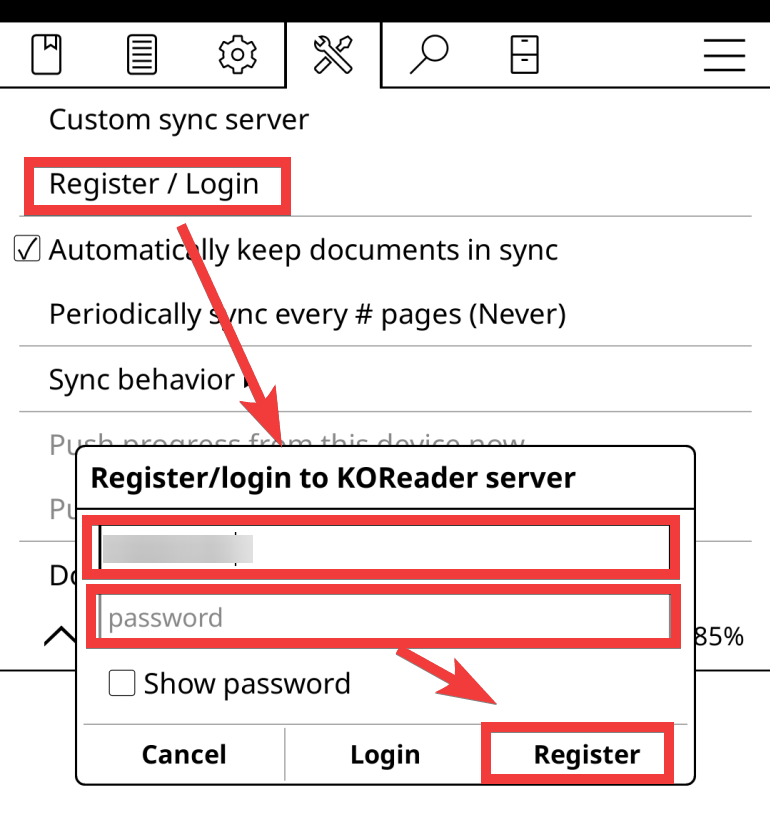
To sync your location from KOReader on Android to Booklore, tap 'Progress sync' from the KOReader menu.
You will need to log in to KOReader, so tap 'Register/login', enter your username in 'username' and password in 'password', then tap 'Register' to create an account and log in.
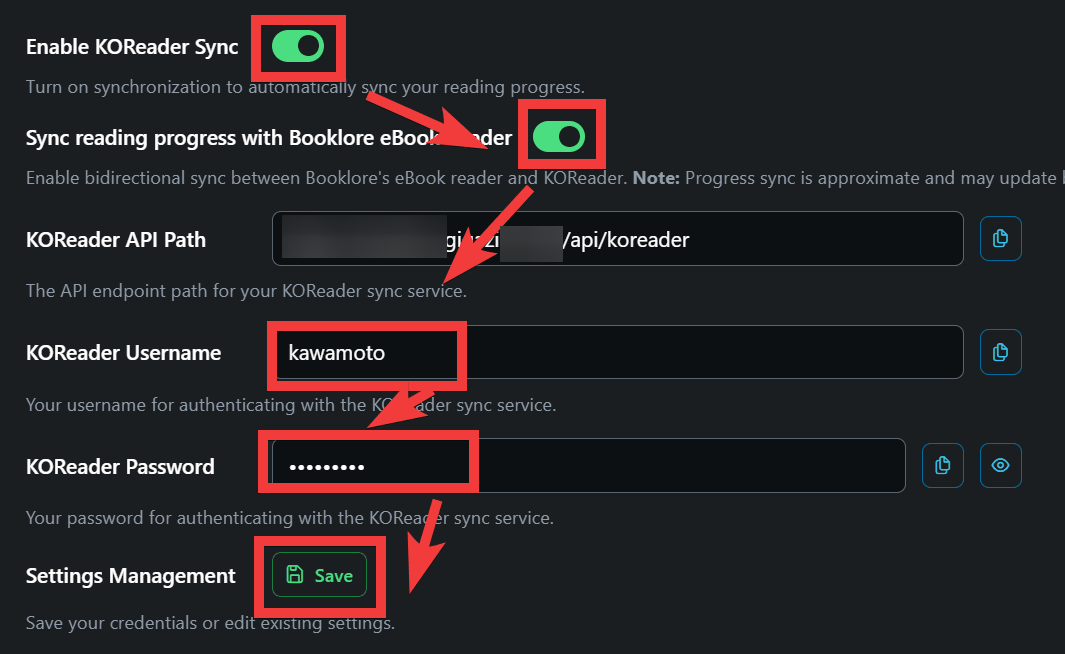
To set up Booklore to sync with KOReader, click the 'Settings' icon in Booklore, click 'Devices' from the settings screen, and click the 'Edit' button under 'Setting Management.'
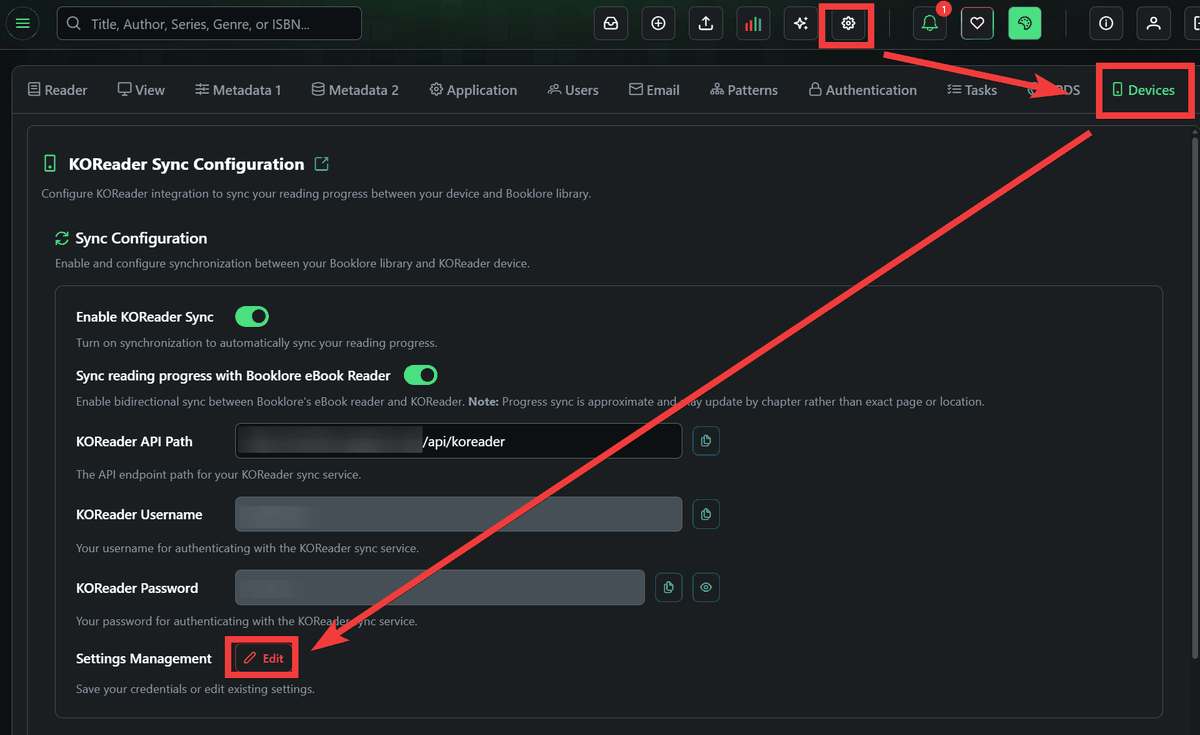
Turn on the toggle switch for 'Enable KOReader Sync', turn on 'Sync reading progress with Booklore eBook Reader', enter the KOReader username you created on Android in 'KOReader Username' and the password in 'KOReader Password', then click 'Save' and make a note of the 'KOReader API Path'.
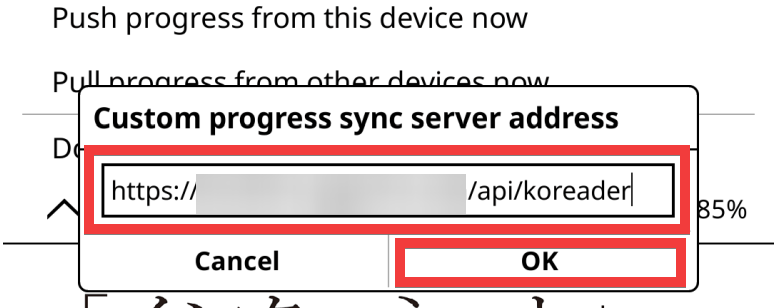
Tap 'Custom sync server' from the Android KOReader menu.
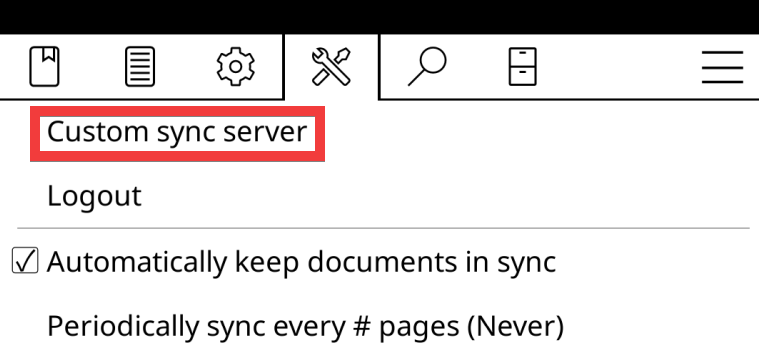
Paste the 'KOReader API Path' you noted in Booklore into 'Custom progress sync server address', enter your username in 'Username' and your password in 'Password', and tap 'OK'.
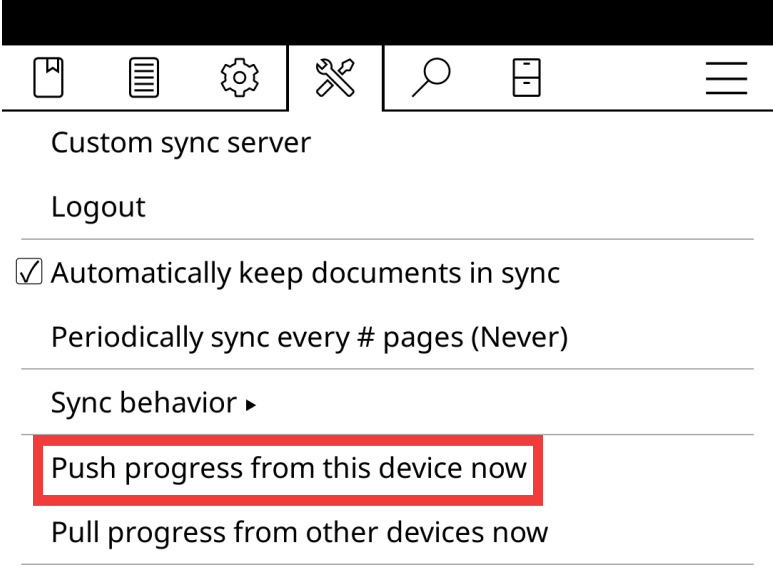
Tap 'Push progress from this device now' to send your current location.
When I opened a book in Booklore, the position I had opened in KOReader was reflected and I was able to continue reading.
- Email sharing, send books to your Kindle or email with one click
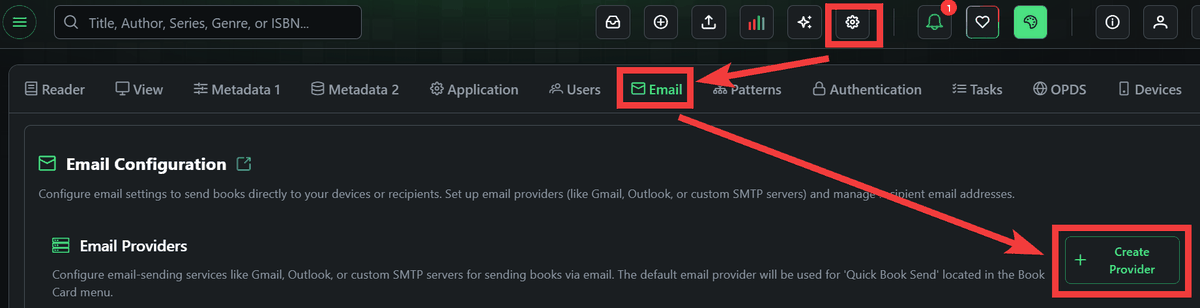
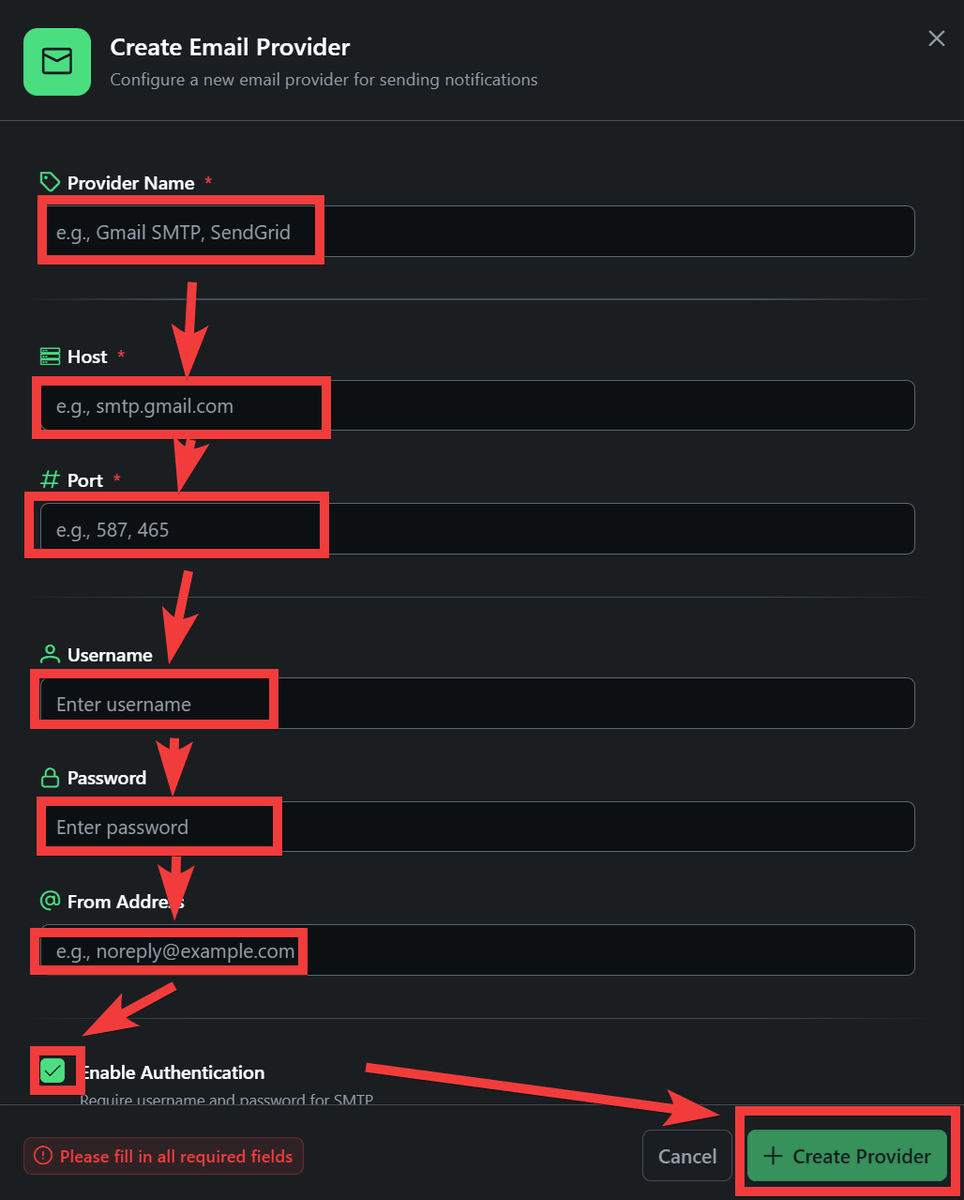
Click the 'Settings' icon, click the 'Email' tab, and click 'Create Provider.'
Enter any name in 'Provider Name,' the SMTP server address in 'Host,' the port number in 'Port,' the user name in 'Username,' the password in 'Password,' the sender address in 'From Address,' check 'Enable Authentication,' and then click 'Create Provider' to register the sending server.
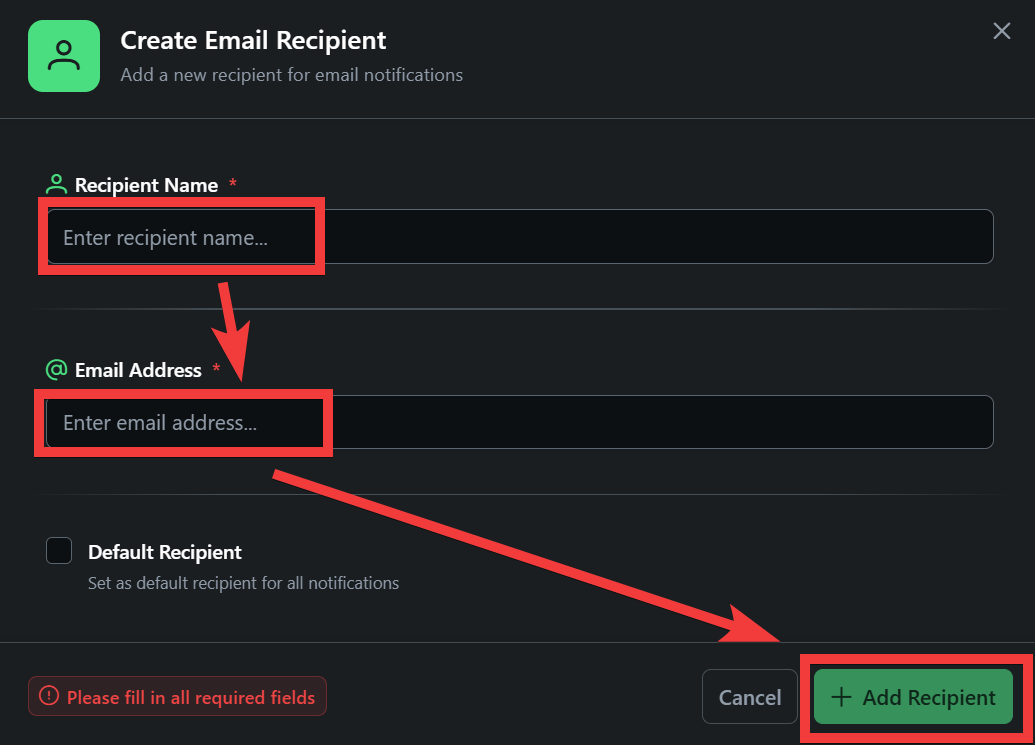
You need to register the recipient's email address in advance, so click 'Create Recipient'.

Enter any name in 'Recipient Name' and an email address in 'Email Address' and click 'Create'.
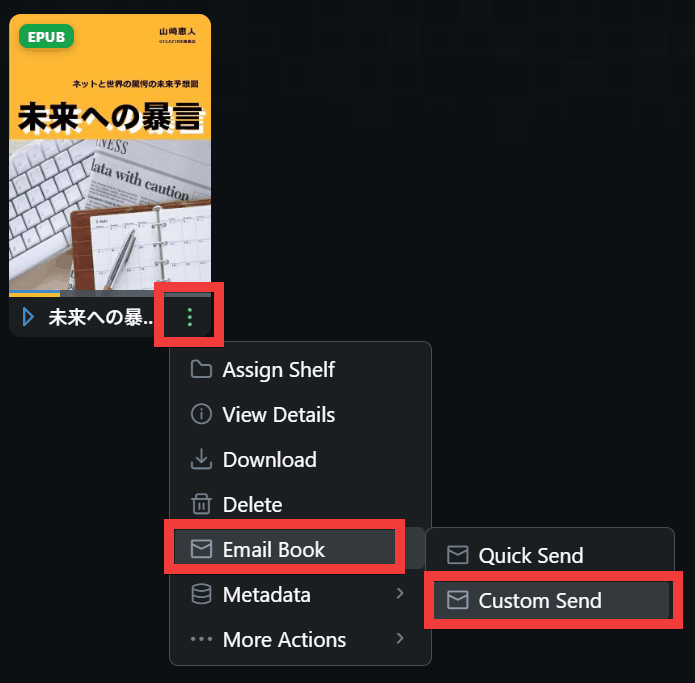
To send with one click, click 'Email Book' from the menu at the bottom right of the book and then click 'Custom Send.'
Select the sending server name you registered earlier from 'Email Provider', select the destination email address you registered from 'Recipient', and click 'Send Book'.
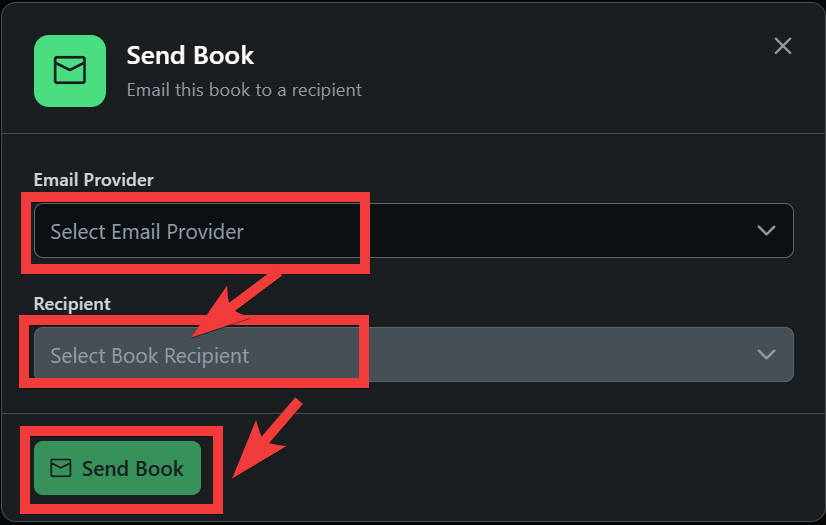
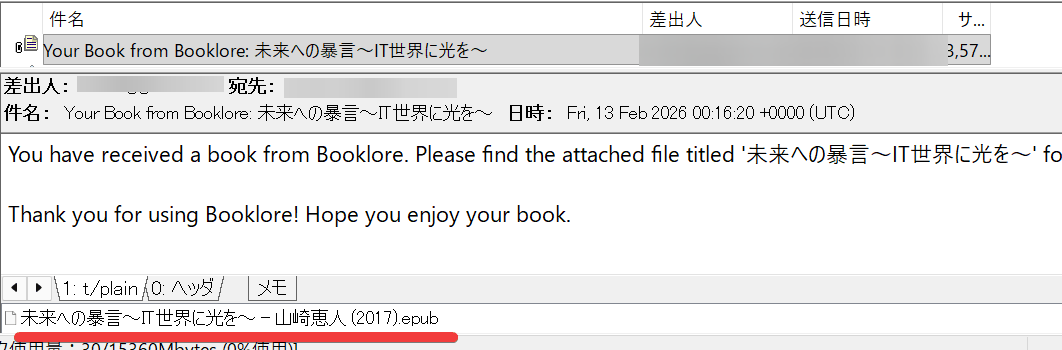
The e-book was attached to the email I received.
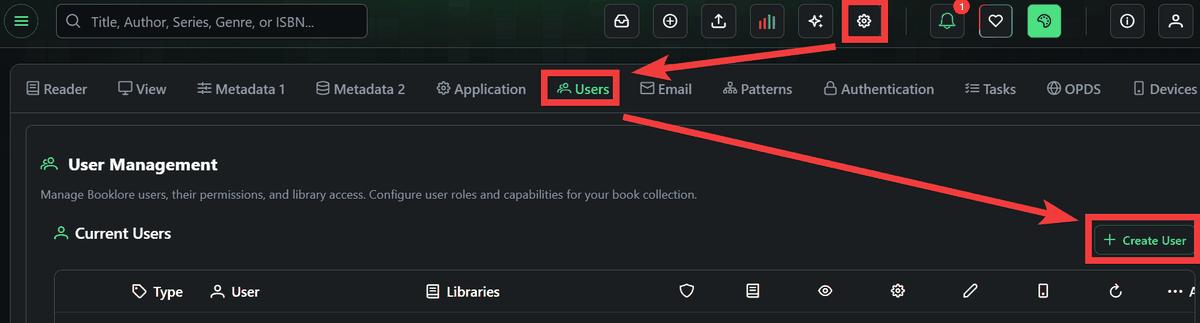
・Multi-user support for dividing permissions
By creating multiple users, you can share e-books with family and friends, and limit the scope of operations by setting permissions. To add a user, click the 'Settings' icon, click the 'Users' tab, and click 'Create User.'
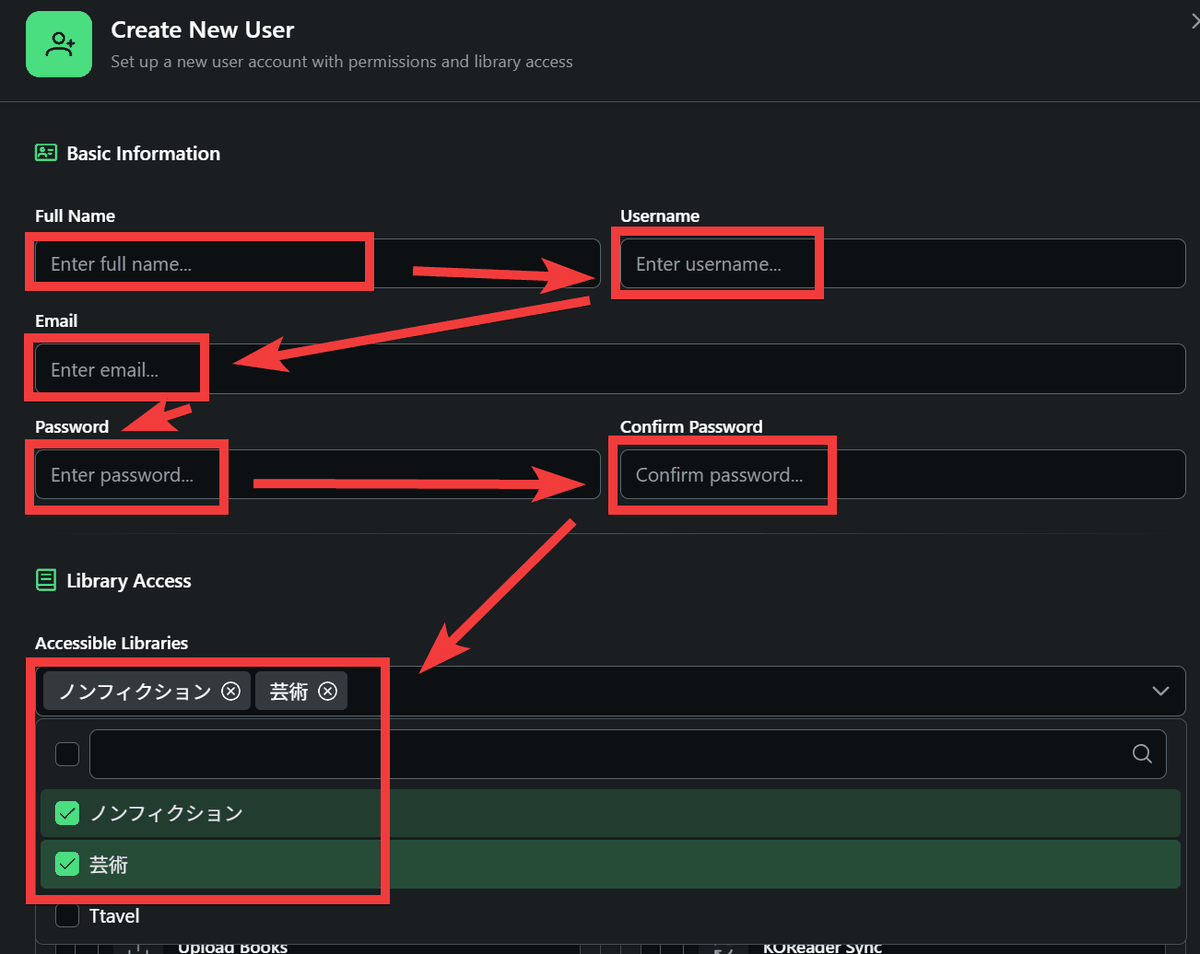
Enter any name in 'Full Name,' your username in 'Username,' your email address in 'Email,' your password in 'Password' and 'Confirm Password,' and then select accessible libraries in 'Accessible Libraries.'
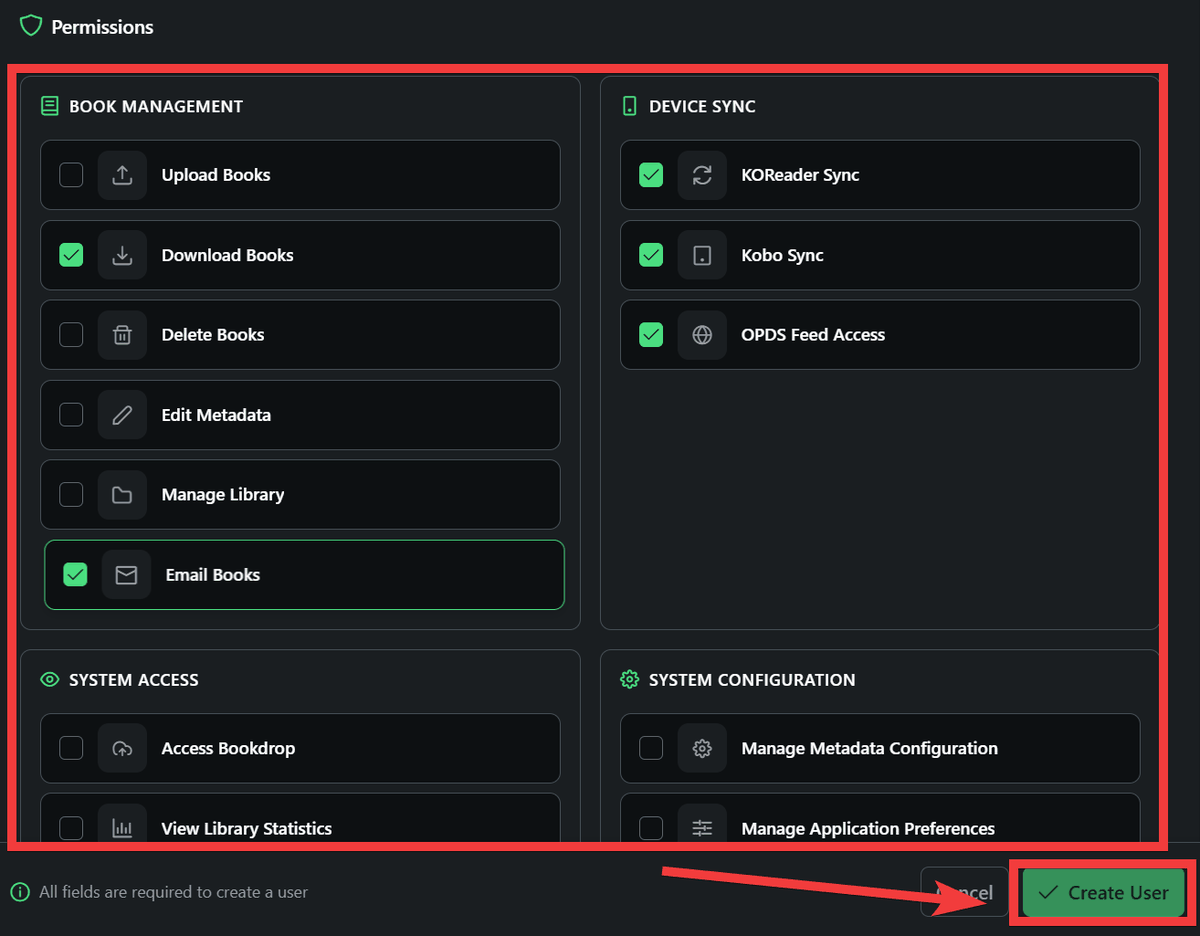
You can also set operation permissions in detail, so check the permissions you want to allow and click 'Create User'.
When logging in as the created user, only the libraries that can be viewed are displayed, and operation icons that are not permitted are hidden.
In addition, this server has all the features you need when it comes to reading, such as statistical functions that show when and how long you read, and the ability to group together series of books.
Related Posts: