I tried making data from scratch to make a logo with a 3D printer All the story
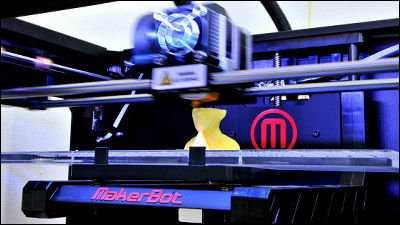
3D printer "Replicator 2Actually purchasedPerform setup, Downloaded dataI tried printing variouslyAs a result, I found out that even a perfect beginner can handle it easily. So what happens when you create your own 3D data and print this time? Actually tried and decided to summarize the procedure necessary to output GIGAZINE's logo data in three dimensions as follows.
◆Free 3D data creation software available
In order to output the three-dimensional object with the 3D printer, the original data is necessary, so this time it is free to use and Japanese is also being done "SketchUpWe will use the design tool called "Production". Incidentally, this software has passed through the process that Google acquired the one that @ Last Software was developing once, then Google sold it to Trimble. Development is still continuing now and you can download from the following link as free software available.
Trimble SketchUp
http://sketchup.google.com/intl/ja
◆Install plug-in for writing in ".stl" format
3D printer "Replicator 2In order to output with ". Stl" file format, you need to write data, but "SketchUp"Is not compatible with" .stl ", you need to install the conversion plug-in from the following site.
Convert Sketchup SKP files to DXF or STL | guitar-list
http://www.guitar-list.com/download-software/convert-sketchup-skp-files-dxf-or-stl
Click "Download Sketchup to DXF or STL plugin - skp_to_dxf.rbz (only Sketchup version 8 maintenance release 2 or later)"
"SketchUpStart up and select "Preferences" from "Window"
Open "Extensions" and select "Install Extension"
Select "skp_to_dxf.rbz" that you downloaded and click "Open"
Click "Yes"
If you click "OK", plugin addition is completed
with this"SketchUp".stl" format will be able to output data produced using the ".stl" format.
◆Creating 3D data for output
"SketchUpActivate "Architectural design - millimeter", click "Start using SketchUp".
The startup screen looks something like this.
The human type data which is put in the standard for size comparison becomes an obstacle to work when making small data, so select "erase" from the right click and erase it.
Select rectangular tool.
Left click and draw a rectangle of an appropriate size, while holding down the left click, enter "100, 25" in the window at the lower right and press the enter key.
Click the full display icon to display a rectangle.
While selecting a part of the rectangle, open the menu with right click and select "flip side".
Select "3D Text" from "Tools".
Enter the characters you want to make a three-dimensional logo, select the font, the height of excitement, etc., and click "Arrange".
Huge characters appear like this.
Select "Scale" from the tool.
Reduce the text to fit the size of the rectangle you placed first.
Click the "move" icon to move the text over the top of the rectangle you placed first.
If it fits perfectly with such feeling OK.
Move the created data to the center on 3D data called "origin". If you do not do this work, you will not be able to display anything when you make it into a ".stl" format file, so be careful.
With text like this it will be OK if "Text" comes over "Origin".
Click "Tools", "Export to DXF or STL" from the state where all parts are selected with "Ctl + A".
Click "OK".
Select "stl".
Click "OK"
Add a file name and click "Save"
◆Convert data with MakerWare
Make the completed file "MakerWareDrag and drop it to open it.
It will be OK if it is displayed like this.
Click the icon drawn as "M".
Click "Export".
Add a file name and save it on the SD card.
◆Output with 3D printer
Insert the SD card into which data was entered into the printer.
Select "Build from SD" and select the data for printing, the output will start.
The output data is as follows.
Looking up it is like this.
I attached it to the cover of "iPad mini".
The following is what I tried to create with another font.
Failed work that made too small making it unreadable is like this.
MakWare "output with the output resolution set to Low (low).
Looking at the end up, you can see that the surface is decorated.
When the resolution is Medium (medium), it is as follows.
It is smoother than outputting with Low.
In addition, when the resolution was set to High (high), the output stopped halfway and it was not possible to see the results this time. Probably because the room temperature was low, as the resolution was increased, the amount of material output at once decreased, so it solidified quickly and it seems that the output stopped because it stuck around the nozzle .
By the way,HTML5 logo that was in ThingsverseThe results are shown below.
so,"Replicator 2As a result of actually using the 3D printer, it was found that free software can be used to print the three-dimensional logo with crispness. Furthermore, a paid version of "SketchUp Pro"It is also possible to read a DWG file written in Adobe Illustrator and convert it to 3D, so it is possible to create even finer designs.
Related Posts: