Starting from scratch iOS application development "Selecting and displaying images saved on iPhone"
Preliminary knowledge Let's develop iOS app from scratch! This is "iOS application development starting from scratch". This time, I will make an application "Select and display images in iPhone". Please note that this article is made with reference to official commentary articles.
Start Developing iOS Apps (Swift): Jump Right In
https://developer.apple.com/library/content/referencelibrary/GettingStarted/DevelopiOSAppsSwift/
1stRealized the screen transition only by setting the storyboard. We will use the screen transition this time, which will be the third time, but this time we will use the code to realize the screen transition.
IOS application development starting from scratch "Application to switch screens with buttons" - GIGAZINE
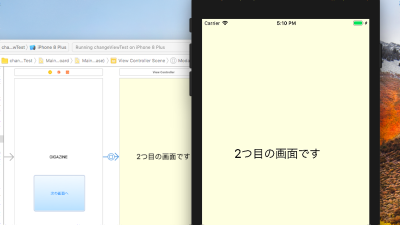
Incidentally,Previous 2ndWas the content that "use the code to operate the screen".
I will move on at once. Launch Xcode and click "Create a new Xcode project" to create a new project.

Confirm that "Single View App" is selected and click "Next".

This time I made the product name "selectImage". Since the previous information remains in other columns, click "Next" as it is.

Confirm the save destination and click "Create".

We will arrange the UI parts. Last time I used "Button" or "Label", but this time I use "Image View". Drag "Image View" from the lower right column and paste it on the screen.

Use Constraints (constraint) so that the placement of parts does not shift. For this time, set the margins on both sides to 32 points, and also set constraints on the aspect ratio. When you decide the constraint, click "Add 3 Constraints".
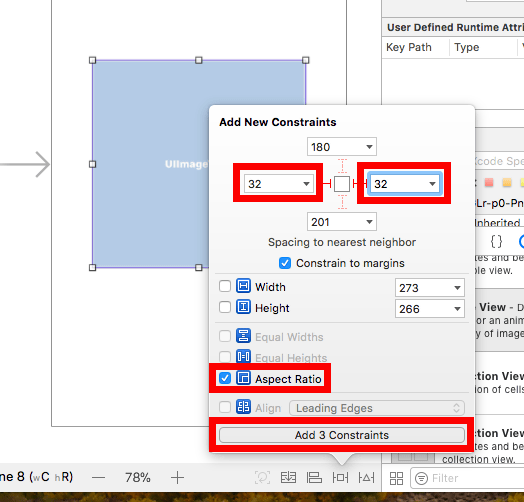
"Multiplier" is set to "1: 1" from "aspect" setting in "Constraints" of "Image View".

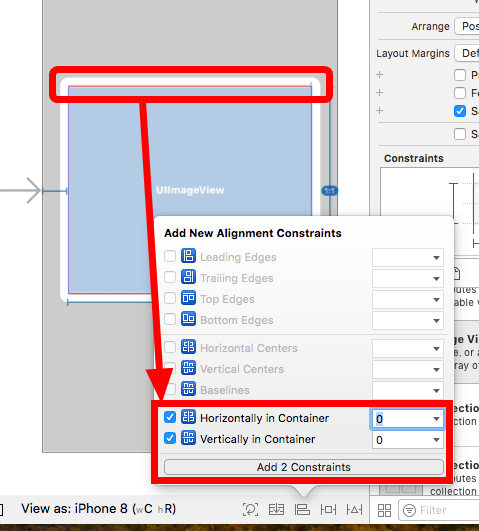
As shown in the image below, the side of the part is red indicates that some constraints are not enough and the position of the part can not be determined uniquely. It was set to be placed in the middle of the screen from "Alignment Constraints".
Tap Gesture Recognizer "on top of this" UIImageView "to place it by tapping on the part you just placed so that you can move to the screen to select the image.

I will start on the code. Click the double loop mark on the upper right to switch to the assistant editor mode. You will see a screen called Storyboard on the left and Code on the Right.

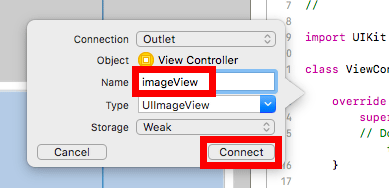
Hold down the Ctrl key and click UIImageView and drag to paste it into the code.

The name in the code is anything but this time it was "imageView". After naming, click "Connect".
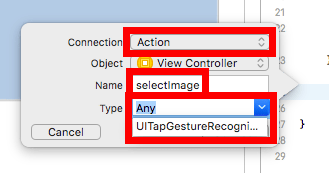
Then Ctrl-click and drag the "Tap Gesture Recognizer" which is the second from the right among the four marks arranged on the screen to the code screen.

Set "Connection" to "Action" and set the name in the "Name" field. Anything is acceptable, but this time I chose "selectImage". Next, select "UITapGestureRecogni ..." from the menu to the right of "Type". Finally click "Connect".
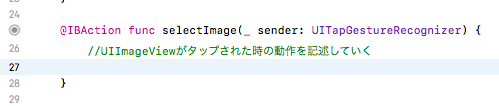
When UIImageView is tapped, the part of "// UIImageView describing the behavior when tapped" in the image below is executed.
In order to select an image, it is necessary to prepare "screen for selecting images". However, since Apple has prepared a class dedicated to "screen for selecting images", I will use that class without thinking about difficult things. First,
[code]let pickerController[/code]
We name the new screen as "pickerController". Anything is okay with this name. continue
[code]let pickerController = uiimagepi[/code]
If you input up to, candidates will come down, so select "UIImagePickerController" and press the enter key. And finally add '()' to get instances which are entity of the screen. About the relationship between class and instancePosting to Qiita by @ komo_taIt is easy to understand.

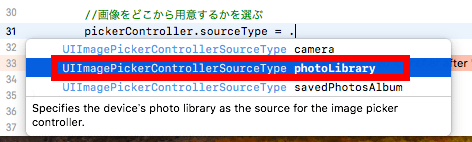
We will set the image so that it can be selected from "Photo Library". Enter "pickerController" as the name of the screen you created earlier ... ...

Dot".Connect with "sourceType".

after that,"="And input it again.If you enter "3 candidates are displayed. I can choose from "camera (photographed with camera)" "photoLibrary (photo library)" "savedPhotosAlbum (photo album)", but this time I chose "Photo library".
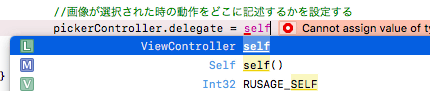
Then, "Where to write the code for operating the image selection screen" is set. The "UIImagePickerController" of the image selection screen class prepared by the standard has a mechanism called "delegate", and it is a convenient specification that "you can write only the minimum necessary thing". To use it, first enter "pickerController.delegate" ......
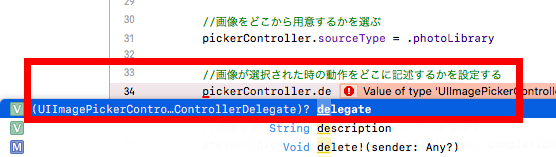
If you write "= self" behind it OK. Since "self" this time points to the "ViewController" class which writes the code, I will write "code for operating screen for image selection" later in "ViewController".
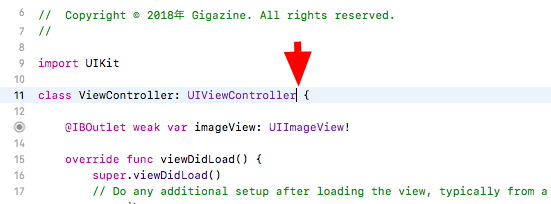
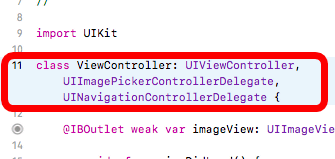
In order to use "delegate", it is necessary to apply each delegate protocol. It is not difficult to say, just write the name of the delegate protocol behind "class ViewController: UIViewController" at the top of the code.
Comma after UIViewController ","Followed by" UIImagePickerControllerDelegate ".

We will add 'UINavigationControllerDelegate' in the same way. Which delegate protocol should be addedOfficial documentYou can check with.

In addition, it may be displayed by line break due to the display area of the editor, but it is OK if the leftmost line number is one.
Now, return to the "Process when UIImageView is tapped" part, and finally write the process "Display image selection screen". Enter "present" and select "present (viewControllerToPreset ...)" and press the enter key.

Then the template of the screen transition code is automatically entered. For viewControllerToPresent, enter the name of the prepared screen. I entered "pickerController" this time.
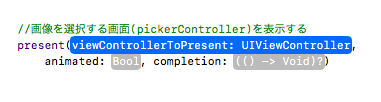
"Animated:" is whether or not to animate when moving the screen, this time select "true". If you set it to "false", the screen switches instantly. "Completion:" describes the processing to be performed after moving the screen. Since I do not have to do anything this time, I input "nil".

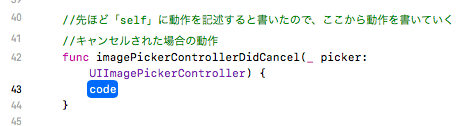
Since we previously set the delegate of pickerController to "self", we will describe the operation of the image selection screen in ViewController. But only two actions should be specified, one is "action when image selection is canceled for some reason" and the other is "action when image is selected". First we will make a cancellation side. Enter "func ima" and select "imagePickerControllerDidCancel ~".

The code is entered automatically. I write the code in the part called "code" that appears between.
If canceled, you can simply close the image selection screen, so select "dismiss ~".
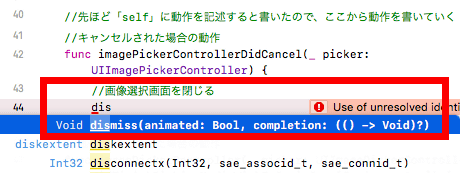
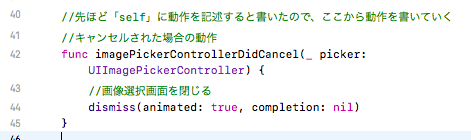
dismiss () works like "close the current screen". We set "true" for "animated:" and "nil" for "completion:".
Now I will describe the behavior when an image is selected. Enter "func imagedidfinish" and select "imagePickerController ~" that came out.

The code is automatically entered. I will write the "action when the screen is selected" to the "code" part displayed in blue.

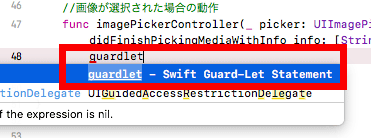
This time we use the Guard-Let syntax to clarify the cause when freezing on error. Details will be explained from the next time onwards, so please take a look at "there are things like that". Select "guardlet - Swift Guard - Let Statement" to be suggested when you type "guardlet" and press the enter key.
Then the code is entered automatically.

Prepare a new variable "selectedImage", check whether it can assign an image there, and return an error if it can not be done. "=Anything is okay as the left side of the variable name is OK, but "info" on the right comes from the above argument, so you need to write "info".
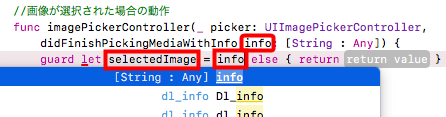
"Info" is passed in a dictionary array. Since the target image is stored in the part "UIImagePicker ~", enter "uiimageorigin" after info, select "UIImagePicker ~" that was suggested, and enclose it with [].

After else it gets called if assignment to selectedImage fails. Delete "return" and insert "fatalError" instead.

Write an error statement. Under that, I attempted to substitute selectedImage into the imageView of the image display UI placed on the screen, but an error came back.
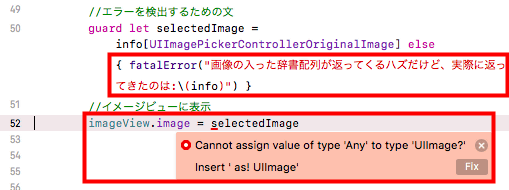
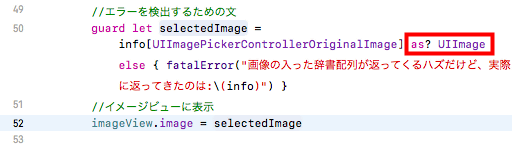
It seems that it was caused by not being able to make type of selectedImage into UIImage, so add 'as? UIImage' after the Guard-Let statement above.
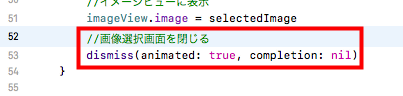
Finally, if you close the image selection screen with "dismiss" like the cancellation processing, the application is completed.
Select "iPhone SE" so that the screen of the simulator is not too large, and press the execute button.

The application launched but it is white. With this, I do not know at all what to tap.

It was caused by not selecting the background color. Select "ImageView" pasted on the screen and select "Background" color from the setting field on the right.

When I try it again, I can tell where I should tap, but when I tap it I have no response at all.

For any part I was forgotten to need to check "User Interaction Enabled" to receive action from the user. Select ImageView again, check User Interaction Enabled somewhat above "Background" and re-execute.

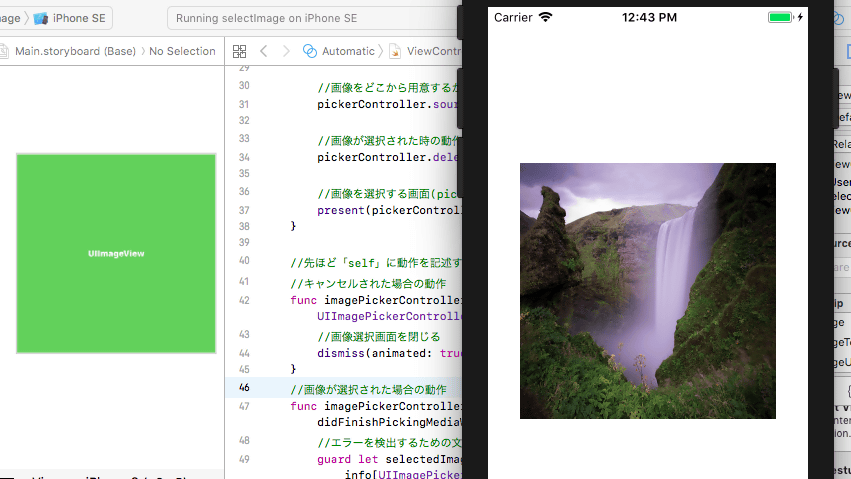
Tap on the green part ......

The image selection screen came out from the bottom. Select "Camera Roll".

The standard prepared images are displayed on the simulator. Tap the image of the waterfall in the lower left ....

The image of the waterfall selected from the photo library was displayed on the first screen.

Concepts that were difficult for the first person such as "class & instance" and "delegate" came out. Classes and instances are almost common to object-oriented languages, so explanations in other languages can help you understand. As for "delegate", if you do not understand so much just by using the existing design, you can implement it, so first, touch it, somehow I grabbed "delegate" and read the detailed explanation It seems easy.
· Continued
Starting from scratch iOS application development "Let's install the created application on iPhone" - GIGAZINE

Related Posts: