Summary of how to use the extension function ``UnivAICharGen'' that generates beautiful character images with a sense of gacha with the image generation AI ``Stable Diffusion''

The image generation AI 'Stable Diffusion' can generate high-quality character images by devising the sentences (prompts) to be input. However, if you overwork your prompts, you'll end up generating similar images, and you'll run into the problem of how difficult it is to create prompts in the first place. Easy to use Stable Diffusion If you use the extension ' UnivAICharGen ' for '
Umi AI on Patreon: V0.2 Release - Specialized Species! | Umi, the Cryoverse AI
https://www.patreon.com/posts/74267457
GitHub - Klokinator/UnivAICharGen: Wildcards and Code for the Umi AI Engine
https://github.com/Klokinator/UnivAICharGen
To use UnivAICharGen, you must first install 'AUTOMATIC 1111 version Stable Diffusion webUI' by referring to the following article. Also, older versions of AUTOMATIC 1111 Stable Diffusion webUI do not support extended functions, so if you are using an older version, please update to the latest version.
Image generation AI ``Stable Diffusion'' works even with 4 GB GPU & various functions such as learning your own pattern can be easily operated on Google Colabo or Windows Definitive edition ``Stable Diffusion web UI (AUTOMATIC 1111 version)'' installation method summary - GIGAZINE

After installing and starting the AUTOMATIC1111 version of Stable Diffusion webUI, enter 'https://github.com/Klokinator/UnivAICharGen.git' in the URL input field in the 'Extensions' menu and click 'Install'.

Next, click 'Installed', check that 'UnivAICarGen' is displayed in the list of installed extensions, and then click 'Apply and restart UI'. This completes the installation of UnivAICharGen.

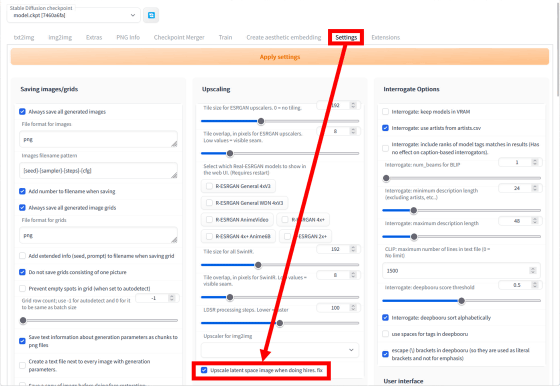
After installing UnivAICharGen, apply the recommended settings. First, click 'Settings' and then enable 'Upscale latent space image when doing hires. fix' in 'Upscaling'.

Next, change the value of 'Eta noise seed delta' in 'Sampler parameters' to '31337'.

When the setting is completed, click 'Apply settings'.

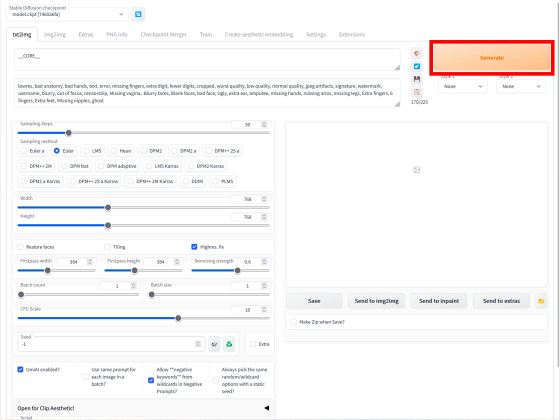
Then change the image generation settings to the recommended settings. First, copy and paste the following text into the prompt input field.
[code]__CORE__
Negative prompt: lowres, bad anatomy, bad hands, text, error, missing fingers, extra digit, fewer digits, cropped, worst quality, low quality, normal quality, jpeg artifacts, signature, watermark, username, blurry, out of focus, censorship, Missing vagina, Blurry faces, Blank faces, bad face, Ugly, extra ear, amputee, missing hands, missing arms, missing legs, Extra fingers, 6 fingers, Extra feet, Missing nipples, ghost
Steps: 30, Sampler: Euler, CFG scale: 10, Size: 768x768, Denoising strength: 0.6, Clip skip: 2, ENSD: 31337, First pass size: 384x384[/code]
After copying and pasting the above text, click the blue arrow button on the right side of the input field.

All settings are now complete. After that, just click the 'Generate' button to randomly generate a beautiful image.

The generated result looks like this.

Using the illustration-specific model data '

The generated image looks like this. Random and beautiful images can be generated more and more without creating prompts.

If you are worried about the generated image prompt, it is convenient to use 'PNG Info'.

It is fun to generate images one by one, but you can also enjoy continuous gacha style such as setting 'Batch cont' to '50' and 'generating 50 images at once and searching for your favorite image'.

In addition, '__CORE__' written in the prompt input field indicates an instruction to 'generate images for adults and images of all ages at a ratio of 1:1', and if you change the '__CORE__' part to '__NSFW__', ' If you change it to 'Adult images only' and '__SFW__', you can output 'All age images only'.
Related Posts:


