Using the SwitchBot Hub 3 to automatically manage the air conditioning in a server room
The SwitchBot Hub 3 is a smart remote control that can be linked to various home appliances. This time, we actually installed it in GIGAZINE's server room and started operating automatic air conditioning management and alert notifications.
·table of contents
1.
◆2: Introduction
◆3: Automation
◆4: Developer options
◆5: Trial API call
◆6: Collaboration with n8n
◆7: Summary
1. Background
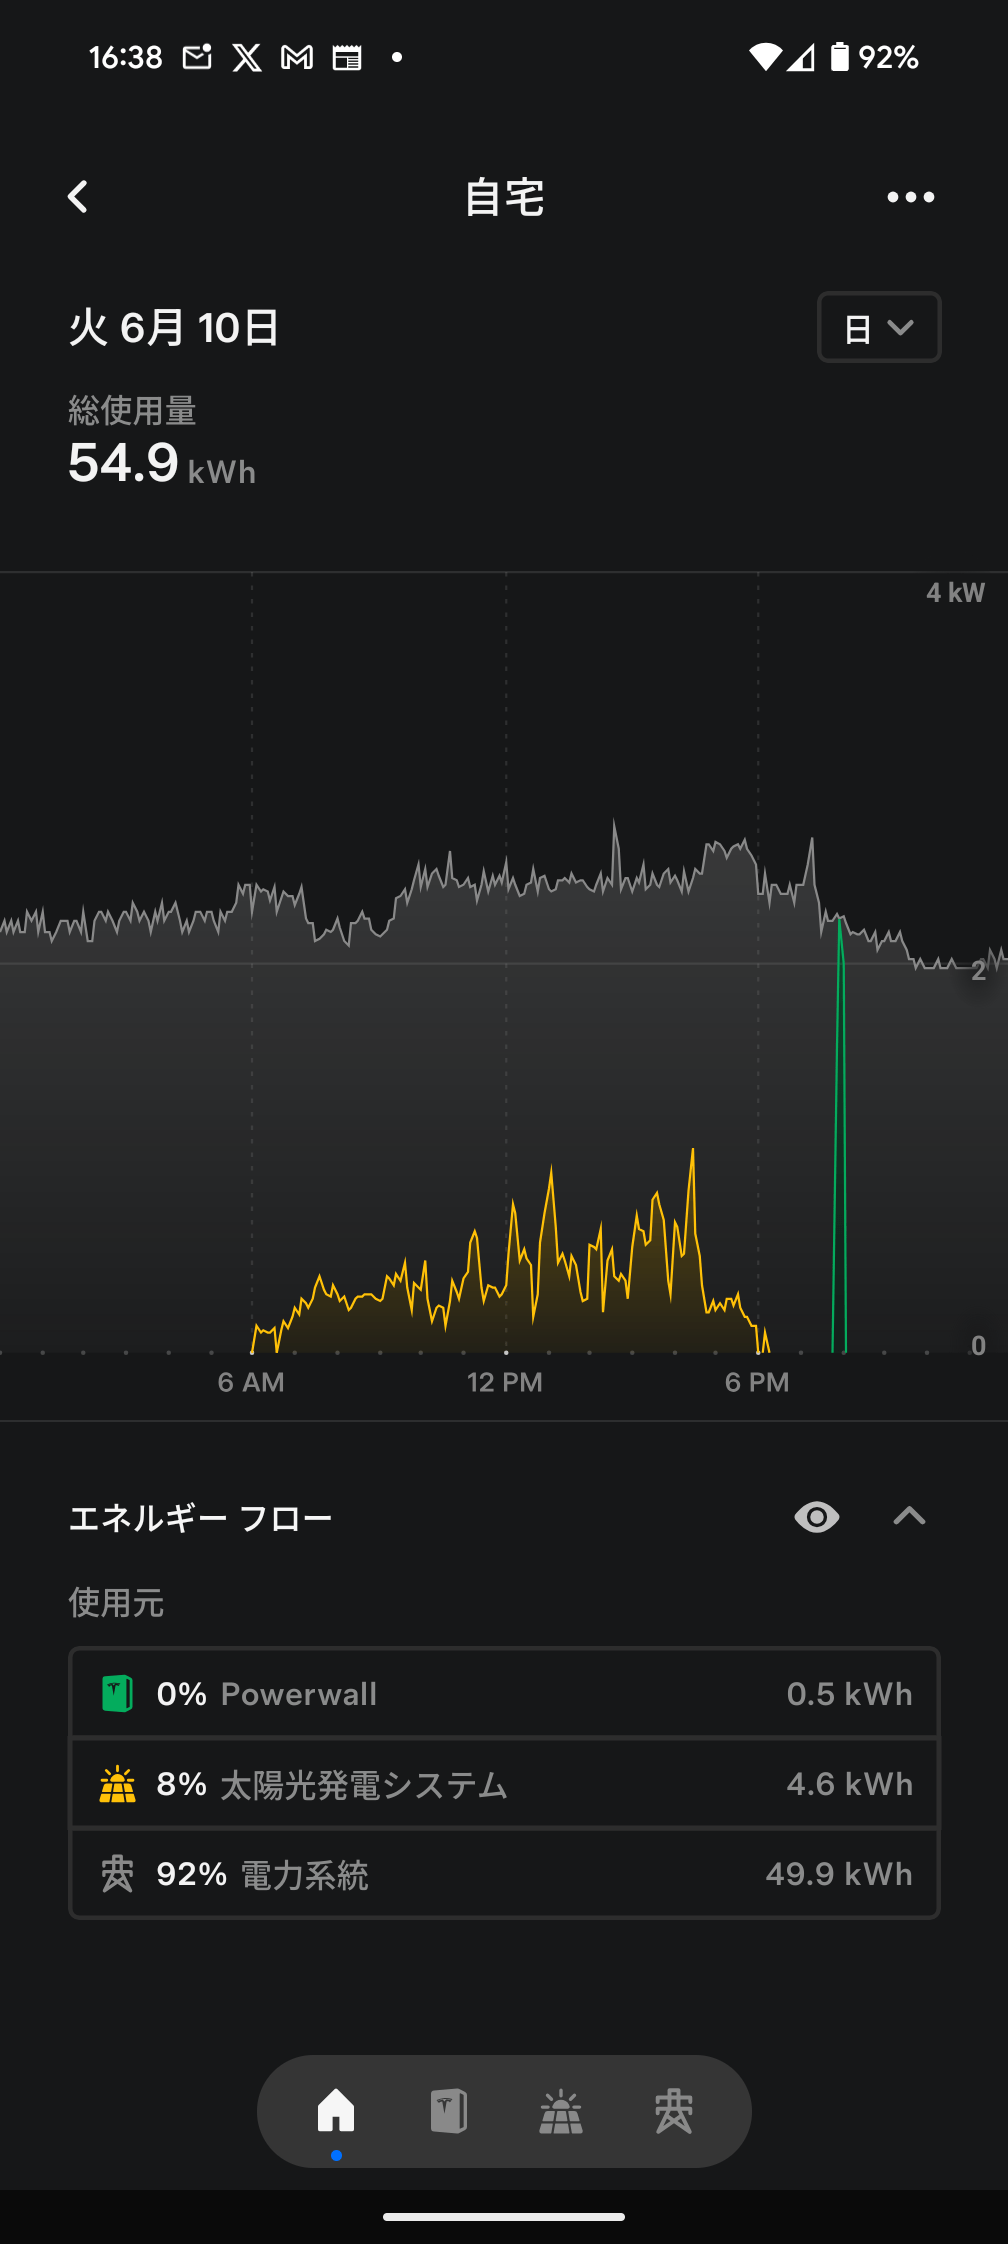
A power outage occurred around the GIGAZINE editorial office at around 7:45 p.m. on Tuesday, June 10, 2025. The cause was contact with trees, birds, and animals . The power outage itself was restored in a short time, and since it was a time when the editorial staff had returned home, there was almost no impact from the power outage. The equipment in the server room, which was the most worrisome, continued to operate normally because it was powered by UPS and Powerwall .
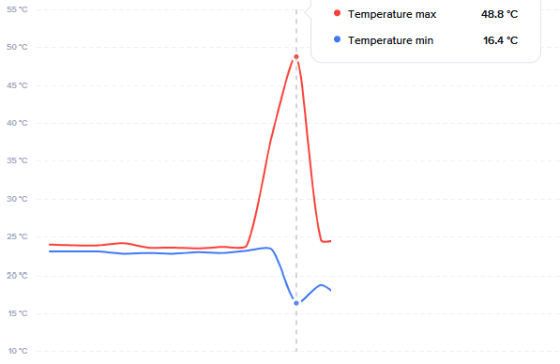
The only problem was the air conditioner, which was constantly cooling the server room to maintain its temperature. Air conditioners, which require a 200V power source rather than server equipment, are not covered by the UPS, and there appears to have been a slight time lag between the blackout and the switch to the Powerwall, so the air conditioner stopped operating after a very short power outage. As a result, while the server equipment continued to operate normally and vigorously released heat, the air conditioner no longer functioned, and the temperature in the server room continued to rise gradually without anyone noticing.
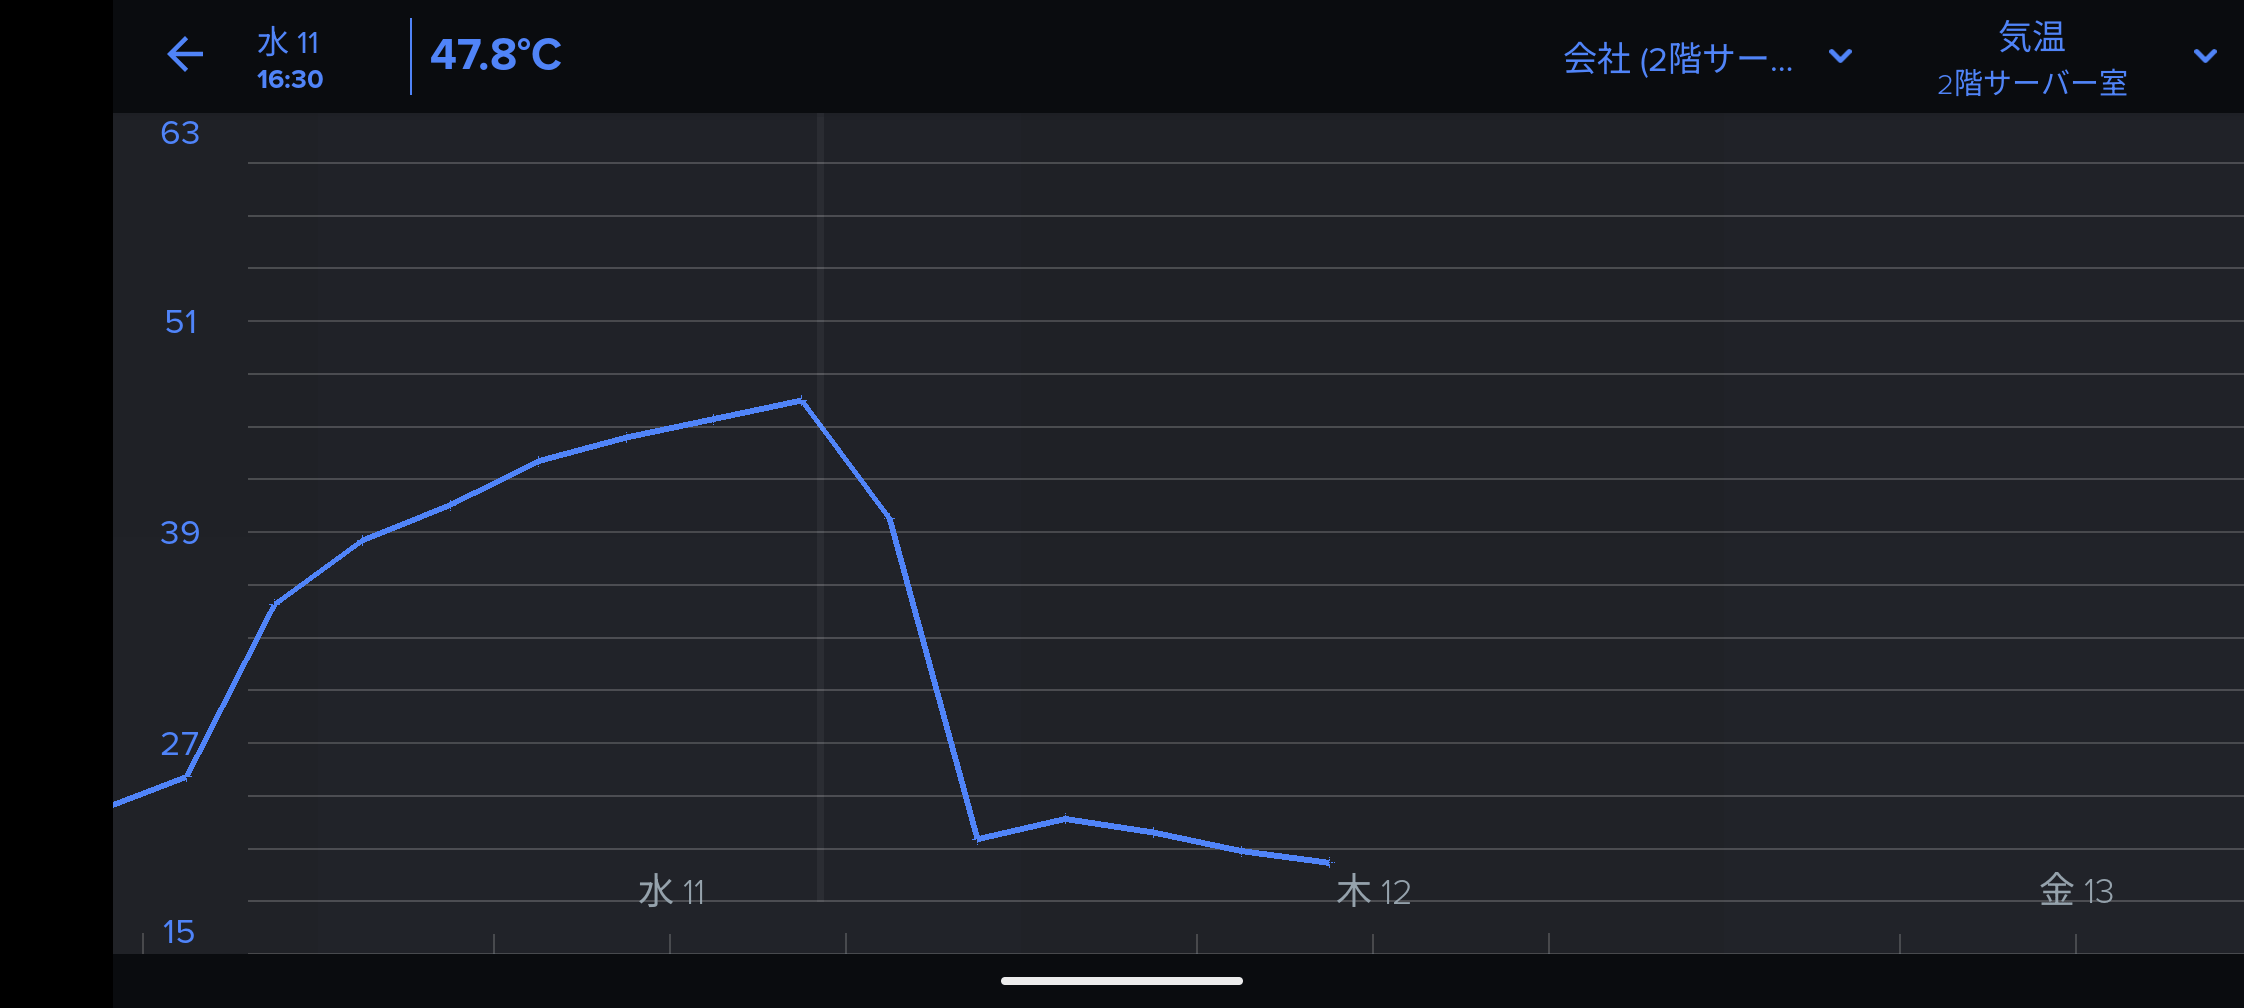
The strange phenomenon first appeared about a day after the blackout, when the responses from some of the servers began to become unstable. An editorial staff member who happened to still be in the office went to check on the situation and noticed that not only was the server room hot, but the cooling fans of the server equipment were making an abnormal noise when they were rotating. From this point, a big frenzy began to take place, with the servers being ventilated and the air conditioners being turned on.
Through reflection on these incidents, we have learned the following lessons:
・A smart remote control needs to be installed in the server room so that an increase in room temperature can trigger the start of the air conditioner.
・It is necessary to prepare a mechanism to notify the outside when the room temperature exceeds a certain value.
We happened to have the new Hub 3 as in-house equipment, and since it has an automation function that is triggered by room temperature, and
◆2: Introduction
First, create a new SwitchBot account for the server room as a first step in the installation process. Although I already had a review account, I wanted to make sure that the two accounts did not affect each other.
Next, I logged into the SwitchBot app with my newly created account and tried to register the Hub 3, but I ran into a problem: Towards the end of the registration process, an unfamiliar screen appeared, asking me to upload my purchasing history.

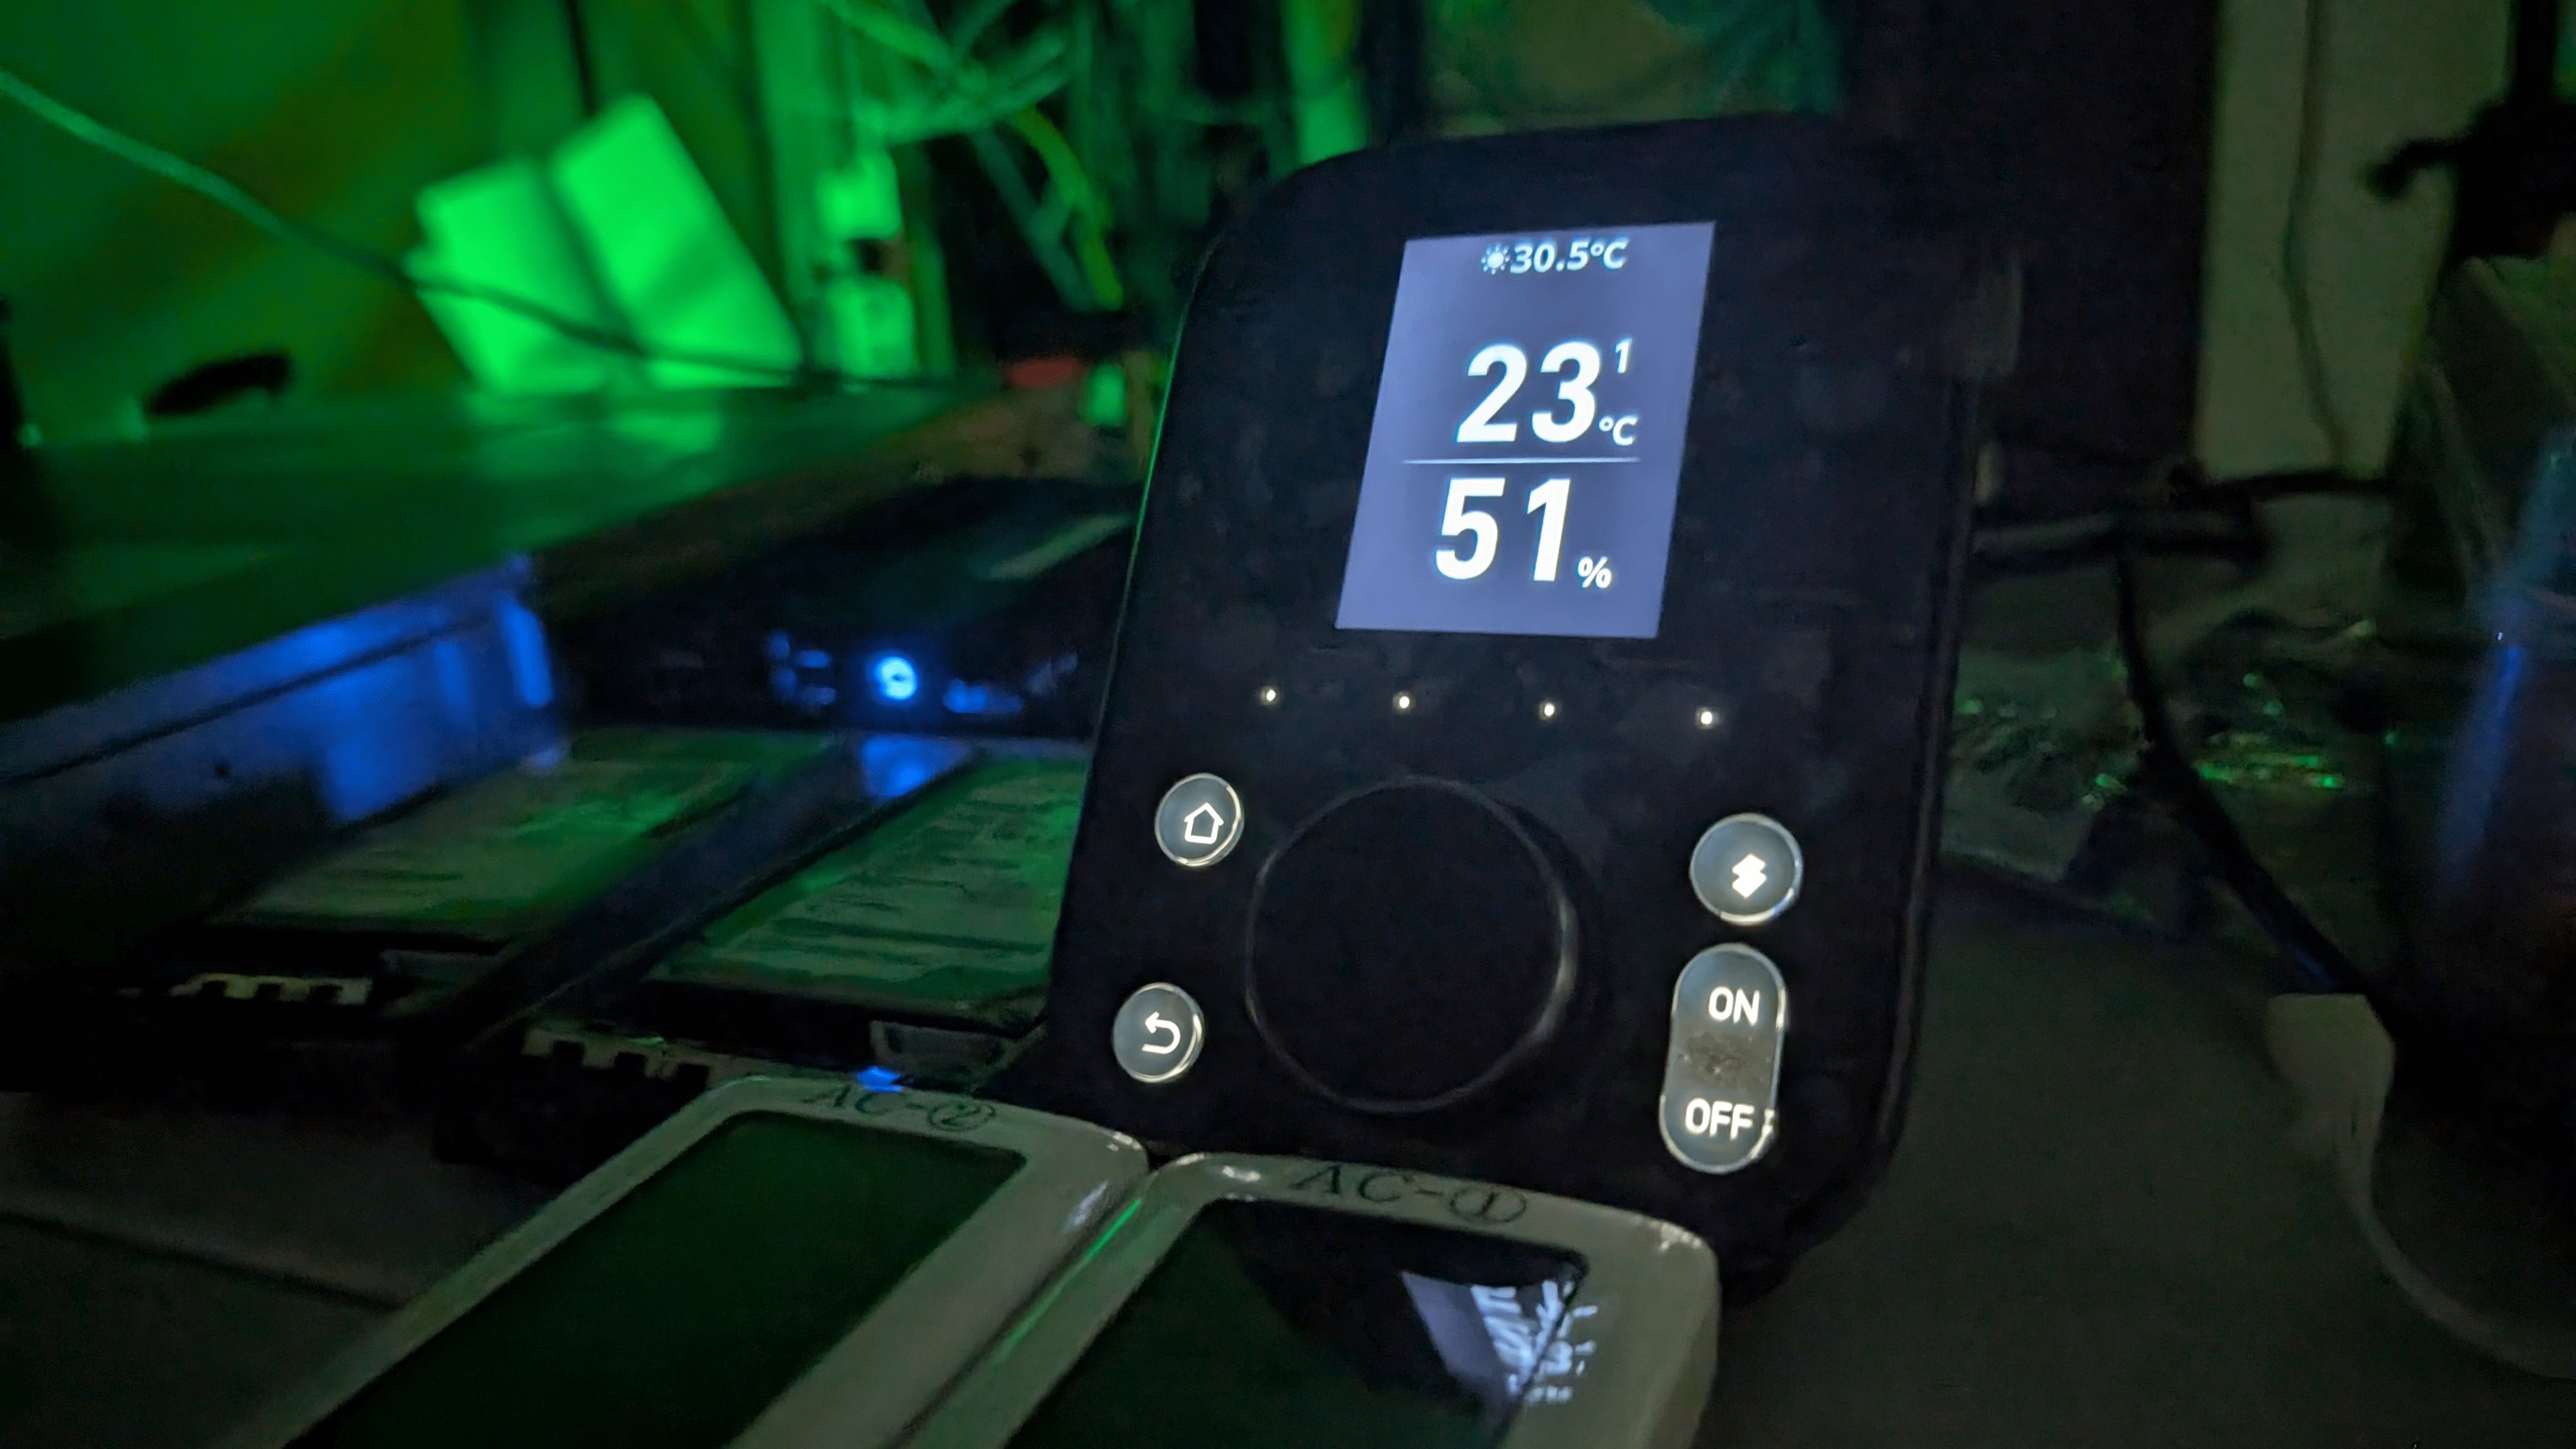
Based on my experience of registering devices several times, I was puzzled because I knew that this step should not have existed, but when I reviewed the Hub 3, I realized that it was still registered to the review account, so I deleted the registration from the review account and the problem was solved. Now that the registration of the Hub 3 was completed successfully, I deployed it in the server room. There would be no point in powering the Hub 3 itself if it stopped being powered, so I made sure to keep it powered by using a UPS. Also, because earthquakes are a common cause of power outages, I took extra precautions and secured it to a rack to eliminate the possibility of it shaking and falling over and stopping operation.
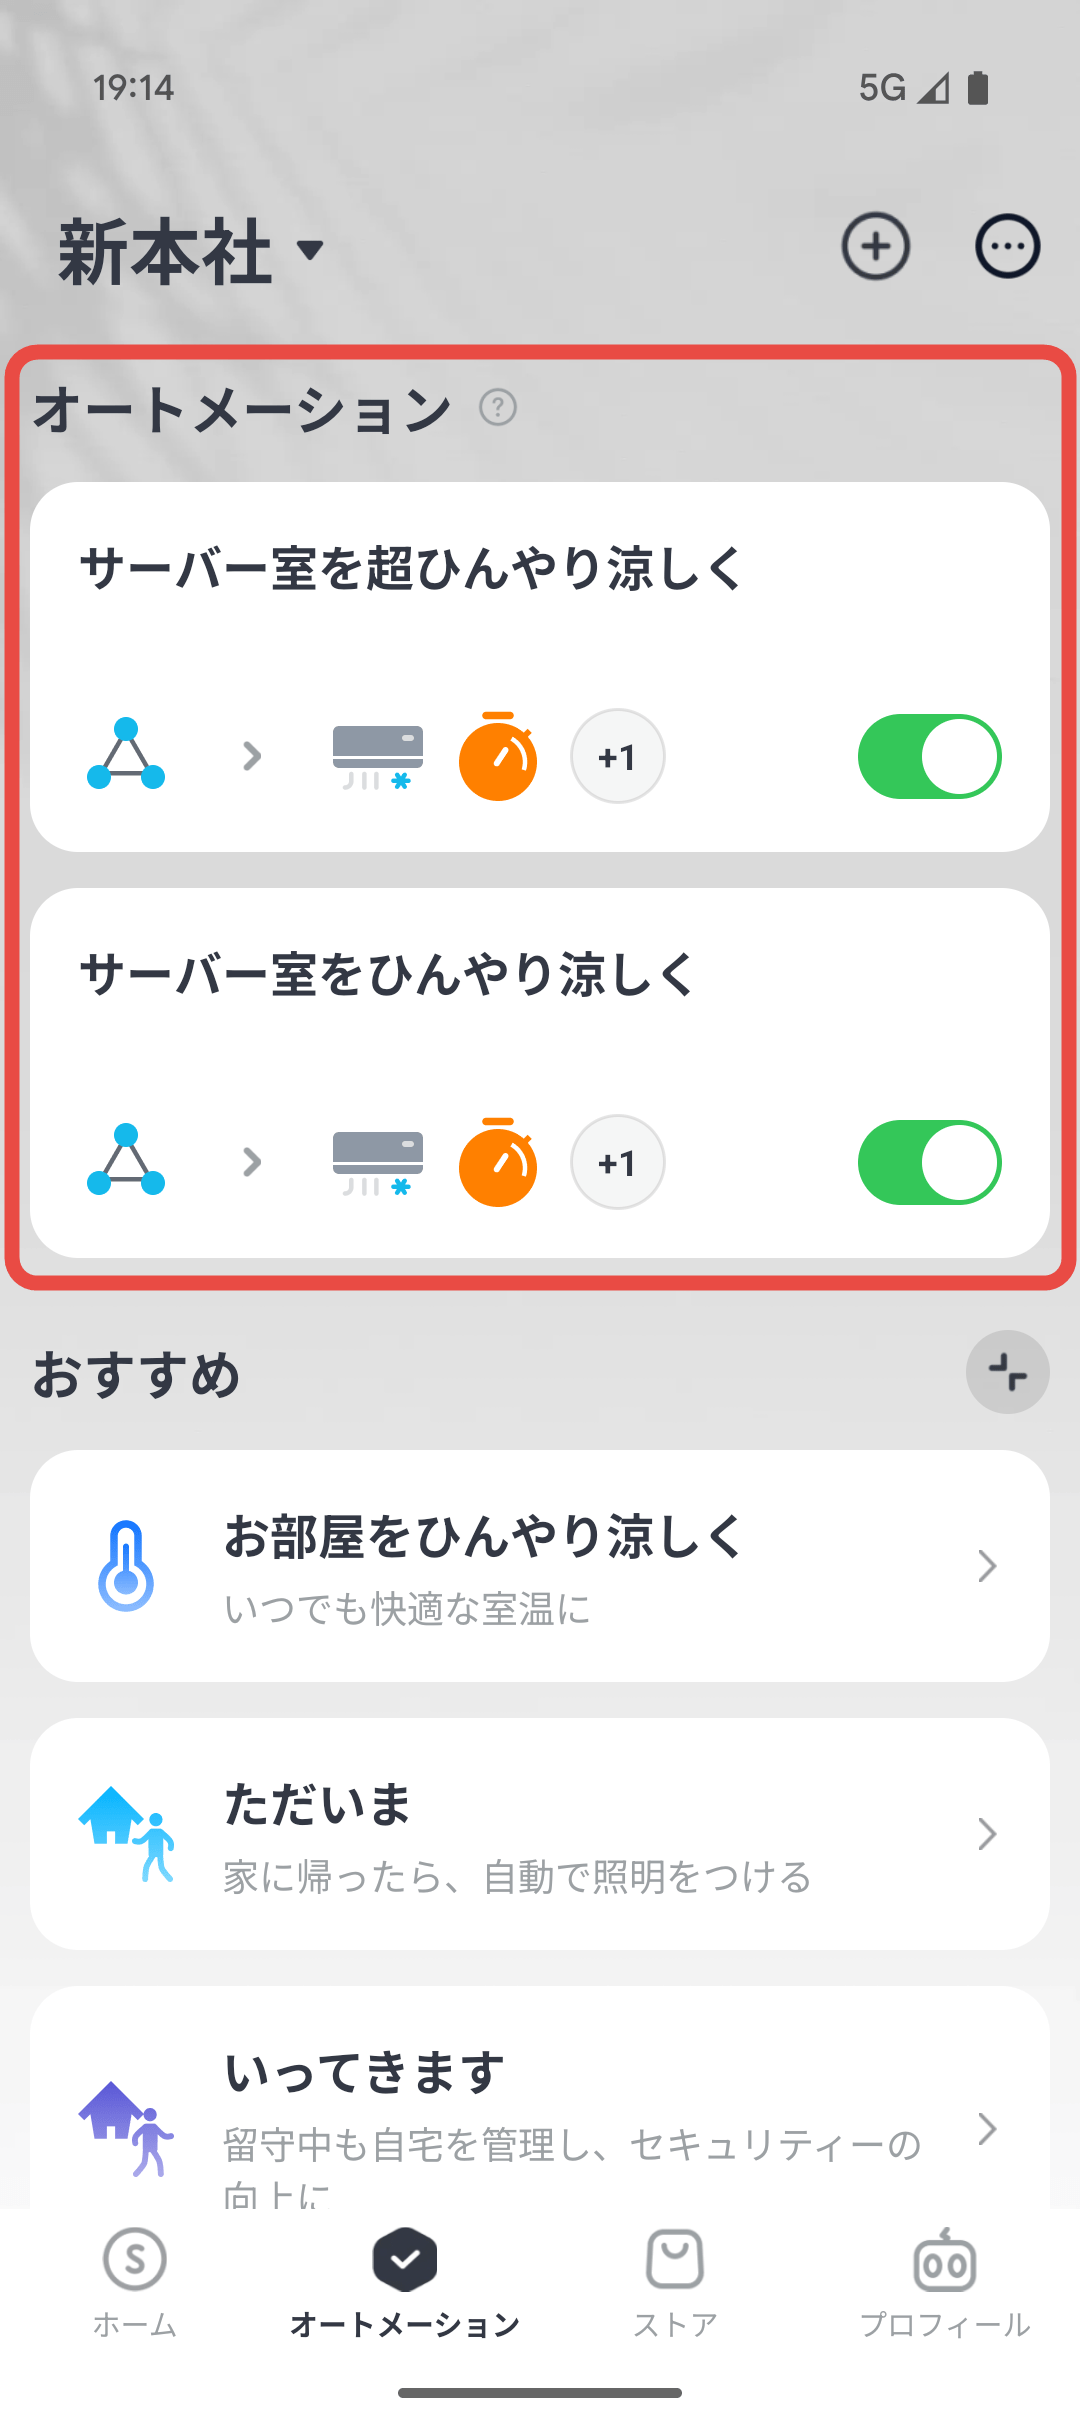
◆3: Automation
The goal of automation is to control the remote control in the server room, so we first need to have Hub 3 installed in the server room learn and register the remote controls for the two air conditioners in the room.
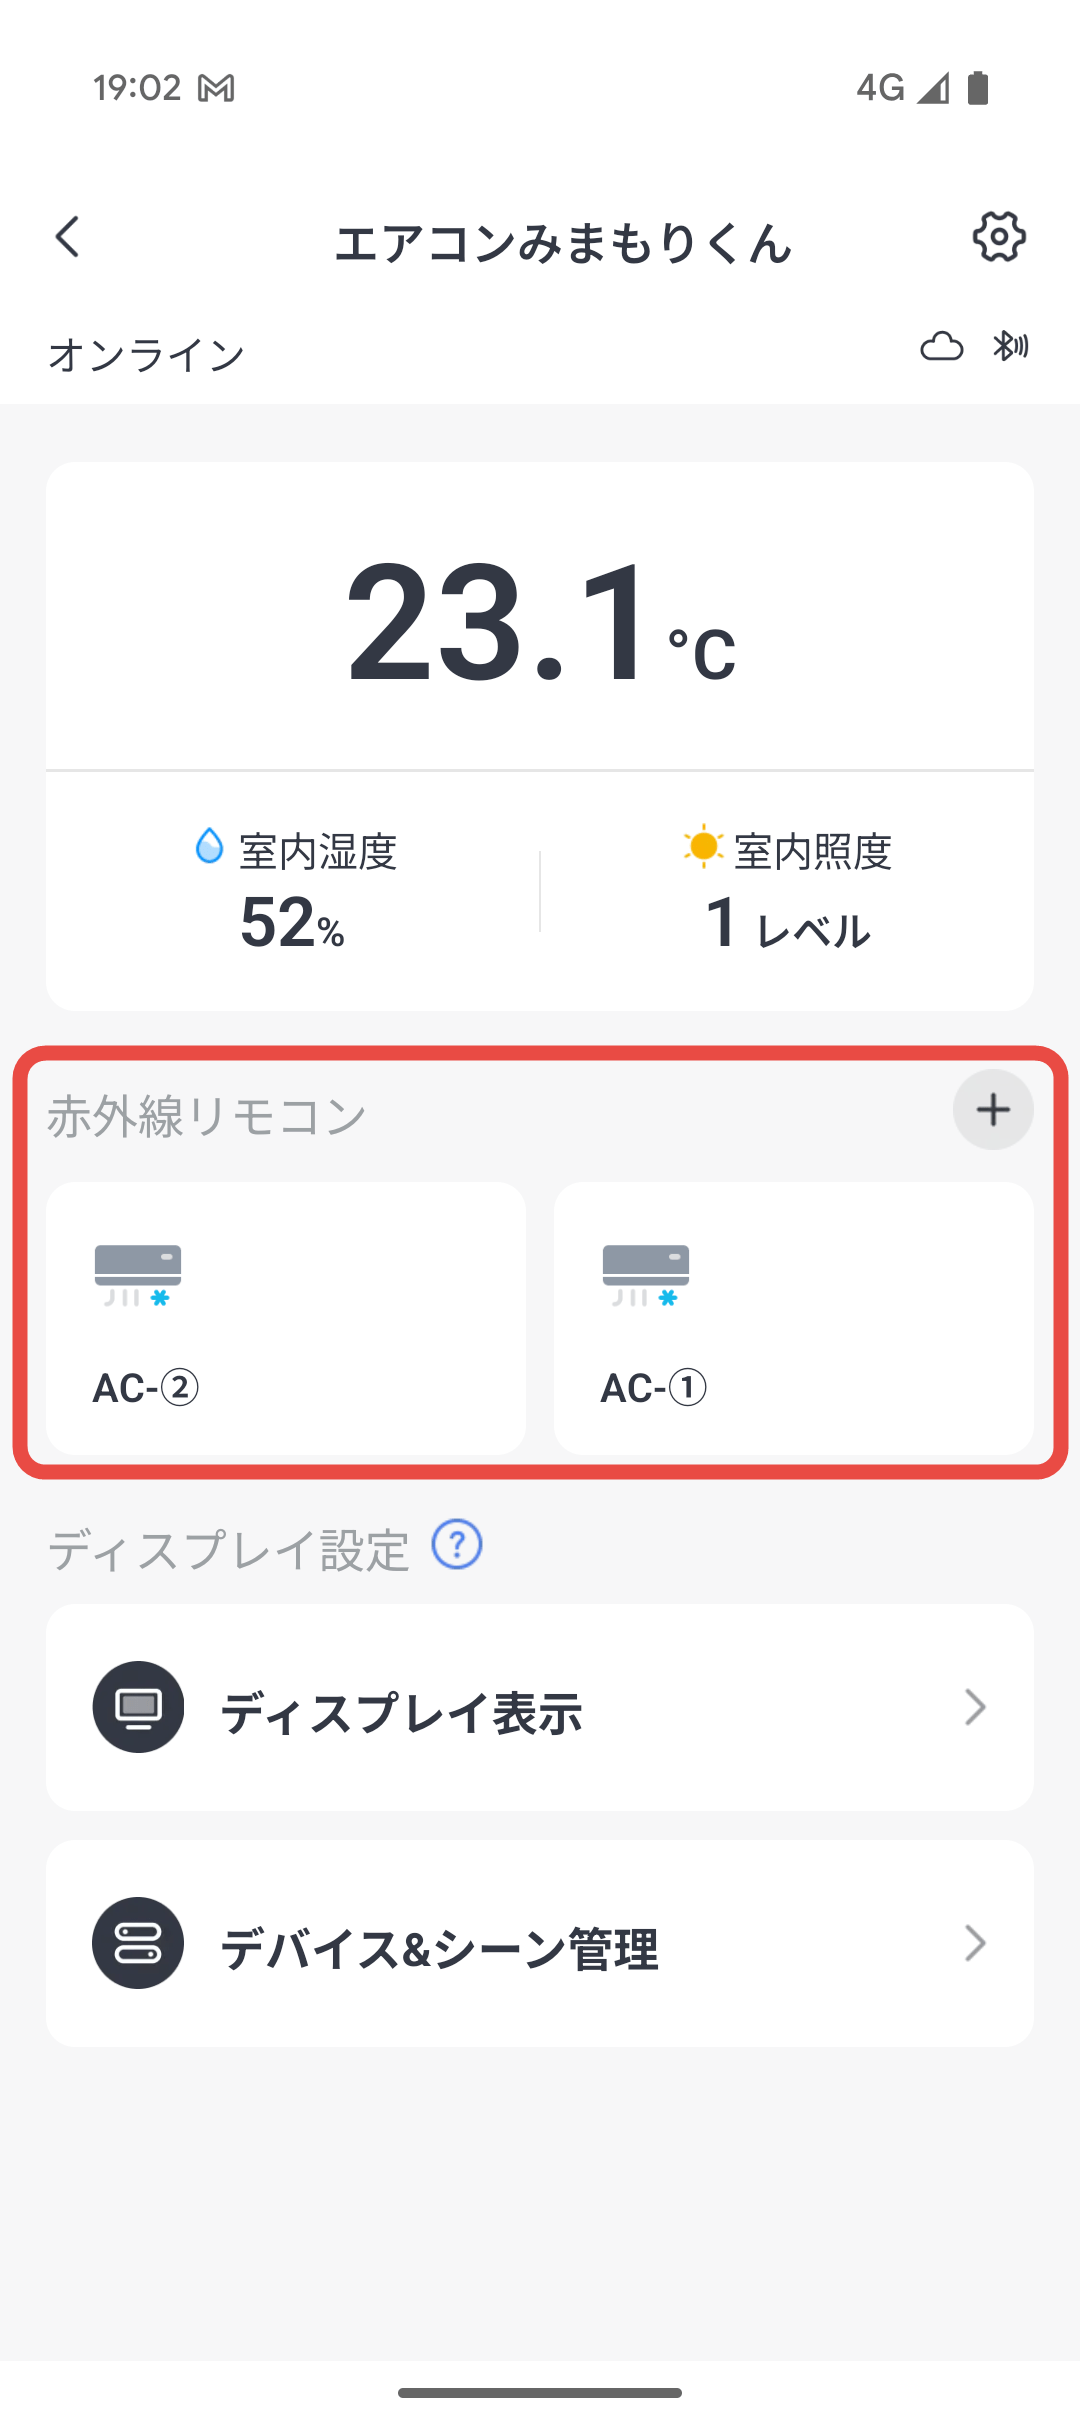
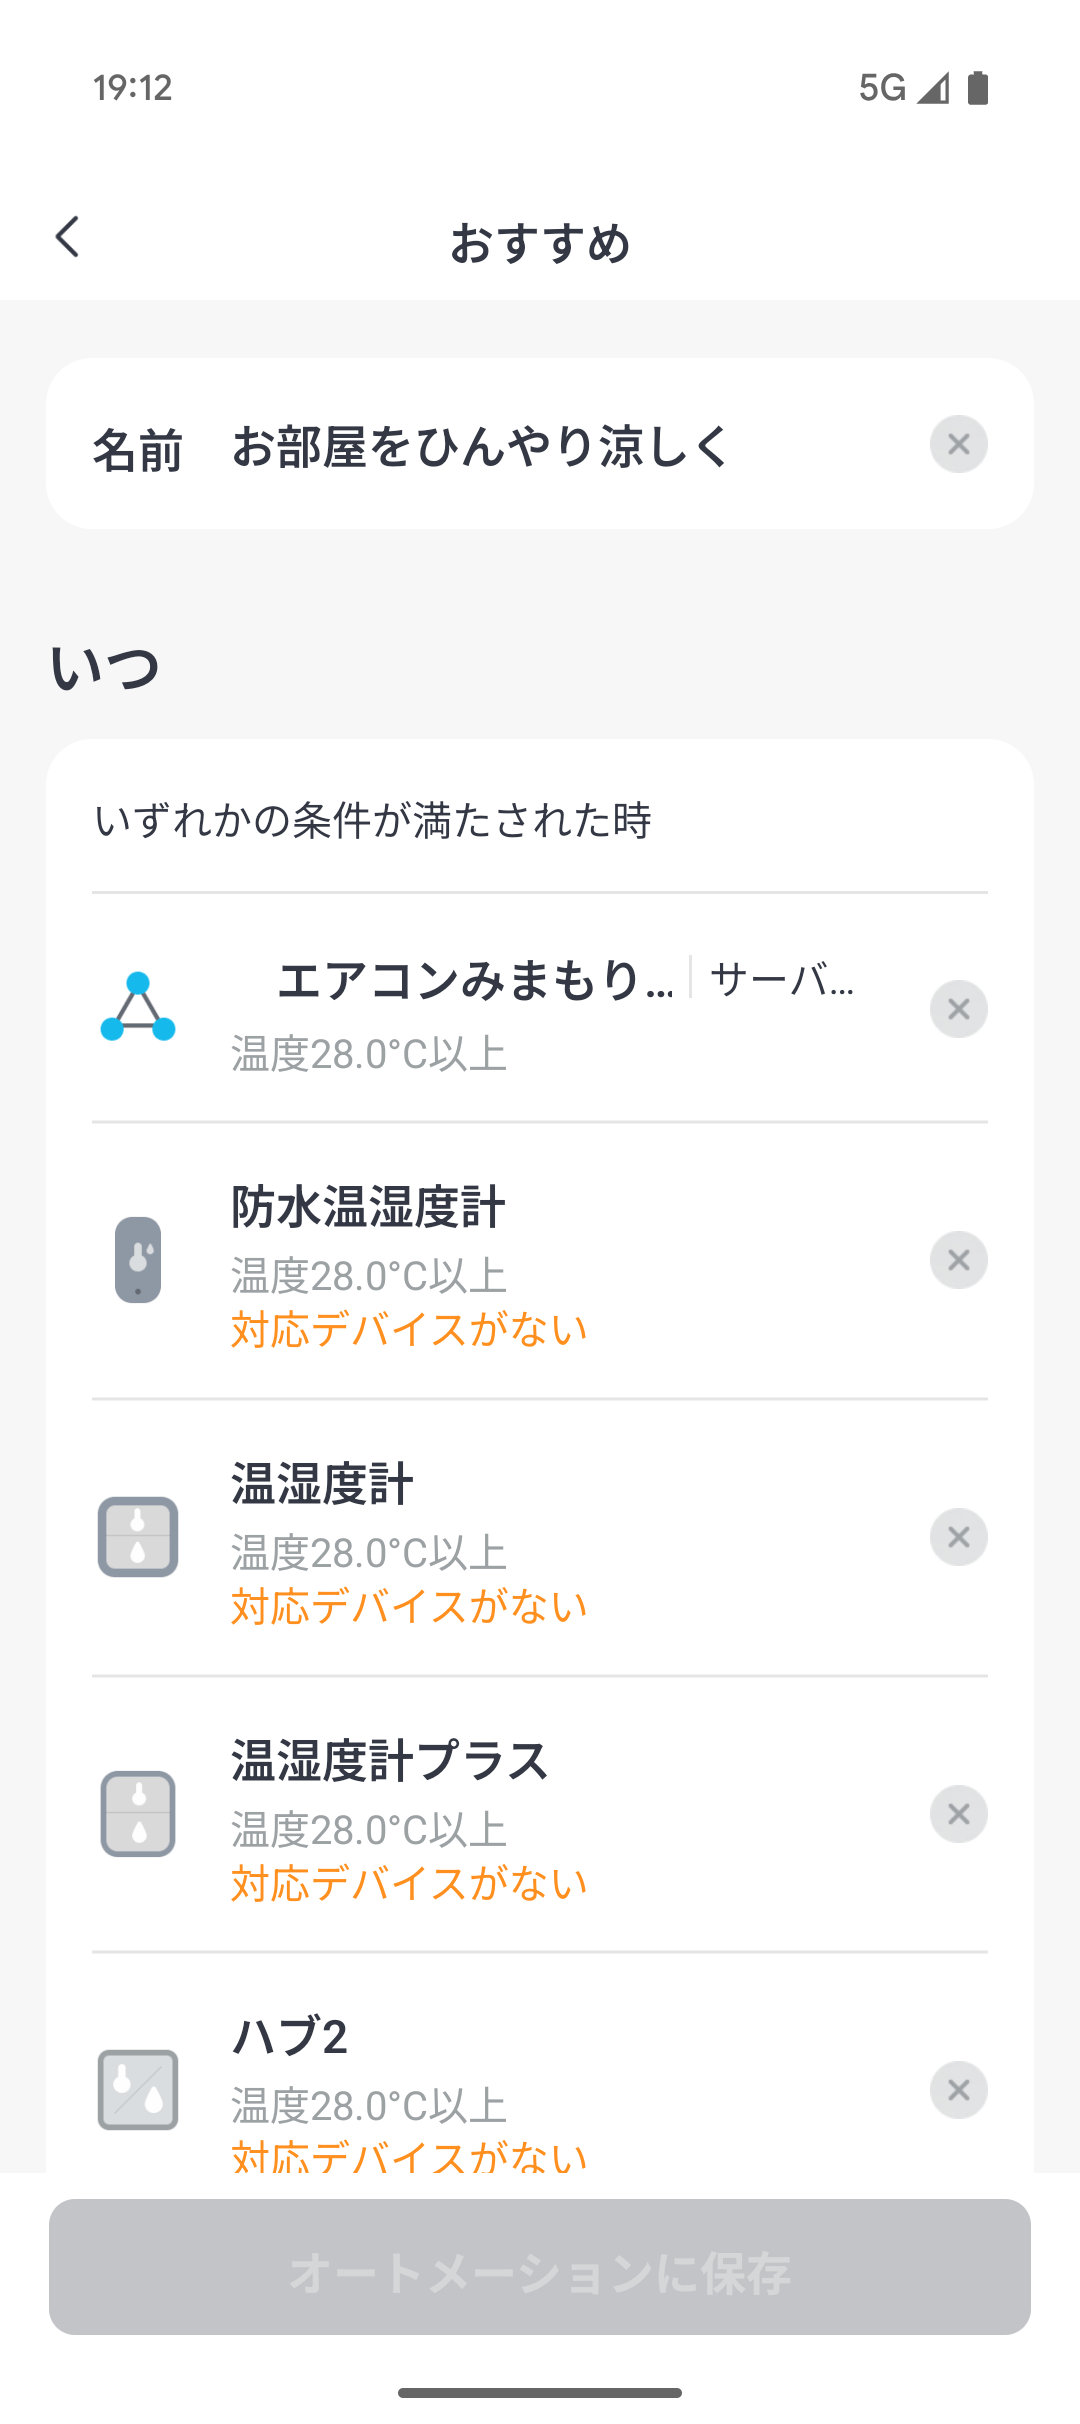
After registering, open the automation screen and create an automation that will operate the air conditioner when the room temperature rises. There is a sample called 'Keep your room cool' in the 'Recommended' section, so we will use it as a reference.
Delete unnecessary triggers and change it to operate two air conditioners.
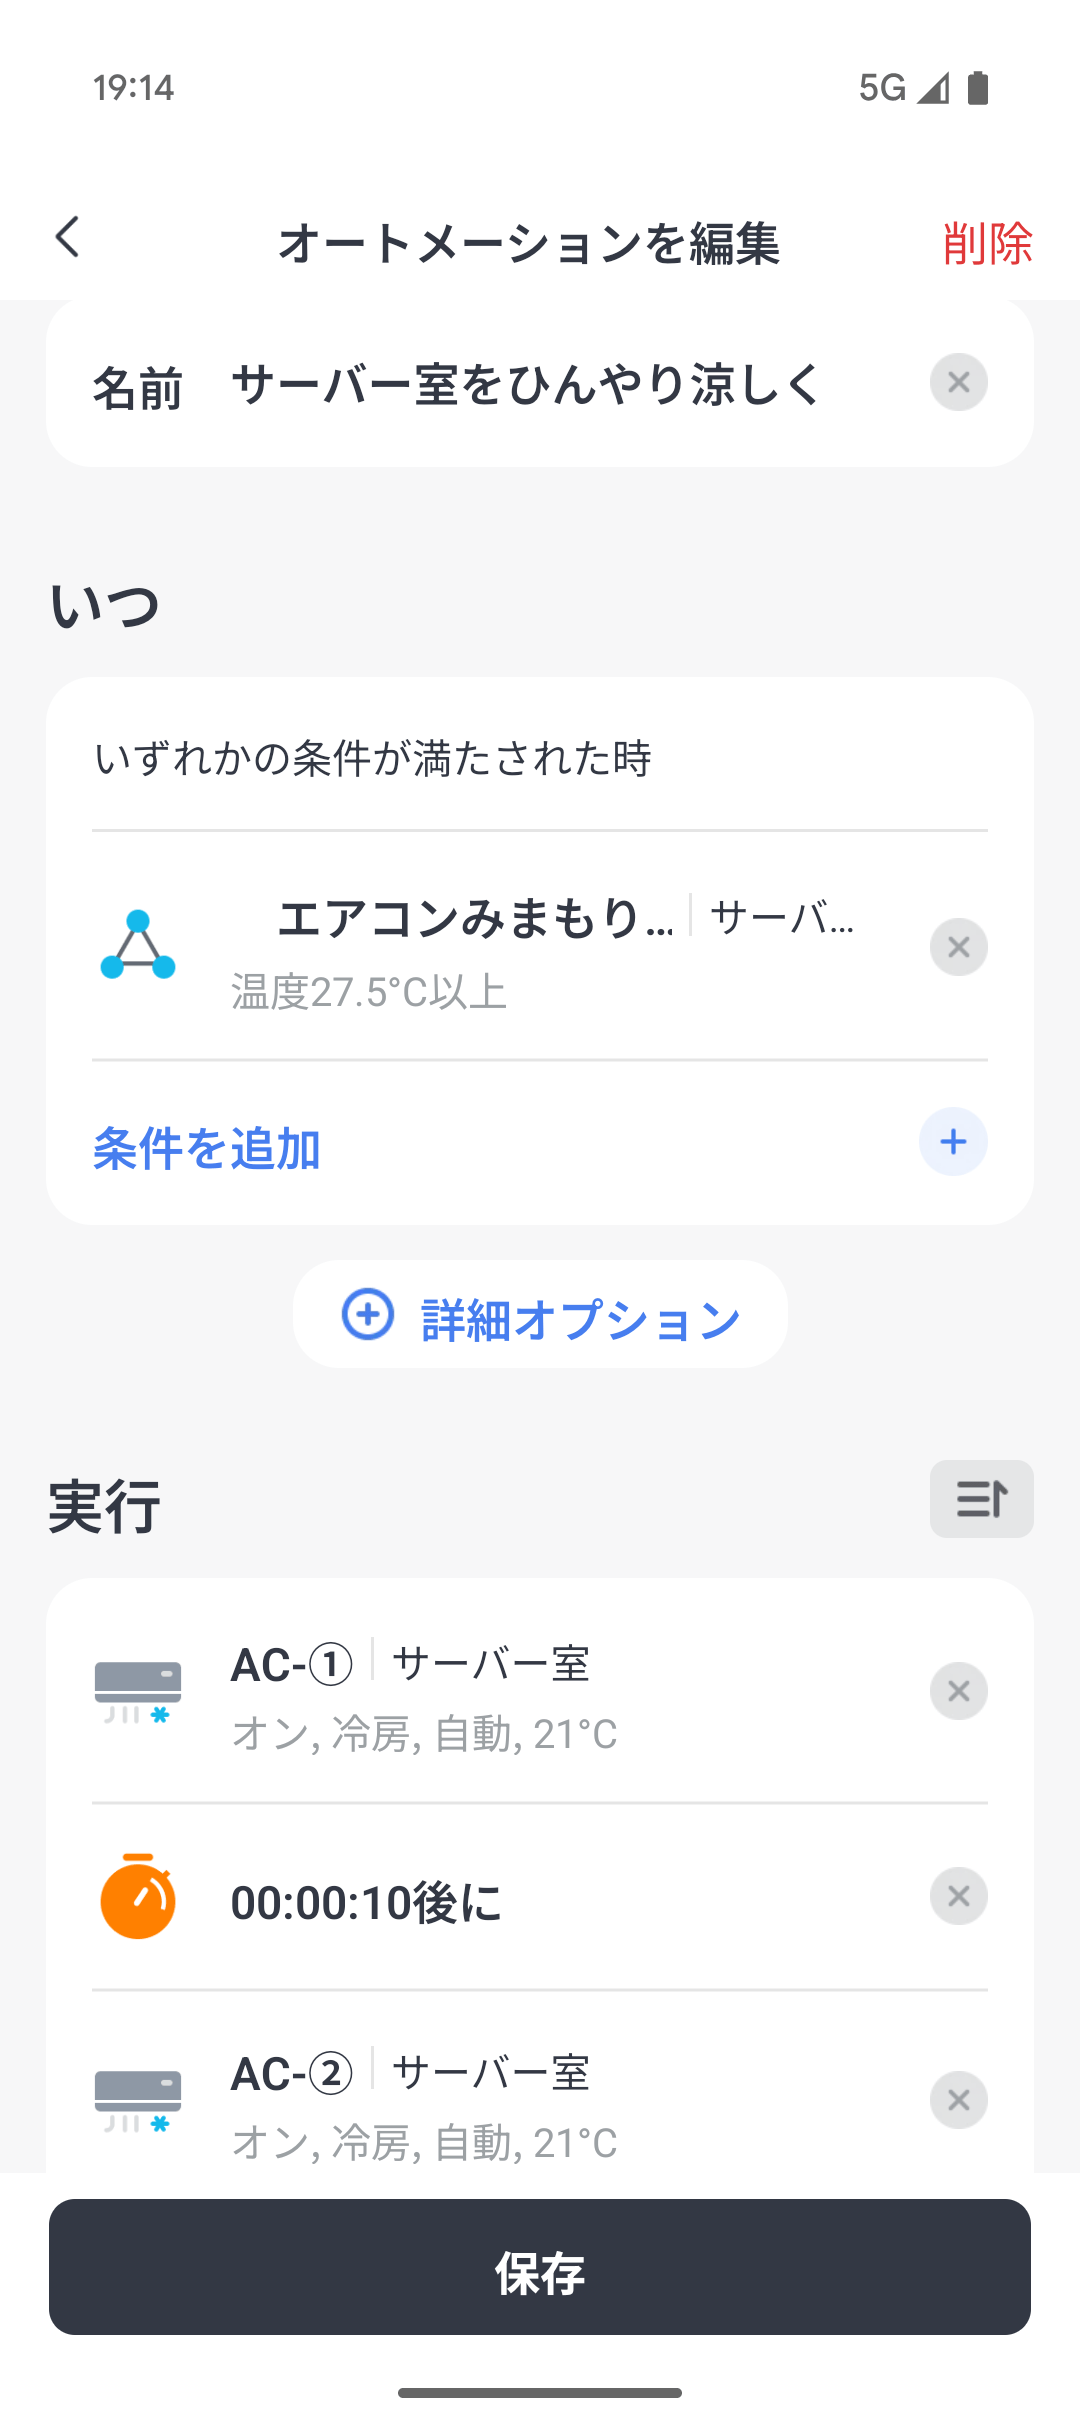
In the unlikely event that the power to the air conditioner is cut off at the moment the automation is activated, we will prepare another automation that slightly changes the trigger room temperature and shifts the activation timing.
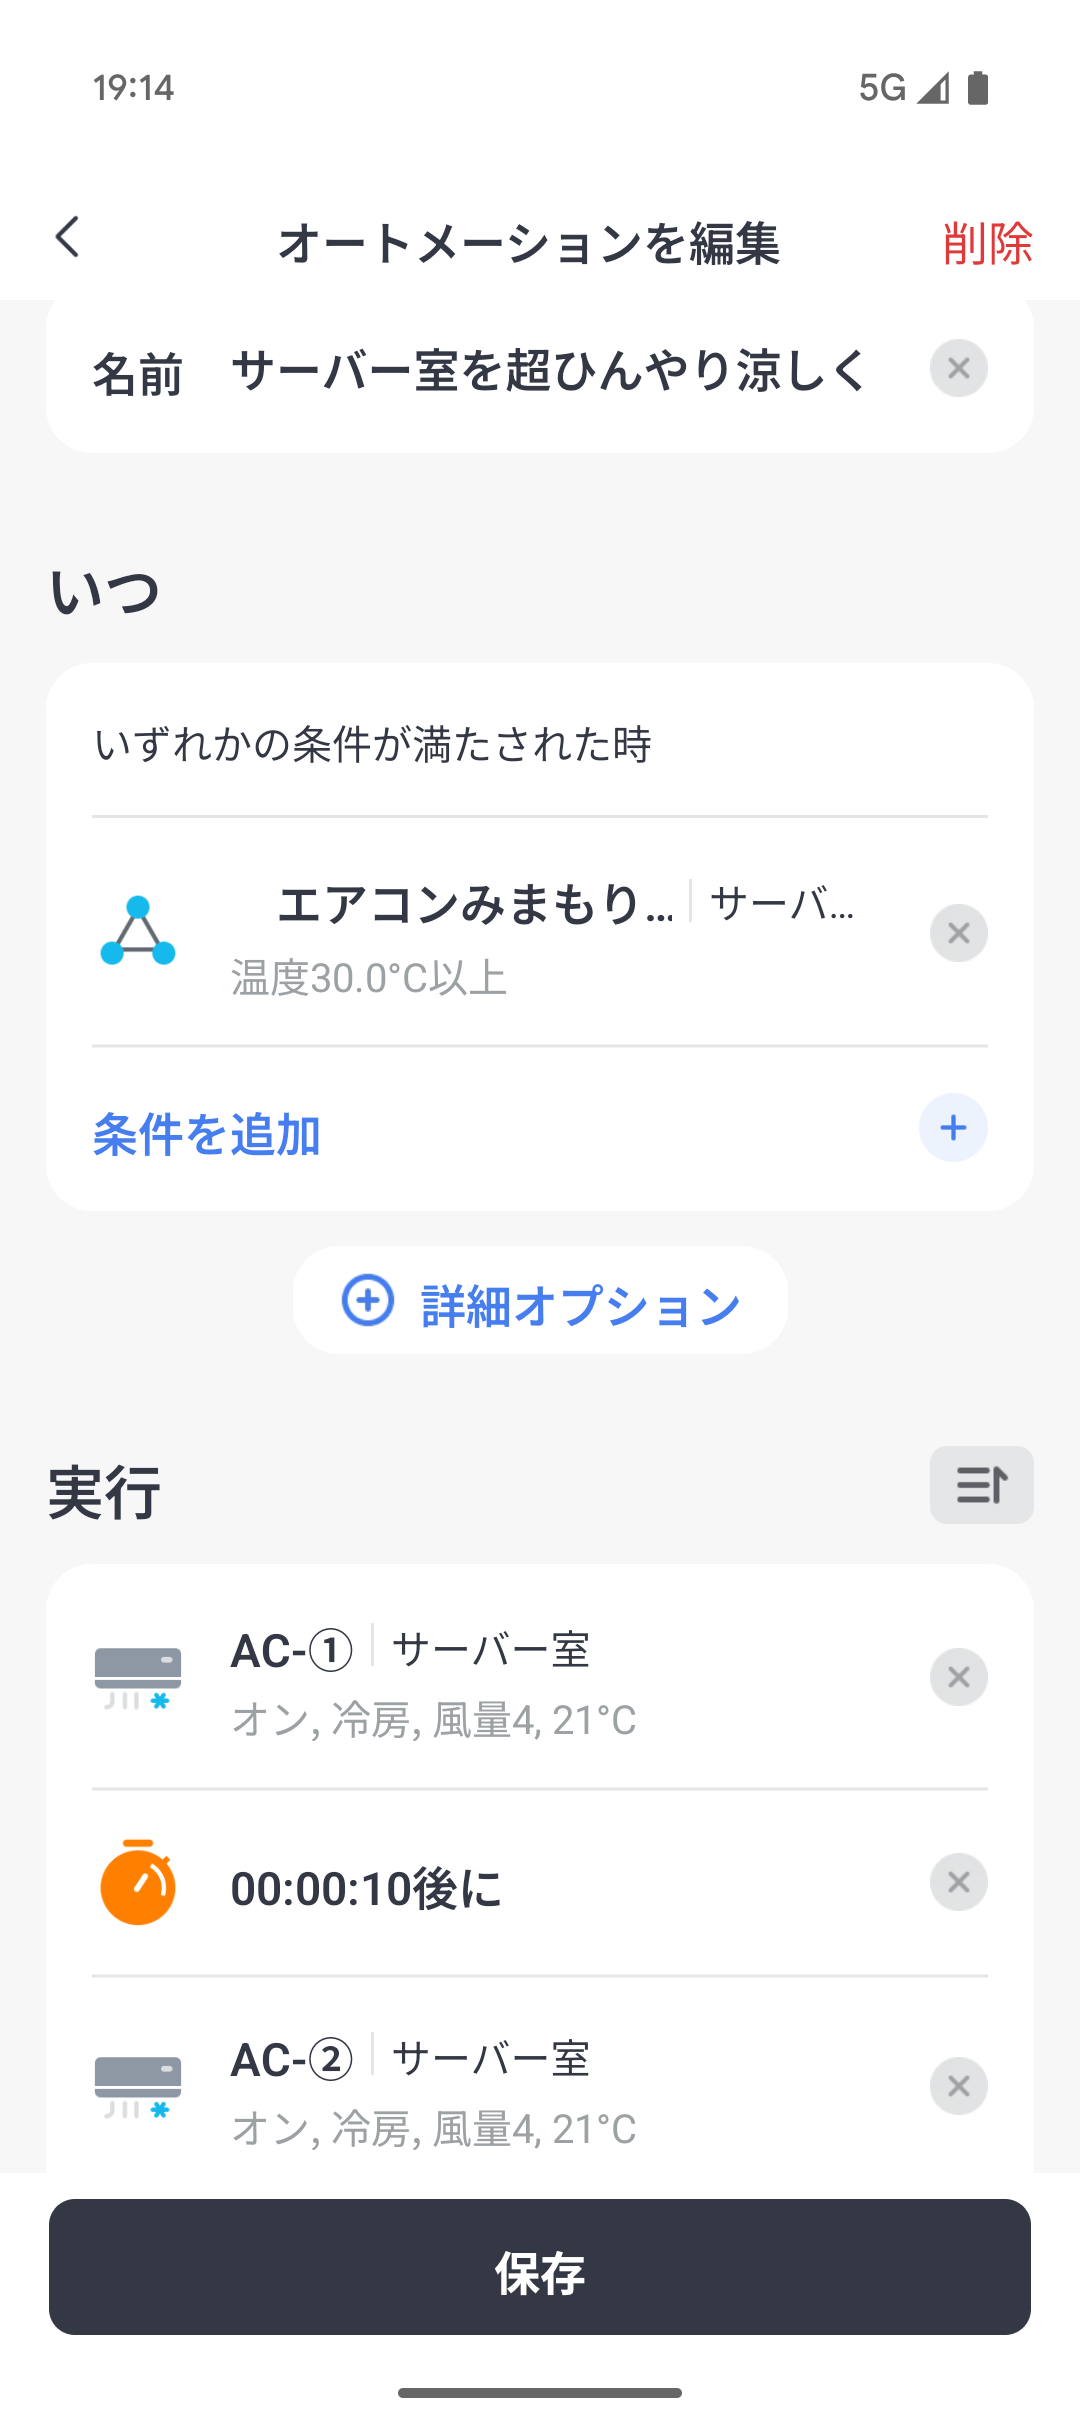
In this way, two automations have been registered. Since situations that cannot be handled by this are beyond the scope of automation in the first place, the automation settings are complete for now.
◆4: Developer options
When implementing the notification function integration, we chose
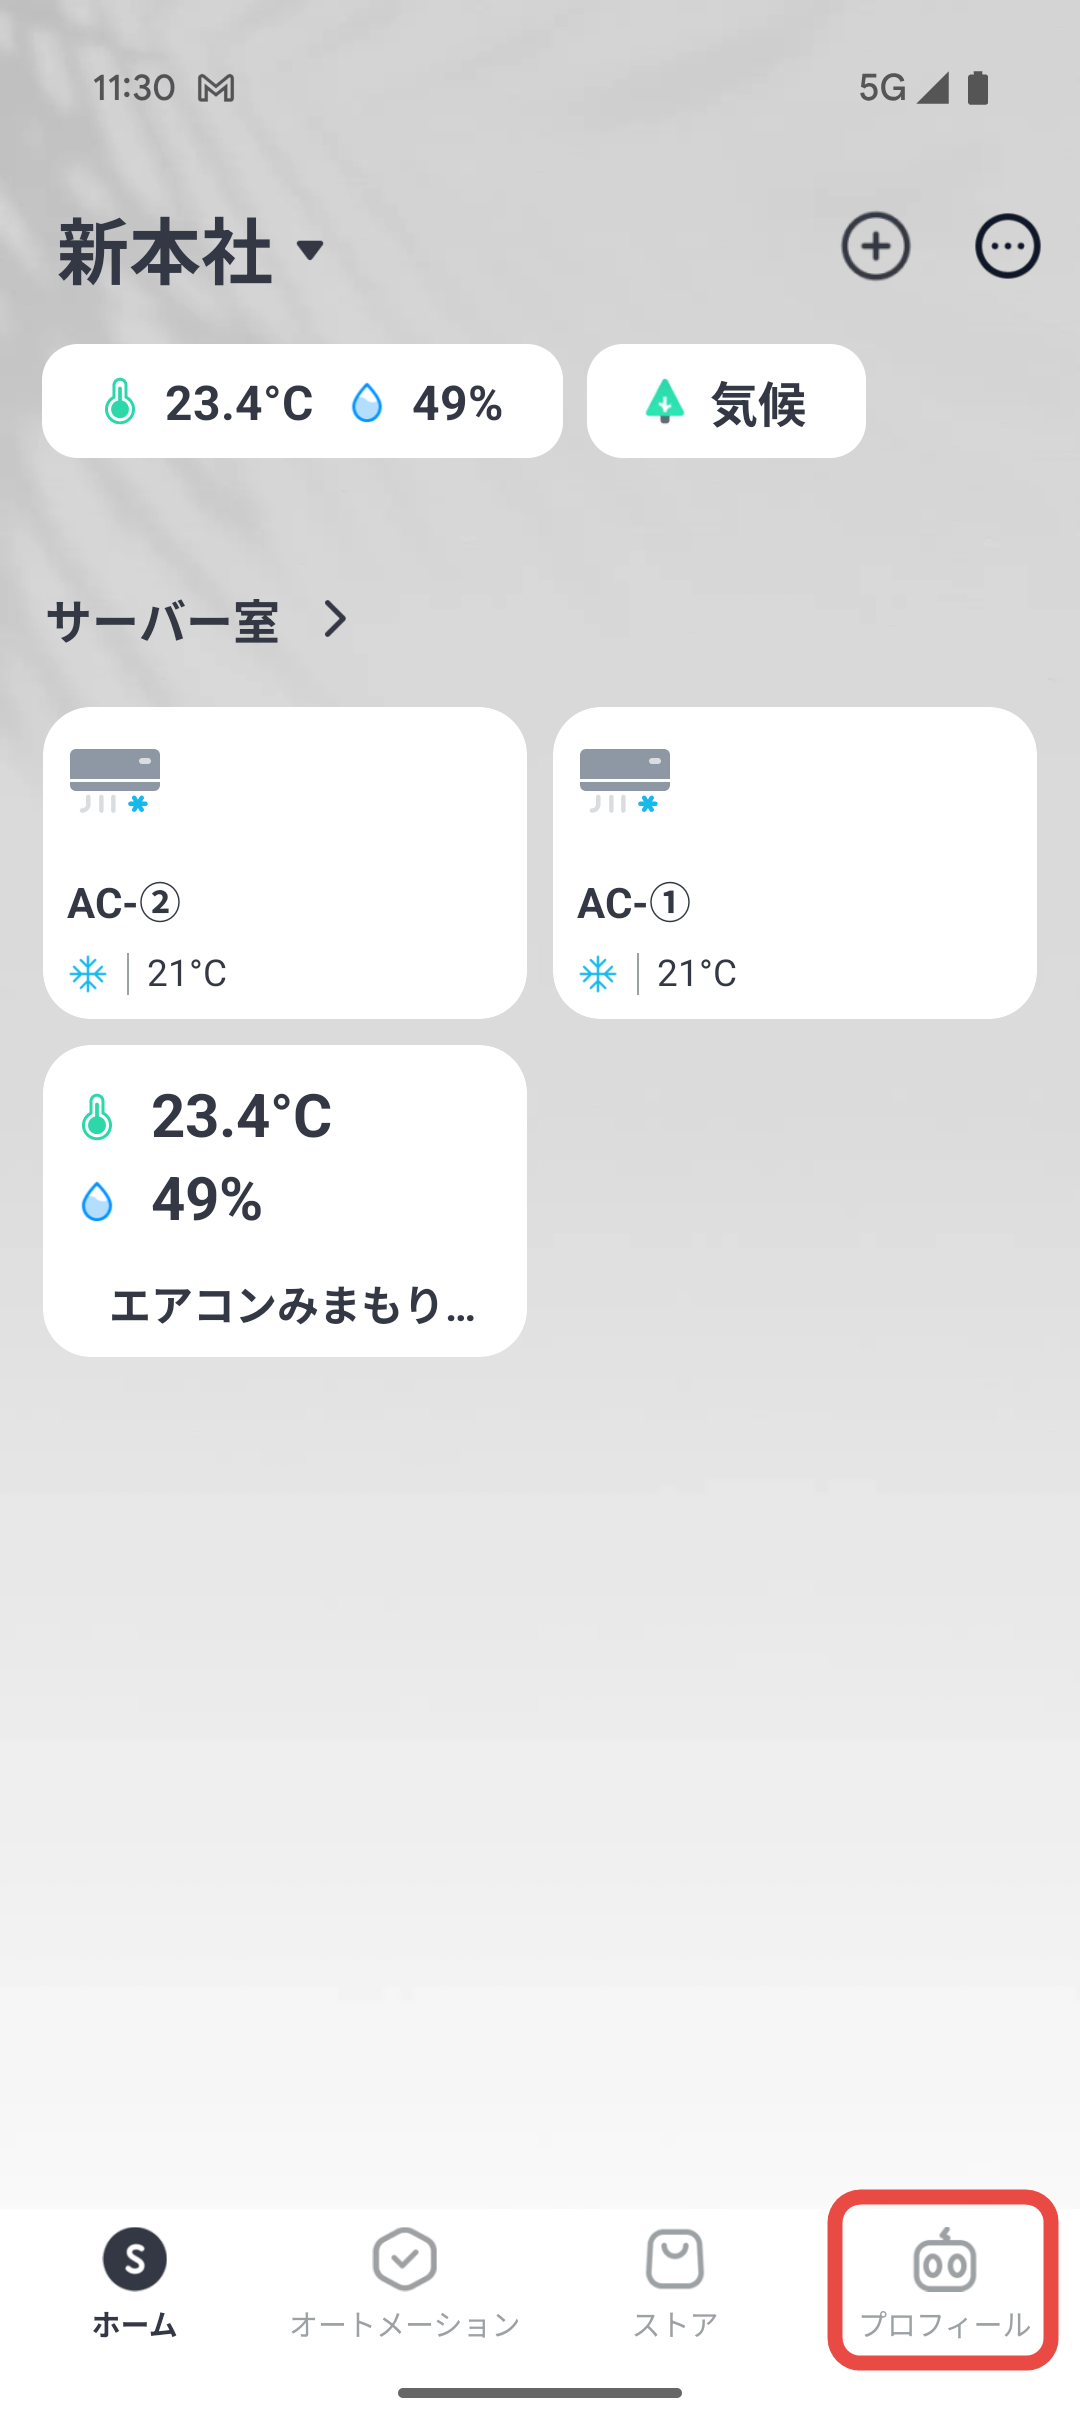
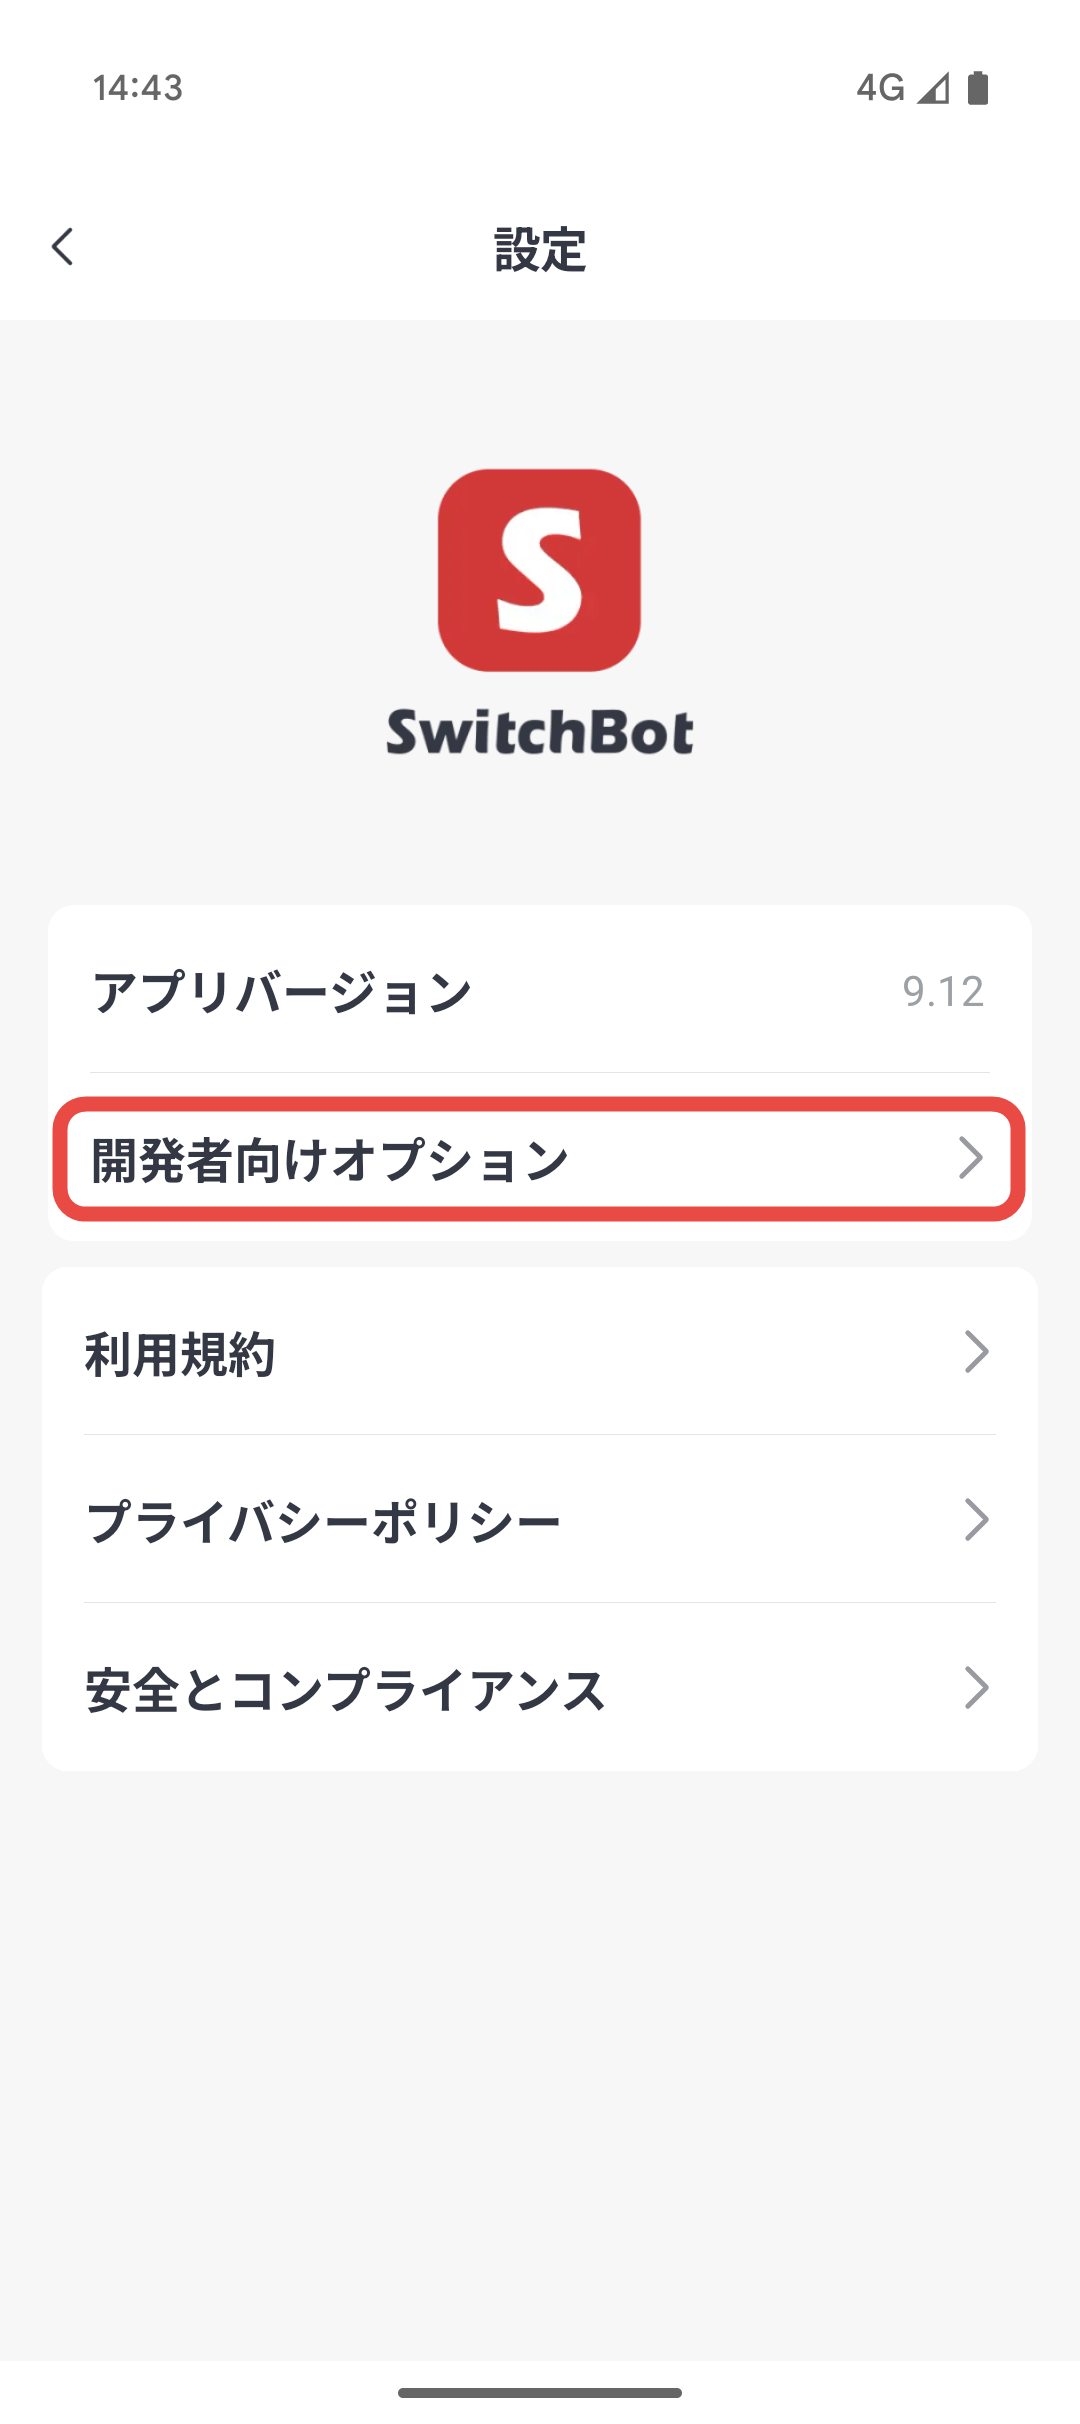
First, you need to obtain the 'token' and 'client secret' required to call the SwitchBot API through the SwitchBot app. Open the app and tap 'Profile' at the bottom.
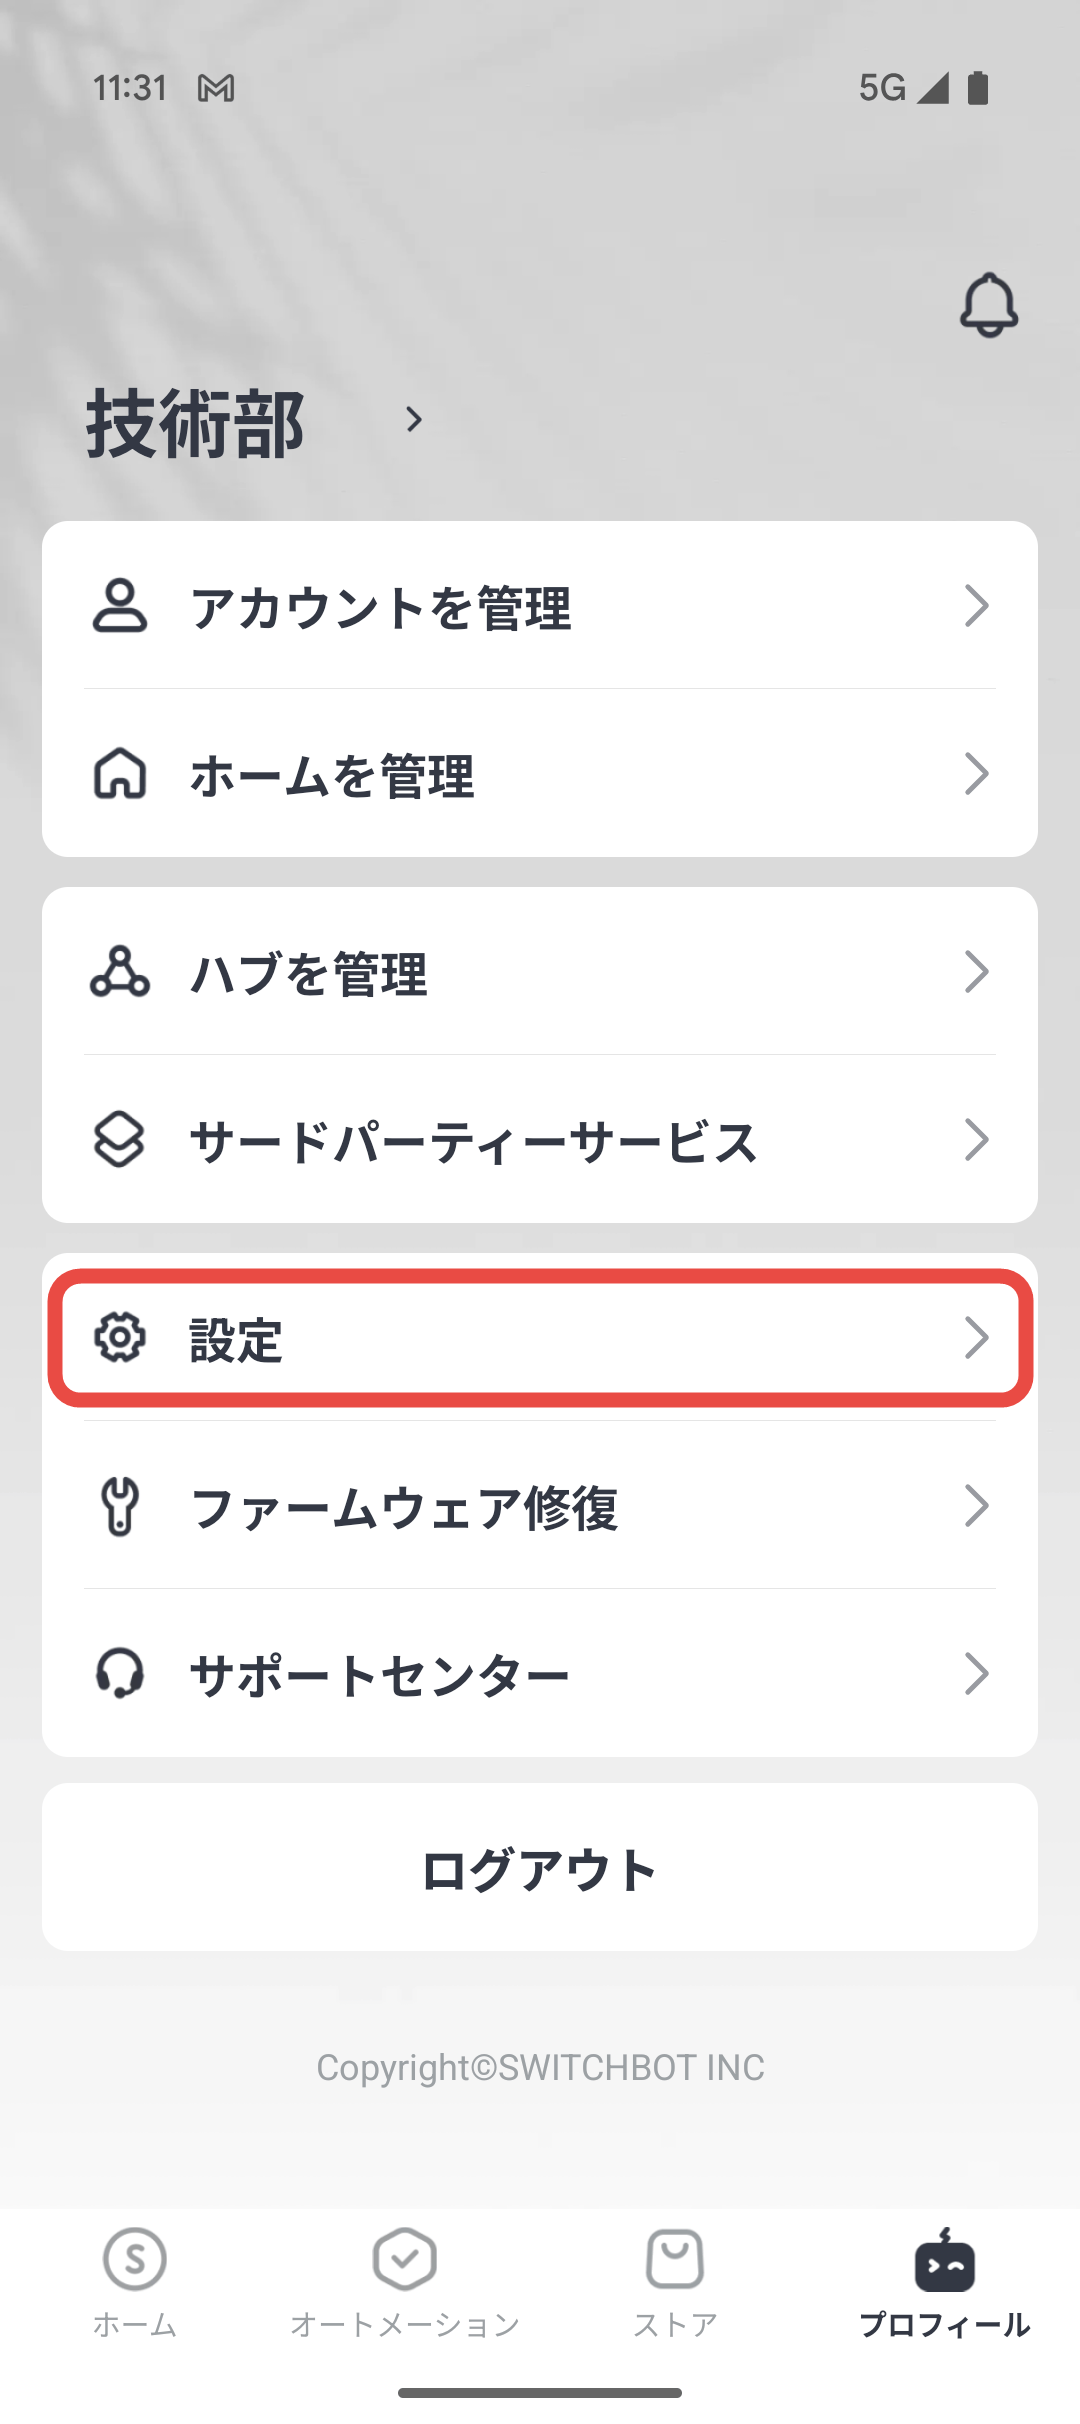
Tap 'Settings' from the menu that appears to open the settings screen.
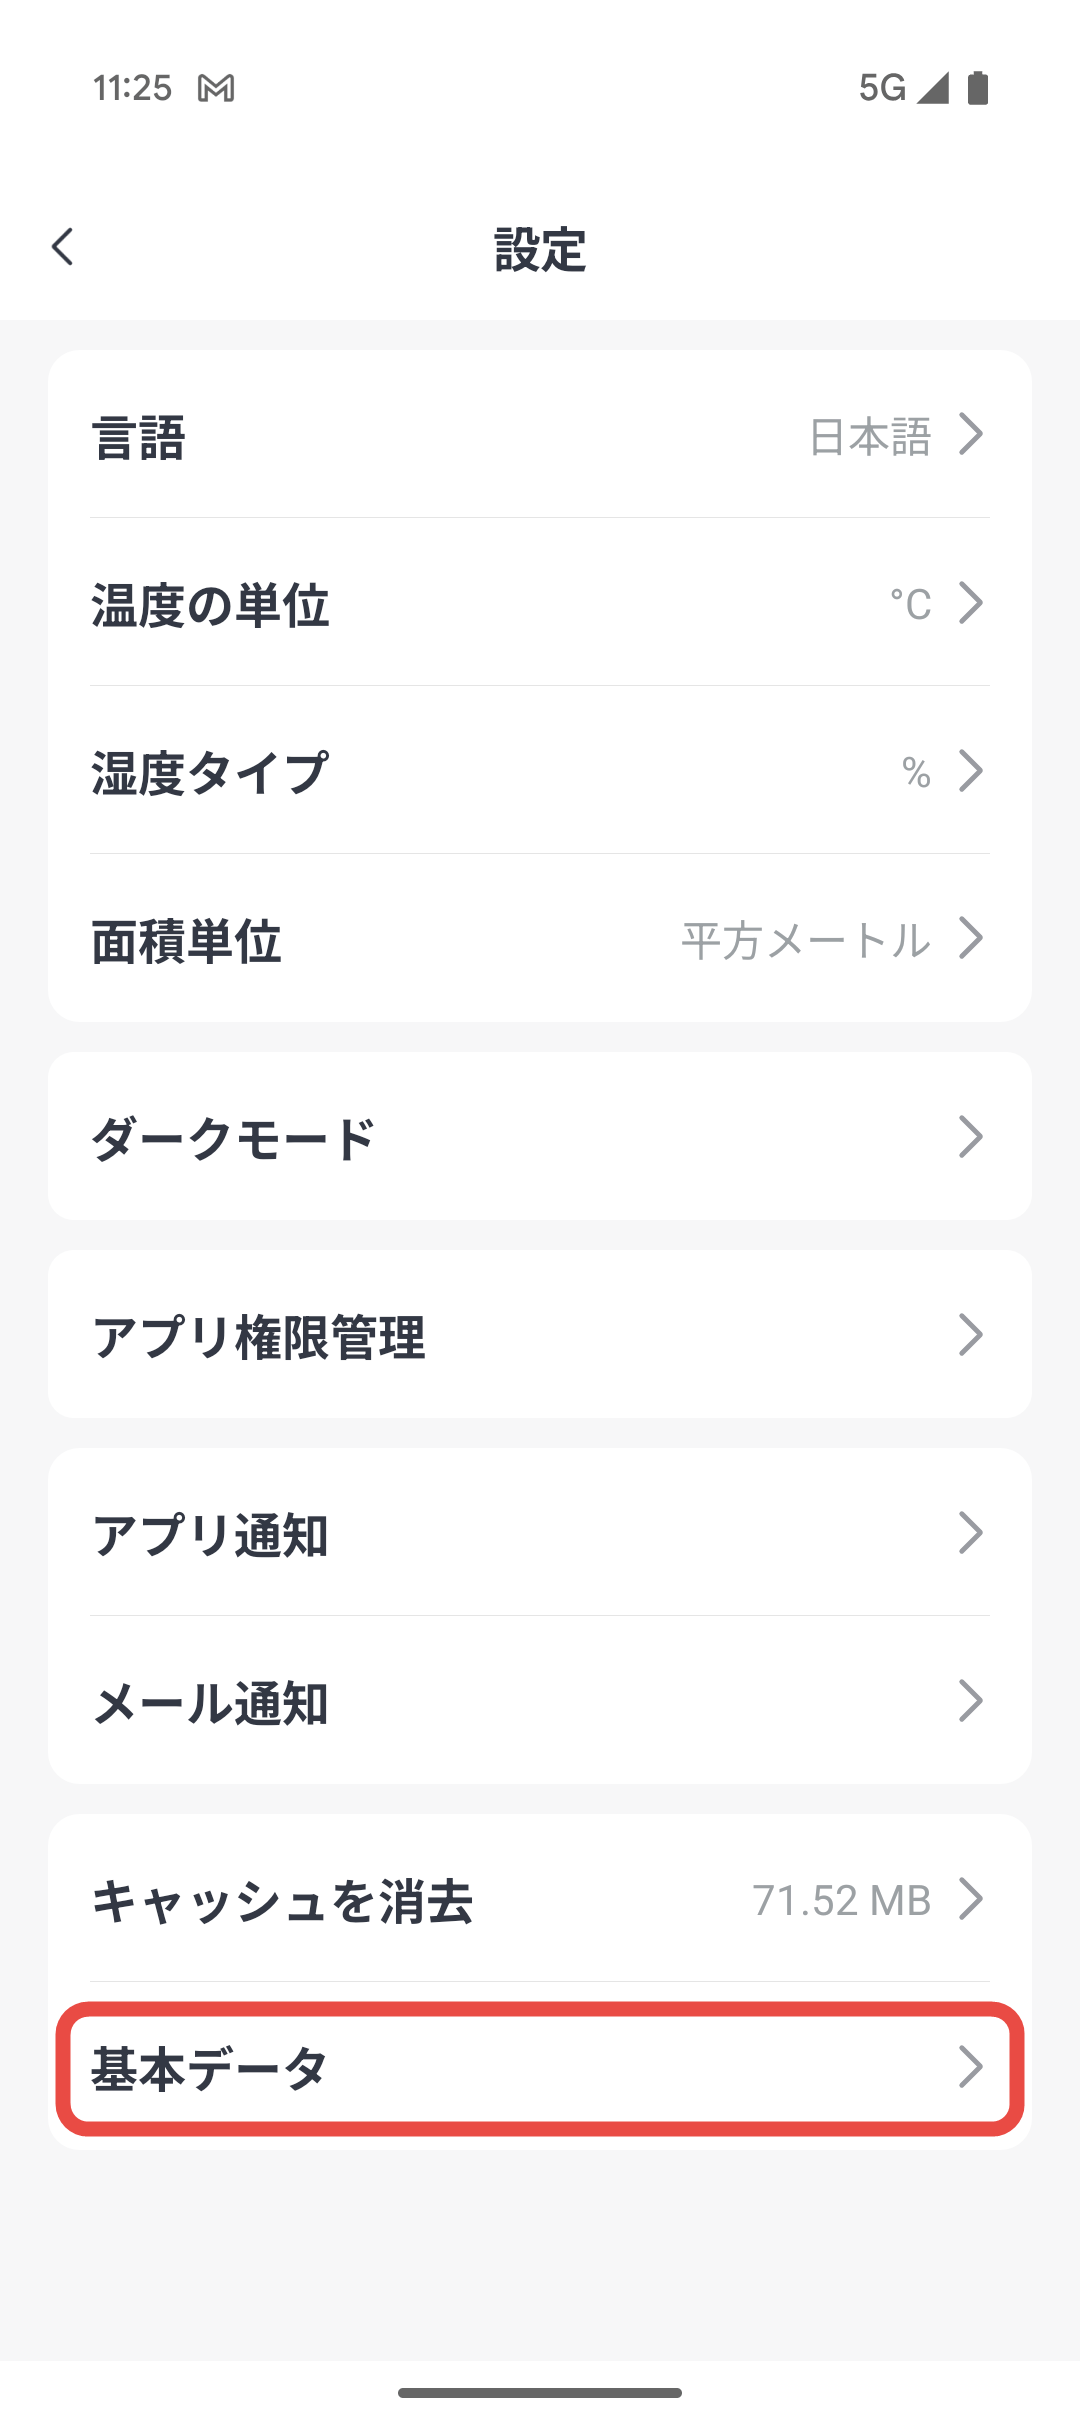
Tap 'Basic Info' at the bottom of the Settings screen.
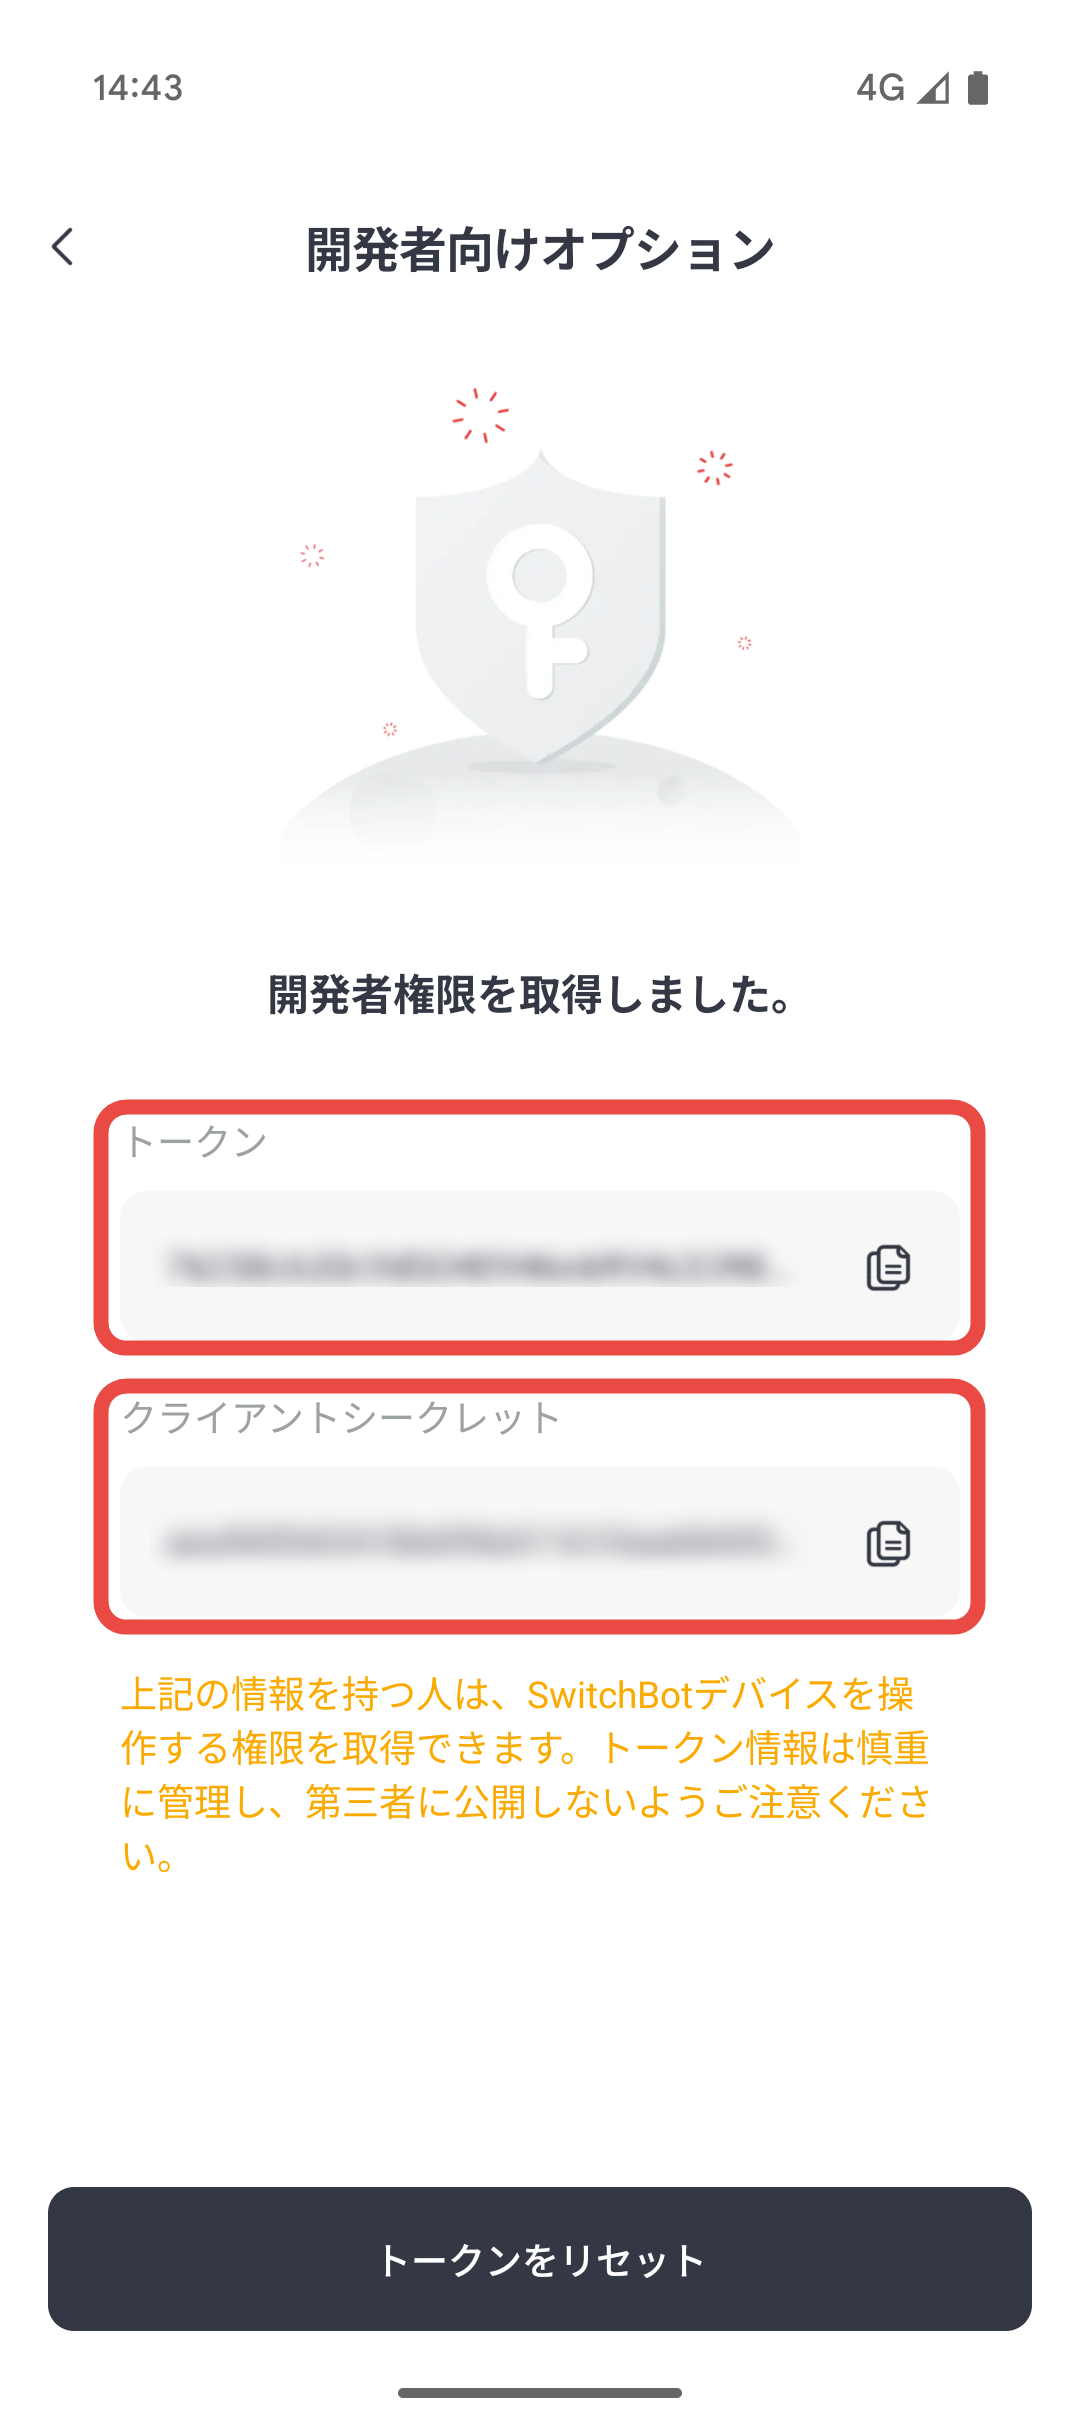
On the screen that opens, tap 'App Version' displayed just below the logo ten times in a row.

'Developer options' will appear, tap it.
Copy the 'Token' and 'Client Secret'.
◆5: Trial API call
Now that I have the 'token' and 'client secret', I will try calling the API. Looking at the API documentation , I see code examples in a variety of programming languages, but they all seem to be basically the same, so I will try writing one in PHP.
First, let's try retrieving a 'device list' as an example of the GET method.
<?php

 $token = 【トークン】;
 $secret = 【クライアントシークレット】;

 function guidv4() {
 $data = random_bytes(16);
 assert(strlen($data) === 16);
 $data[6] = chr(ord($data[6]) & 0x0f | 0x40);
 $data[8] = chr(ord($data[8]) & 0x3f | 0x80);
 return vsprintf('%s%s-%s-%s-%s-%s%s%s', str_split(bin2hex($data), 4));
 }

 $nonce = guidv4();
 $t = time() * 1000;
 $data = utf8_encode($token . $t . $nonce);
 $s = hash_hmac('sha256', $data, $secret, true);
 $sign = strtoupper(base64_encode($s));

 $url = 'https://api.switch-bot.com/v1.1/devices';
 $headers = array(
 'Content-Type:application/json',

'Authorization:' . $token,
 'sign:' . $sign,
 'nonce:' . $nonce,
 't:' . $t
 );

 $ch = curl_init($url);

 curl_setopt($ch, CURLOPT_URL, $url);
 curl_setopt($ch, CURLOPT_RETURNTRANSFER, true);
 curl_setopt($ch, CURLOPT_HTTPHEADER, $headers);

 $response = curl_exec($ch);
 curl_close($ch);

 echo $response;
The response was as follows:
{
 'statusCode': 100,
 'body': {
 'deviceList': [
 {
 'deviceId': 【ハブ3のデバイスID】,
 'deviceName': 'エアコンみまもりくん',
 'deviceType': 'Hub 3',
 'enableCloudService': true,
 'hubDeviceId': ''
 }
 ],
 'infraredRemoteList': [
 {
 'deviceId': 【エアコン1のデバイスID】,
 'deviceName': 'AC-①',
 'remoteType': 'Air Conditioner',
 'hubDeviceId': 【ハブ3のデバイスID】
 },
 {
 'deviceId': 【エアコン2のデバイスID】,
 'deviceName': 'AC-②',
 'remoteType': 'Air Conditioner',
 'hubDeviceId': 【ハブ3のデバイスID】
 }
 ]
 },
 'message': 'success'
 }
As another example of the POST method, let's look at 'registering a webhook.'
<?php

 $token = 【トークン】;
 $secret = 【クライアントシークレット】;

 function guidv4() {
 $data = random_bytes(16);
 assert(strlen($data) === 16);
 $data[6] = chr(ord($data[6]) & 0x0f | 0x40);
 $data[8] = chr(ord($data[8]) & 0x3f | 0x80);
 return vsprintf('%s%s-%s-%s-%s-%s%s%s', str_split(bin2hex($data), 4));
 }

 $nonce = guidv4();
 $t = time() * 1000;
 $data = utf8_encode($token . $t . $nonce);
 $s = hash_hmac('sha256', $data, $secret, true);
 $sign = strtoupper(base64_encode($s));

 $url = 'https://api.switch-bot.com/v1.1/webhook/setupWebhook';
 $webhook_url = '【webhookのURL】';
 $headers = array(
 'Content-Type:application/json',
 'Authorization:' . $token,
 'sign:' . $sign,
 'nonce:' . $nonce,
 't:' . $t
 );
 $params = array(
 'action' => 'setupWebhook',
 'url' => $webhook_url,
 'deviceList' => 'ALL'
 );
 $json_params = json_encode($params);

 $ch = curl_init($url);

 curl_setopt($ch, CURLOPT_URL, $url);
 curl_setopt($ch, CURLOPT_RETURNTRANSFER, true);
 curl_setopt($ch, CURLOPT_HTTPHEADER, $headers);

 curl_setopt($ch, CURLOPT_POST, TRUE);
 curl_setopt($ch, CURLOPT_POSTFIELDS, $json_params);

 $response = curl_exec($ch);
 curl_close($ch);

 echo $response;
The response was as follows:
{
 'statusCode': 100,
 'body': {},
 'message': 'success'
 }
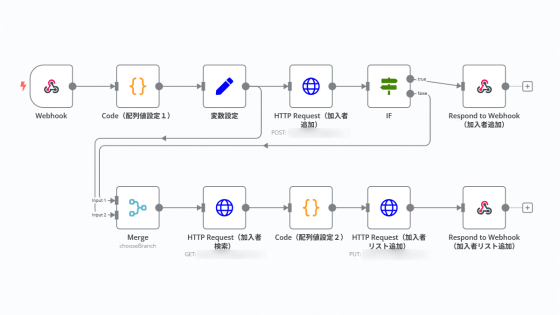
◆6: Collaboration with n8n
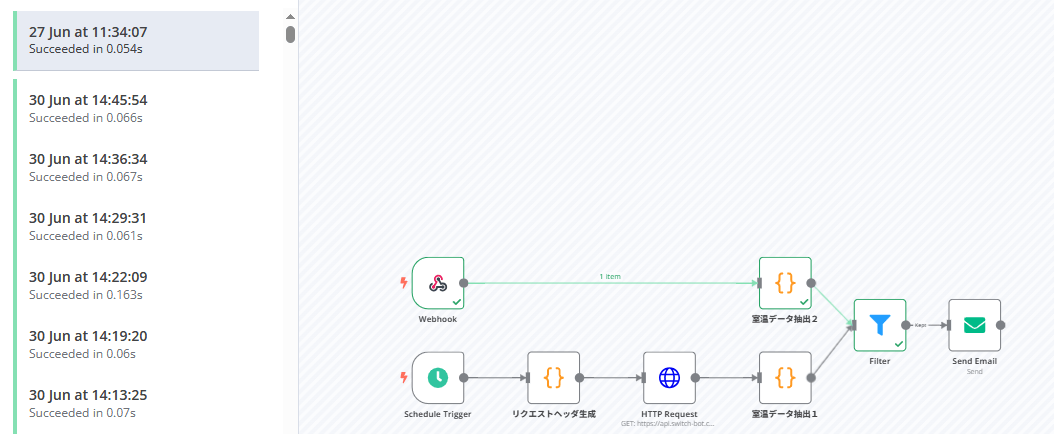
Now that we're ready, we'll finally create a workflow for n8n. We'll use a webhook as the trigger to start the workflow, but we'll also set up a trigger to call the API periodically in case the webhook doesn't work properly. The workflow will look like this:
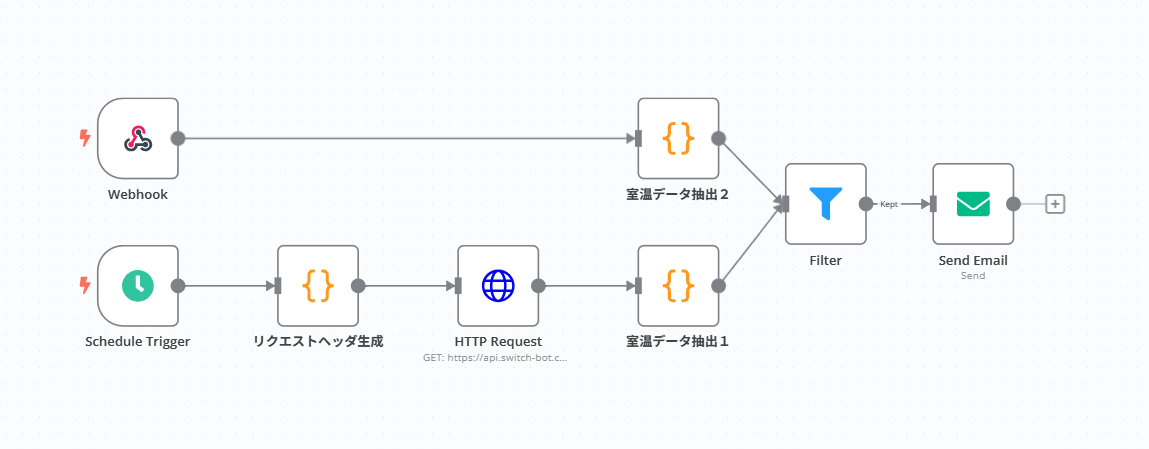
・Schedule execution
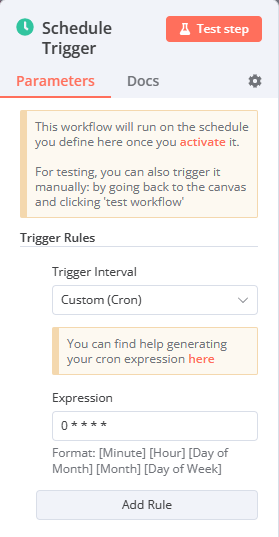
This will be triggered by the 'Schedule Trigger' node. By setting 'Trigger Interval' to 'Custom (Cron)', you will be able to flexibly change the schedule in the future.
When the trigger fires, generate a request header with authentication information. To do this, use the 'Code' node and use 'Python' as the default language, as some libraries are available.
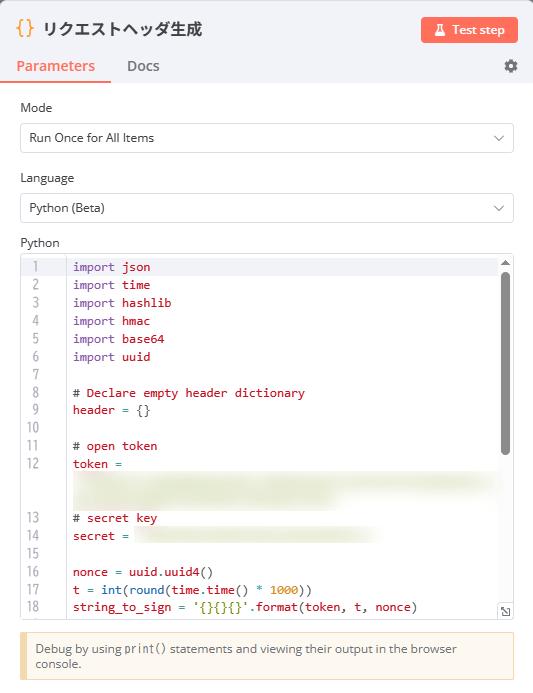
The code is almost exactly like
import json
 import time
 import hashlib
 import hmac
 import base64
 import uuid

 # Declare empty header dictionary
 header = {}

 # open token
 token = 【トークン】
 # secret key
 secret = 【クライアントシークレット】

 nonce = uuid.uuid4()
 t = int(round(time.time() * 1000))
 string_to_sign = '{}{}{}'.format(token, t, nonce)

 string_to_sign = bytes(string_to_sign, 'utf-8')
 secret = bytes(secret, 'utf-8')

 sign = base64.b64encode(hmac.new(secret, msg=string_to_sign, digestmod=hashlib.sha256).digest())

 header['Authorization'] = token
 header['Content-Type'] = 'application/json'
 header['charset'] = 'utf8'
 header['t'] = str(t)
 header['sign'] = str(sign, 'utf-8')
 header['nonce'] = str(nonce)

 return header
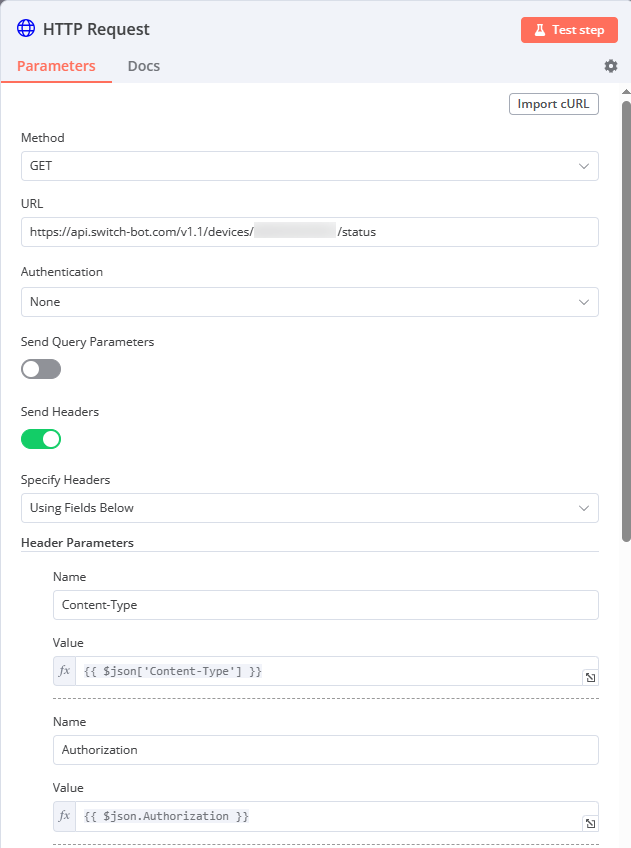
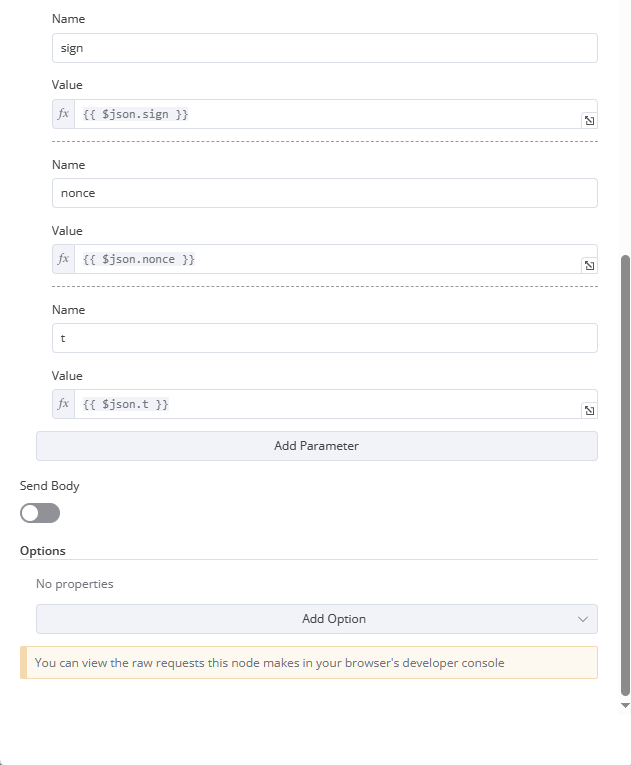
Then, call the API in the 'HTTP Request' node. For the request header, use the value generated in the 'Code' node.
The response data from the API looks like this. The room temperature data is body.temperature, which is 21.4°C.
[
 {
 'statusCode': 100,
 'body': {
 'version': 'V1.3-0.8-0.1',
 'temperature': 21.4,
 'lightLevel': 2,
 'humidity': 53,
 'moveDetected': false,
 'onlineStatus': 'online',
 'deviceId': 【ハブ3のデバイスID】,
 'deviceType': 'Hub 3',
 'hubDeviceId': 【ハブ3のデバイスID】
 },
 'message': 'success'
 }
 ]
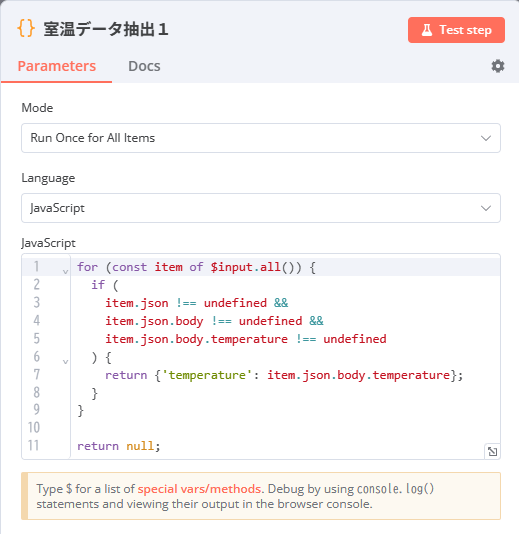
Finally, the response data is processed in the 'Code' node to extract only the required room temperature data. Since no libraries are used here, the language used is 'JavaScript'.
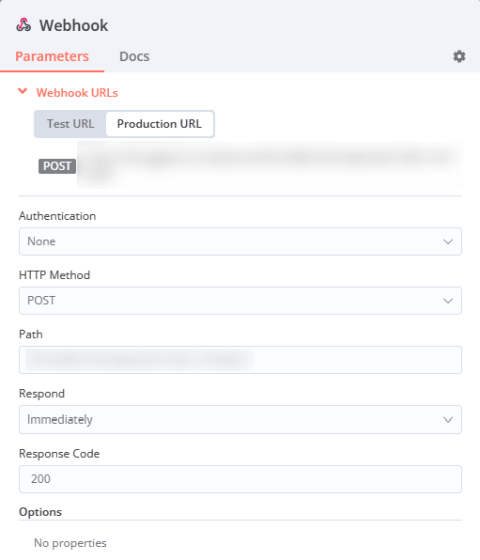
・Webhook
Webhooks are POST methods. They are registered using the 'Register webhook' API call we created earlier, but we couldn't find a way to register authentication information in the webhook settings, so we set 'Authentication' to 'None.' This is something we plan to improve in the future.
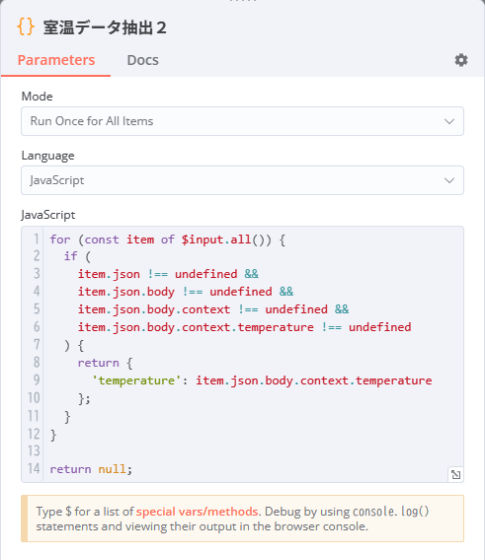
The data sent looks like this. The room temperature data is body.context.temperature, which is 22.8°C.
[
 {
 'headers': 【略】,
 'params': {},
 'query': {},
 'body': {
 'eventType': 'changeReport',
 'eventVersion': '1',
 'context': {
 'detectionState': 'NOT_DETECTED',
 'deviceMac': 【ハブ3のデバイスID】,
 'deviceType': 'Hub 3',

'humidity': 53,
 'lightLevel': 2,
 'scale': 'CELSIUS',
 'temperature': 22.8,
 'timeOfSample': 1750991646754
 }
 }
 }
 ]
This data is then processed by the 'Code' node in the same way as for a schedule run, to extract only the required room temperature data.
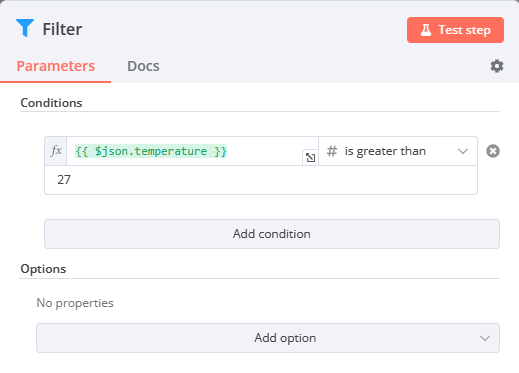
・Common (Notification)
The data obtained from the two flows has been processed in the 'Code' node to make the format consistent, so from this point on, the processing will be common. First, the 'Filter' node only keeps data where the room temperature is above 27°C. This prevents notification processing from being performed if the room temperature is normal.
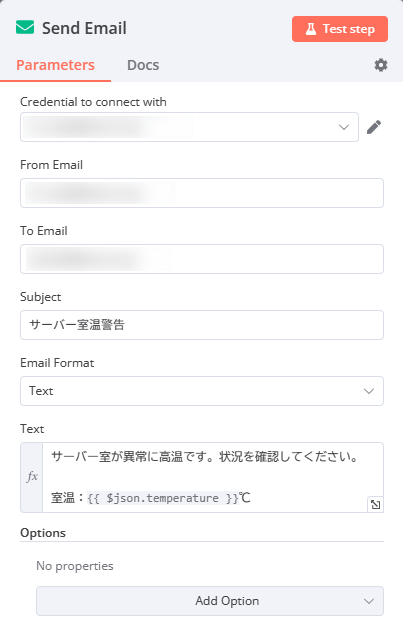
Finally, for notification processing, we will use the 'Send Email' node to send email.
◆7: Summary
When I activated the completed workflow, I could see that the webhook was called at specific times, such as when data was updated, and that the flow stopped executing at the Filter node because the room temperature was normal.
In this way, we were able to reduce one potential risk in the server room. We will continue to do this and strive every day to provide a stable GIGAZINE service.
And we are currently broadcasting the state of the server room that supports GIGAZINE on YouTube Live. If you, dear readers, could donate even 1 yen here , the GIGAZINE server will continue to run at a tremendous pace! You can also find an Amazon wish list to support GIGAZINE here .
Test distribution of the server supporting GIGAZINE Part 3 - YouTube
So, we hope you will continue to support GIGAZINE.
Related Posts:


in Web Service, Review, Posted by log1c_sh