Summary of how to connect a PCIe expansion card to Raspberry Pi 5 & detailed explanation of kernel compilation steps
'
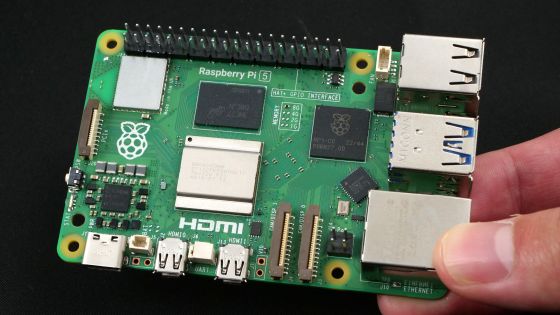
Raspberry Pi 5 – Raspberry Pi
https://www.raspberrypi.com/products/raspberry-pi-5/
Raspberry Pi Documentation - The Linux kernel
https://www.raspberrypi.com/documentation/computers/linux_kernel.html
Home | Raspberry Pi PCIe Database
https://pipci.jeffgeerling.com/
Raspberry Pi 5 is the first in the Raspberry Pi series to support PCIe connectivity, making it possible to recognize M.2 SSDs. The steps to connect an M.2 SSD to Raspberry Pi 5 via the PCIe to M.2 conversion board 'X1000' and set it as a startup disk are summarized in detail in the article below. This time, we will check the steps to make Raspberry Pi 5 recognize PCIe expansion cards such as USB slot expansion cards and wired LAN port expansion cards.
I summarized how to connect an M.2 SSD to Raspberry Pi 5 and set it as a startup disk, and also examined compatible SSDs and differences in transfer speeds for each SSD - GIGAZINE
·table of contents
◆1: Preface about technical aptitude
◆2: Riser card for connecting PCIe expansion card
◆3: Steps to connect an expansion card
◆3-a: Patterns that can be easily recognized
◆3-b: Patterns that can be recognized by kernel compilation
◆3-c: Pattern of connecting a recognizable card and then replacing it with another card
◆1: Preface about technical aptitude
The Raspberry Pi 5 used this time was sent directly to the GIGAZINE editorial department from the Raspberry Pi Foundation and has not received technical standards compliance certification. Therefore, we have submitted a notification for the ` `special system for experiments, etc. using equipment that has not obtained technical compliance .'' In addition, Raspberry Pi 5 is scheduled to be released in Japan after the technical compliance application by the distributor.

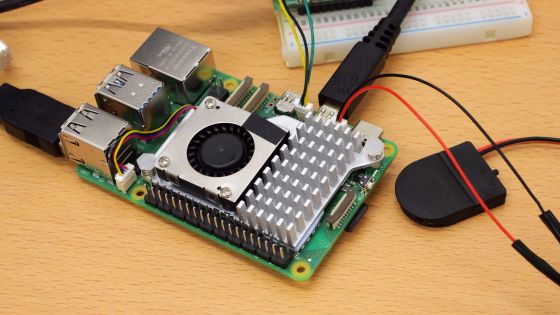
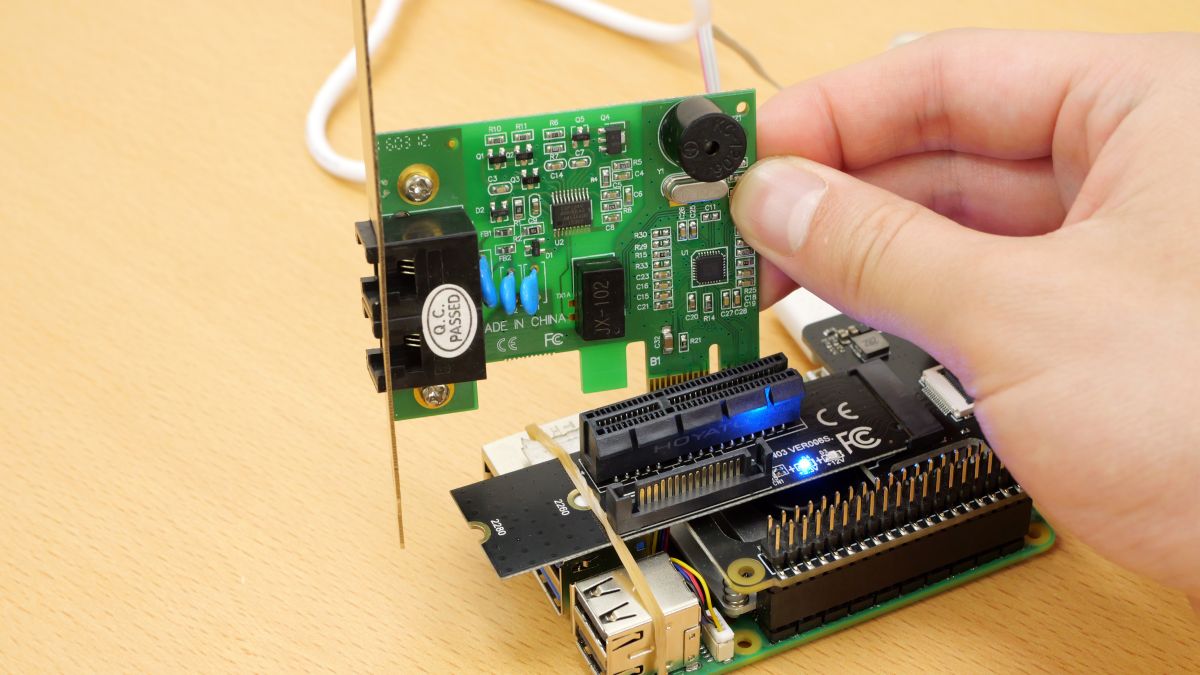
◆2: Riser card for connecting PCIe expansion card
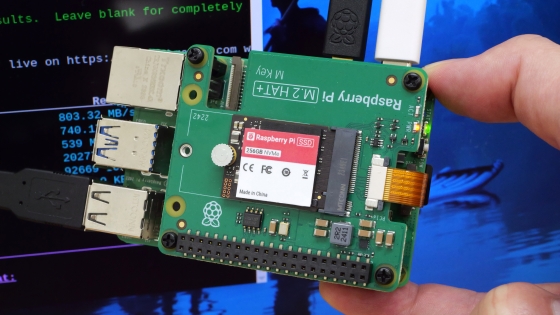
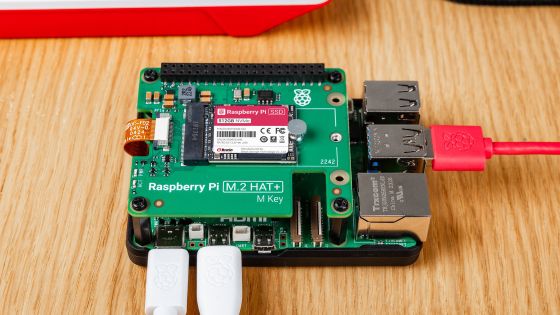
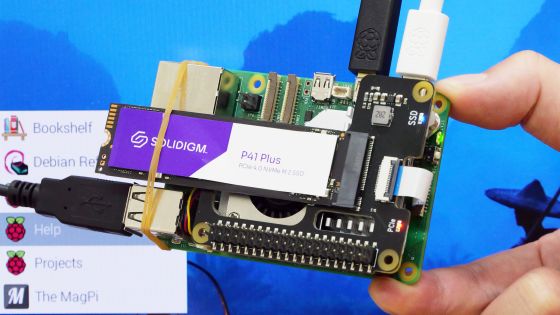
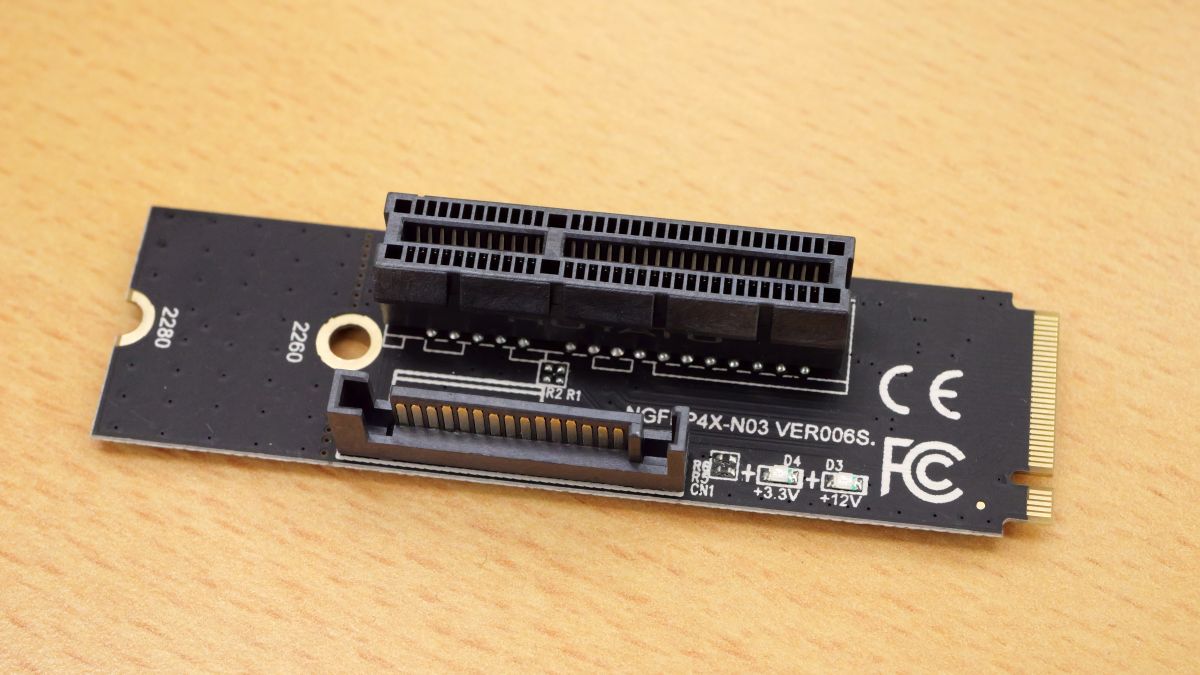
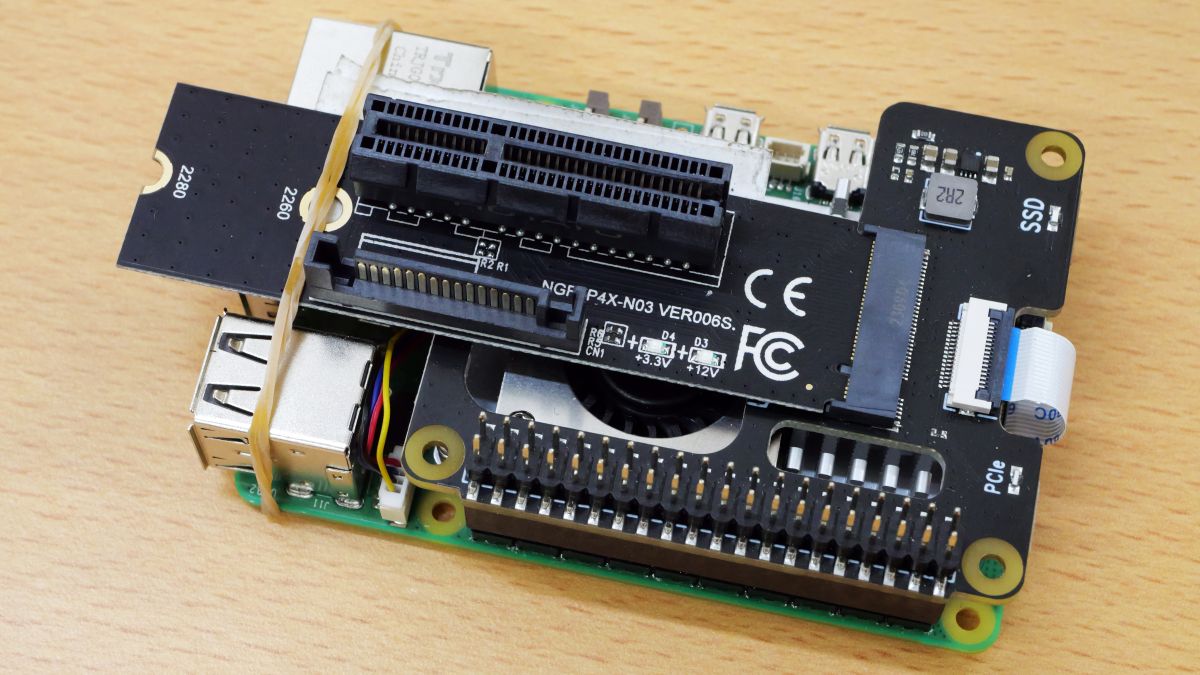
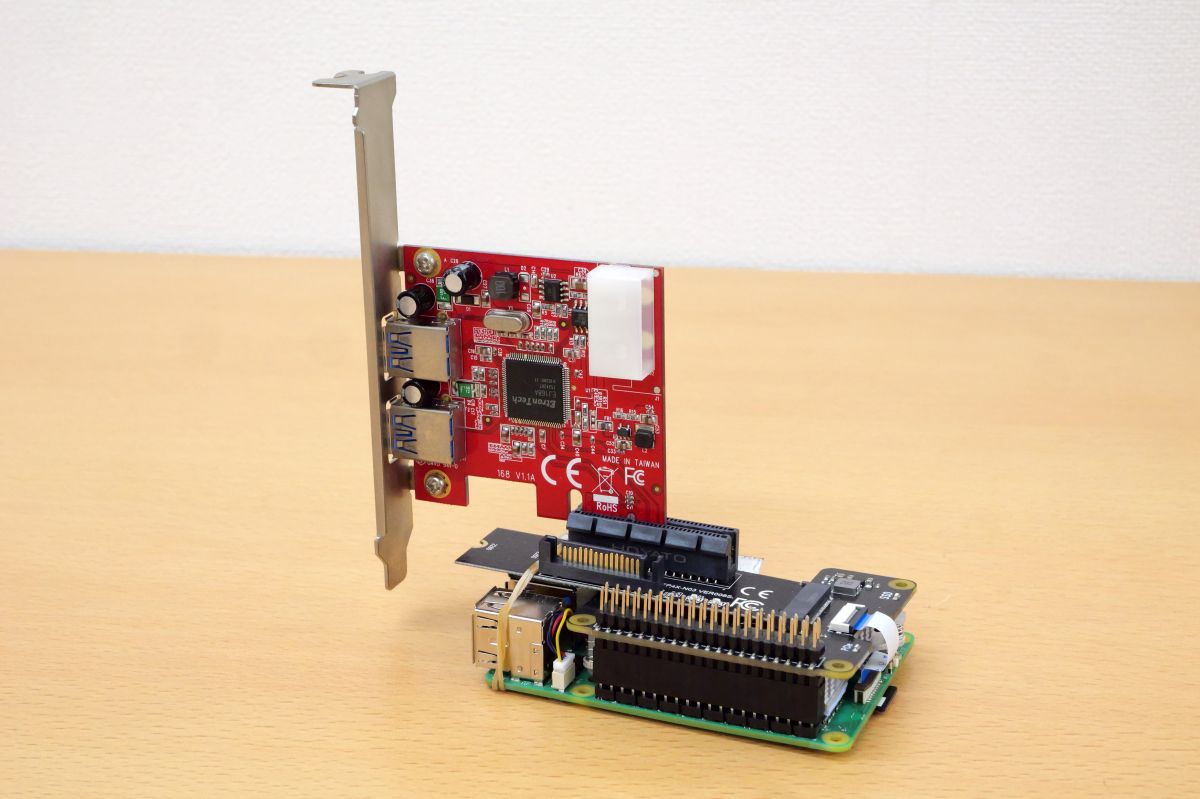
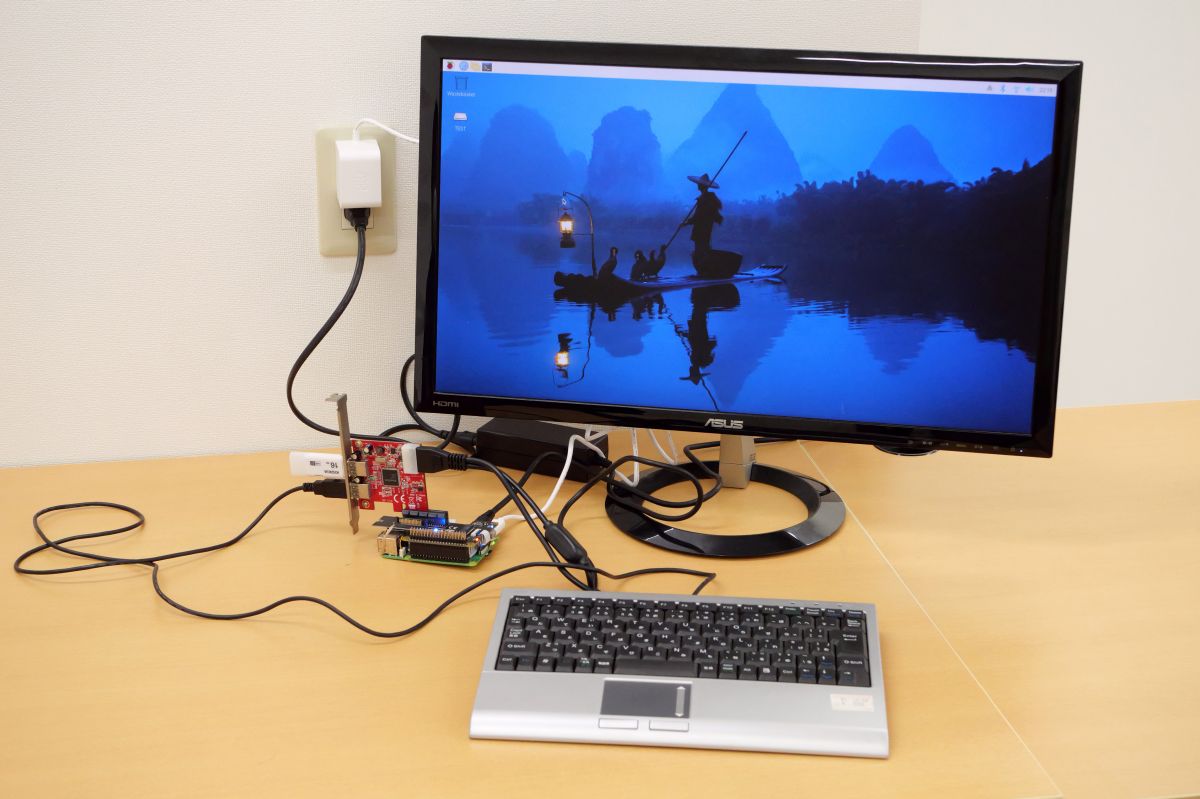
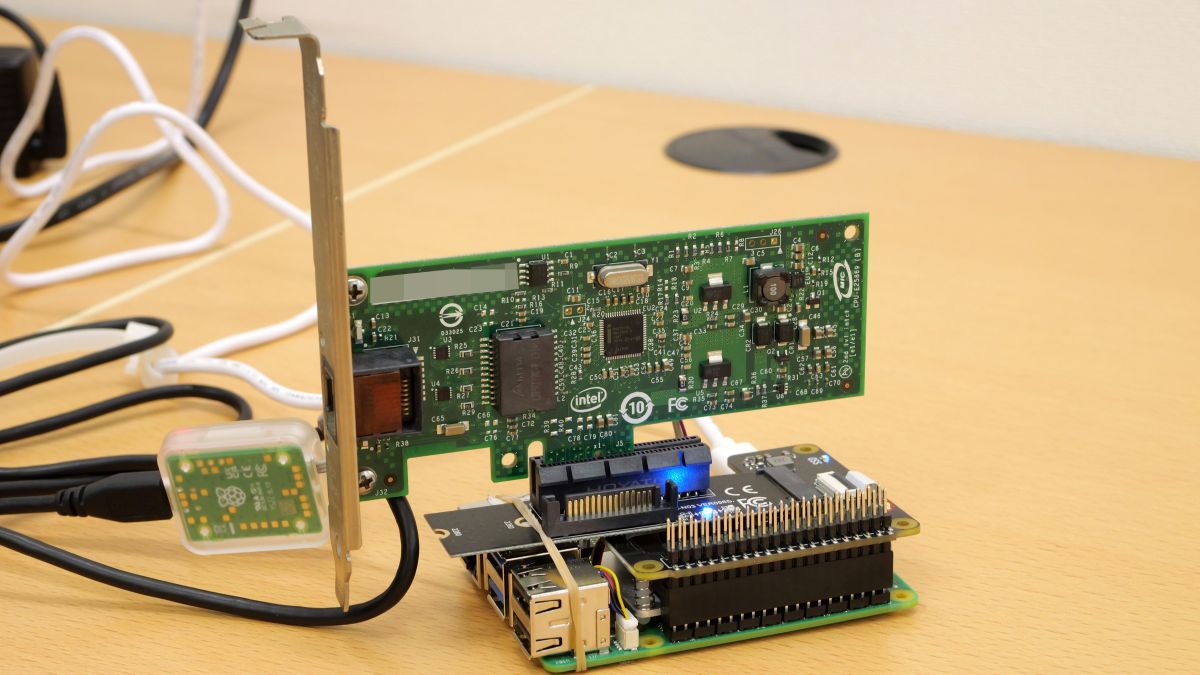
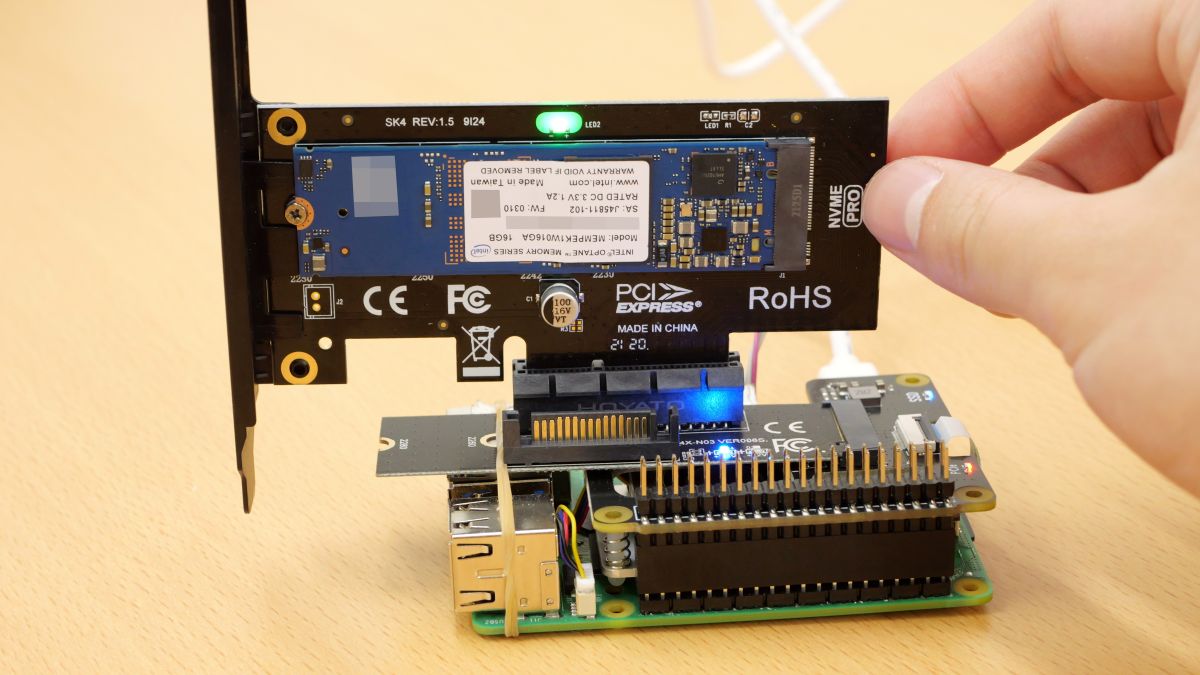
This time, we will connect the PCIe to M.2 conversion board 'X1000' to Raspberry Pi 5, connect the riser card 'NGFFP4X-N03' to X1000, and install the PCIe expansion card to NGFFP4X-N03.
The appearance of NGFFP4X-N03 is like this.
The one I purchased had the end of the slot closed, so I scraped off the plastic at the end.
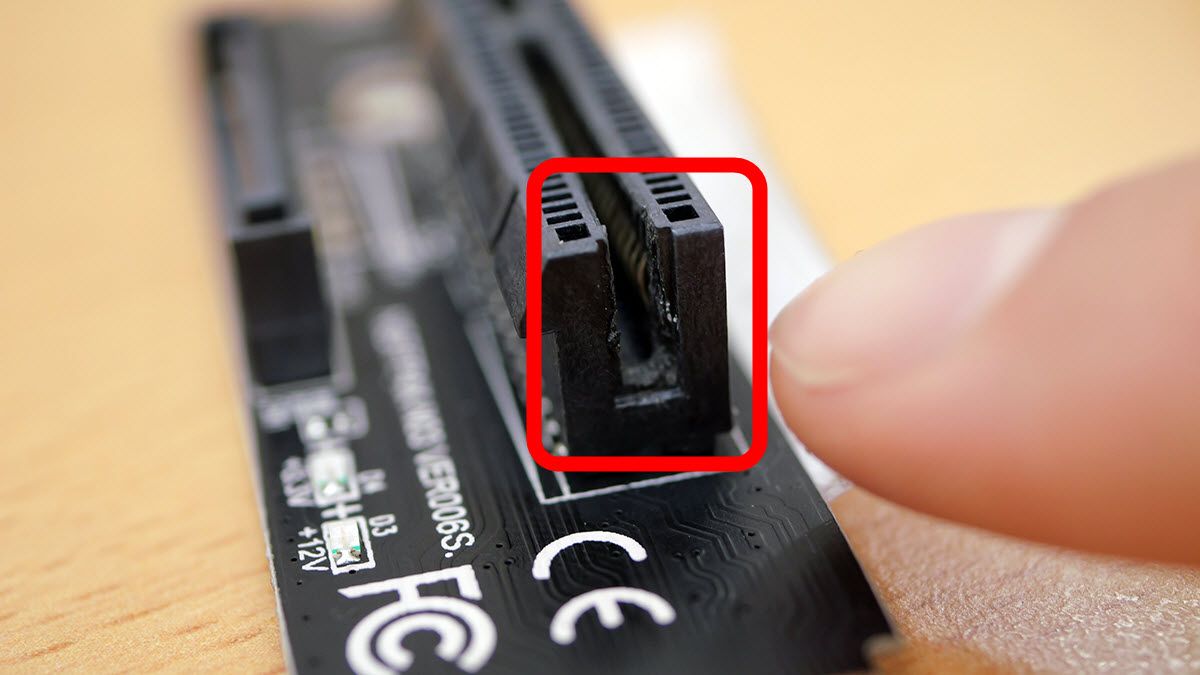
Additionally, tape is pasted on the back to insulate it.
Attach X1000 to Raspberry Pi 5.
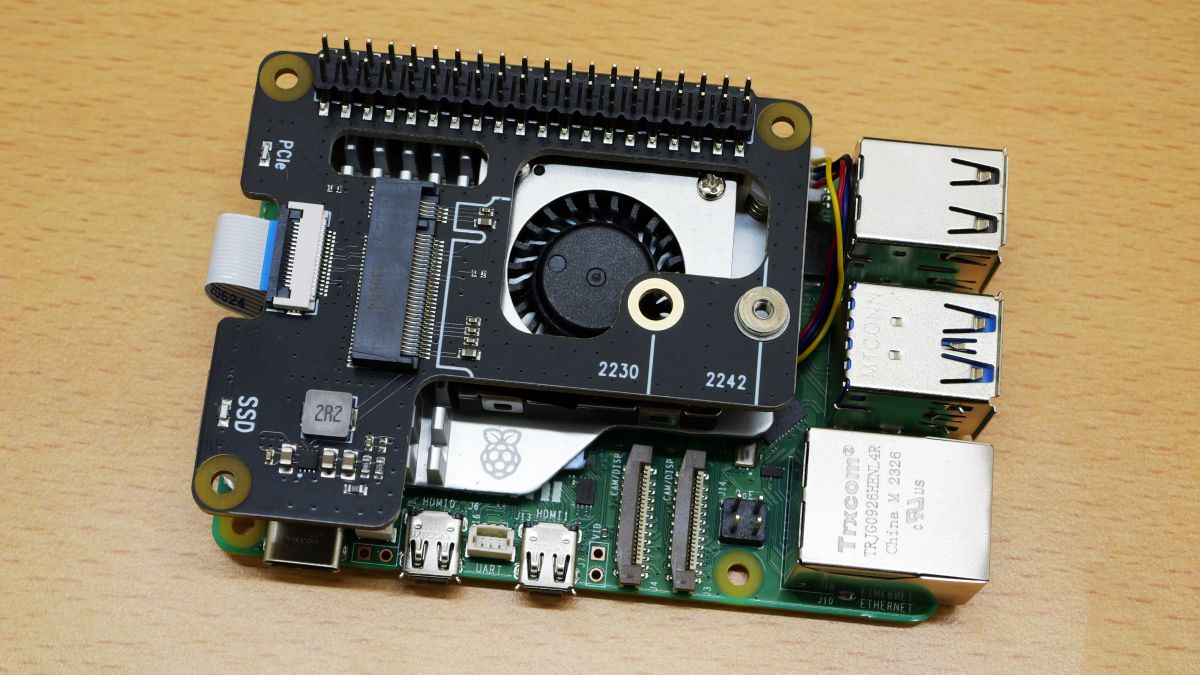
Furthermore, NGFFP4X-N03 is installed in the M.2 slot of X1000. You are now ready to install the expansion card.
◆3: Steps to connect an expansion card
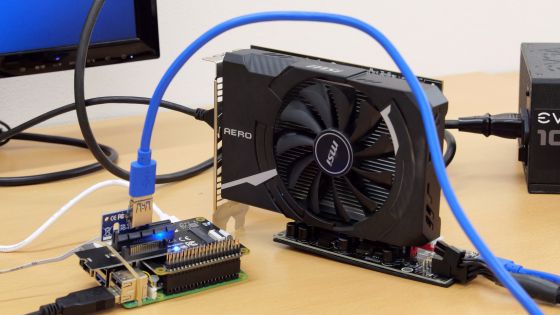
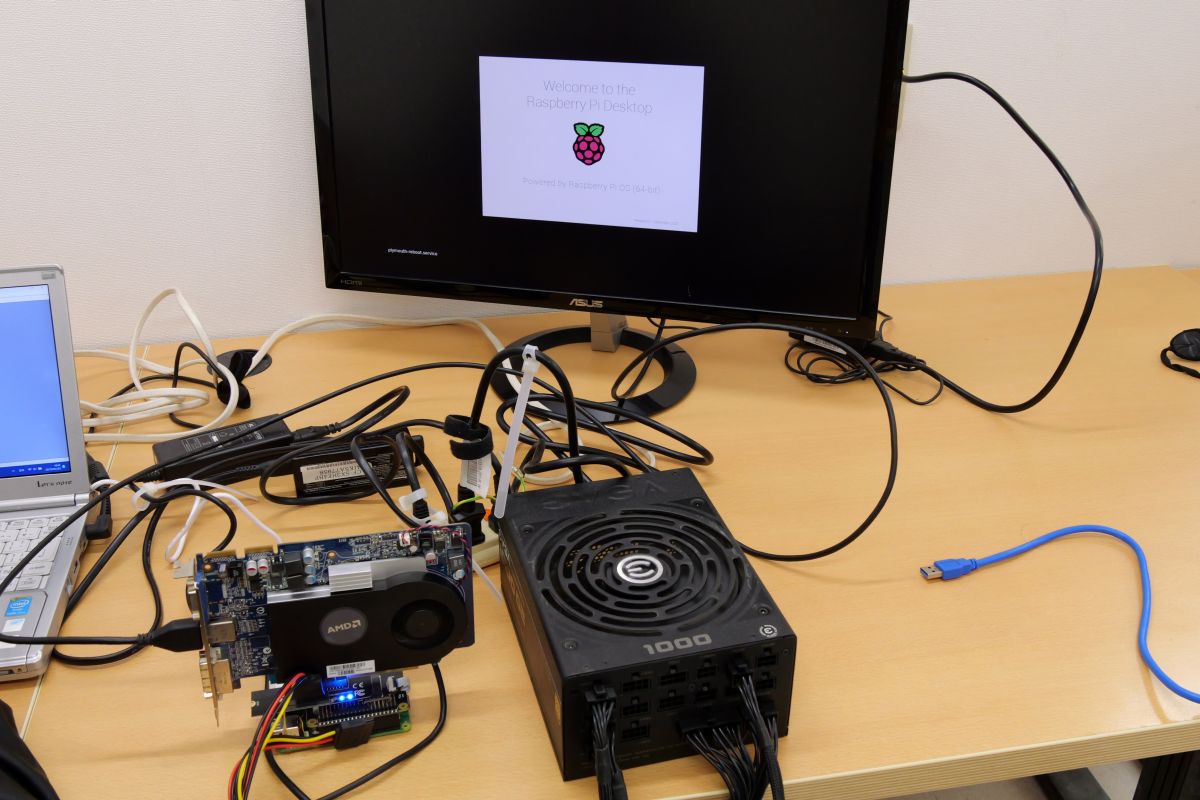
Since I don't know what kind of expansion cards Raspberry Pi 5 is compatible with, I prepared a wide variety of expansion cards such as graphic boards, USB port expansion cards, and wired LAN port expansion cards.
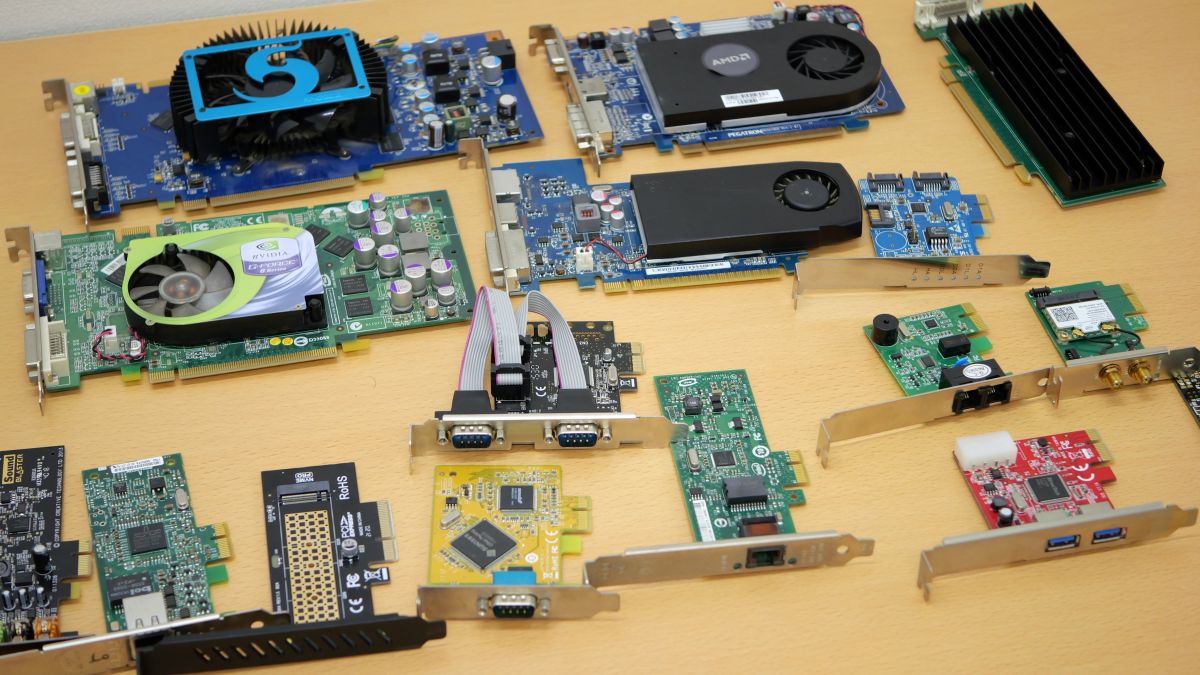
After trying various things, I was able to find three different procedures: ``Connect without any special settings,'' ``Enable the corresponding module and compile the kernel before connecting,'' and ``Recognize an expansion card that can be easily recognized, then replace it.'' , I have summarized each step.
◆3-a: Patterns that can be easily recognized
Depending on the type of expansion card, there are some that can be recognized without any special settings. For example, the following USB port expansion card equipped with the Etron Technology controller was recognized without any configuration.
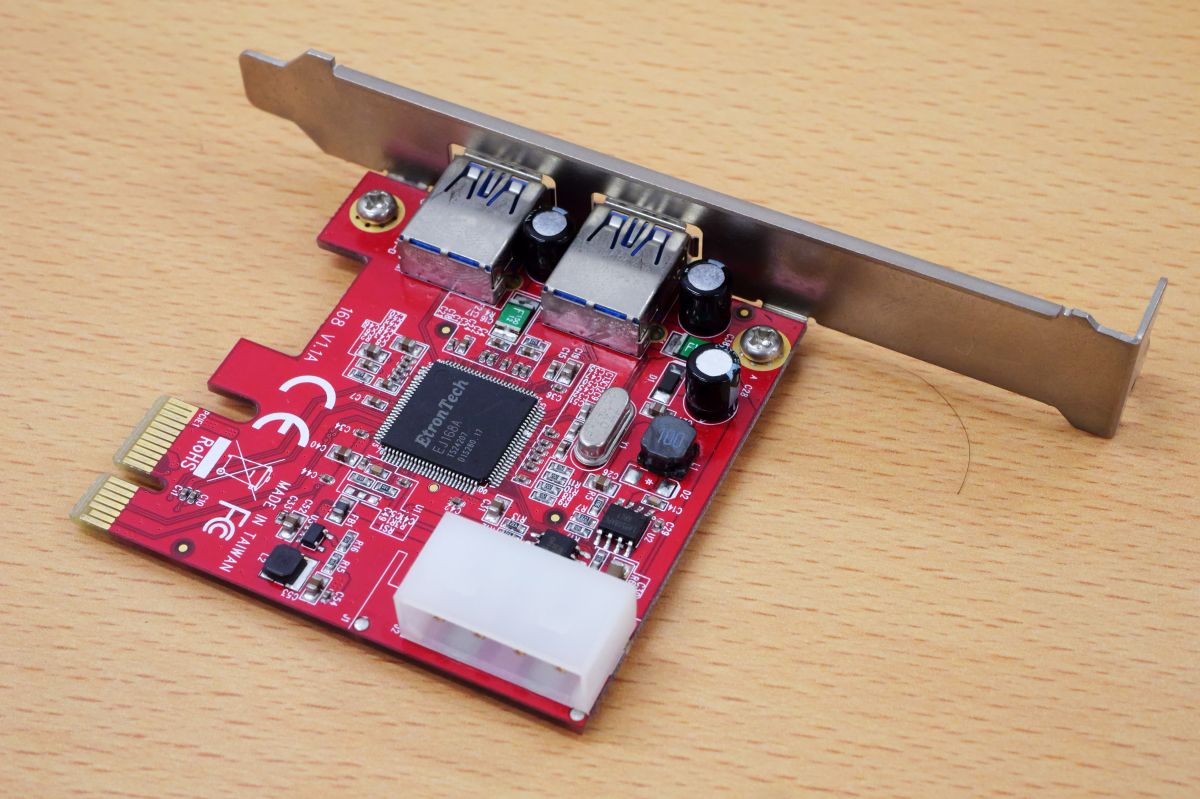
The steps to recognize it are as follows. First, connect the expansion card to NGFFP4X-N03.
Also prepare an auxiliary power supply for the expansion card.
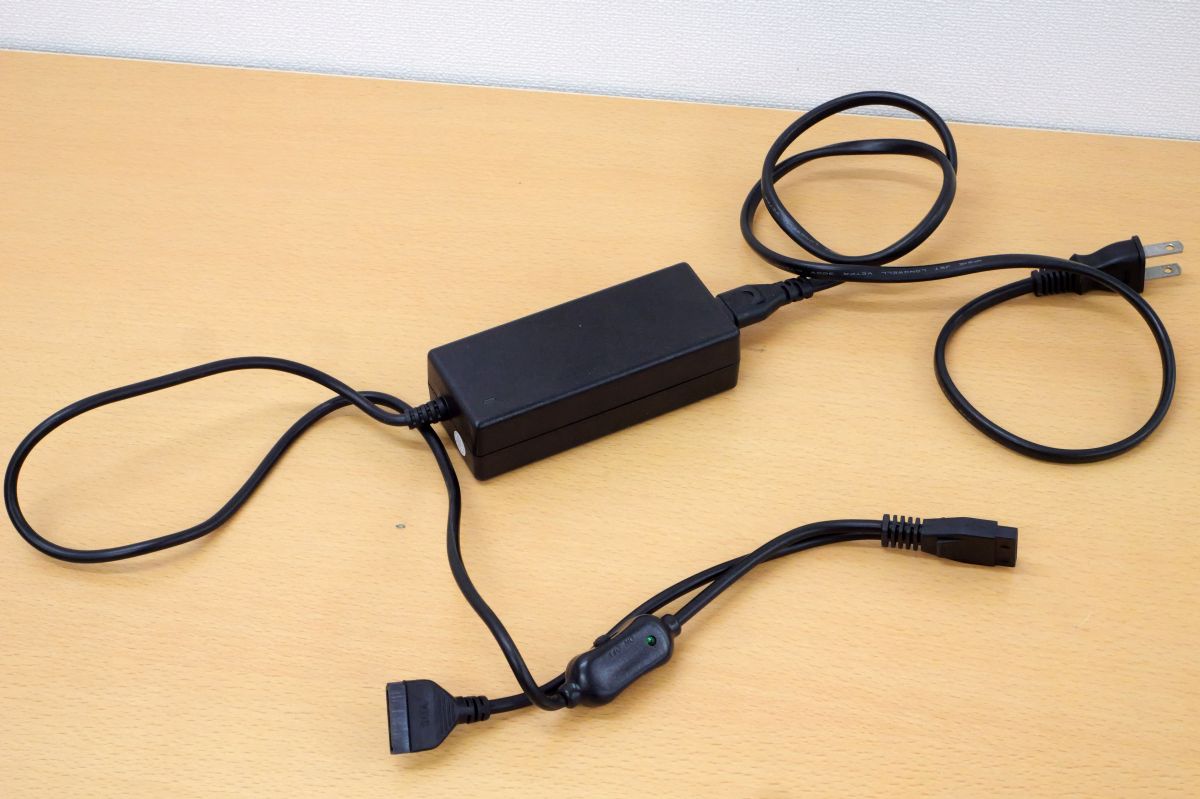
Connect auxiliary power supply.
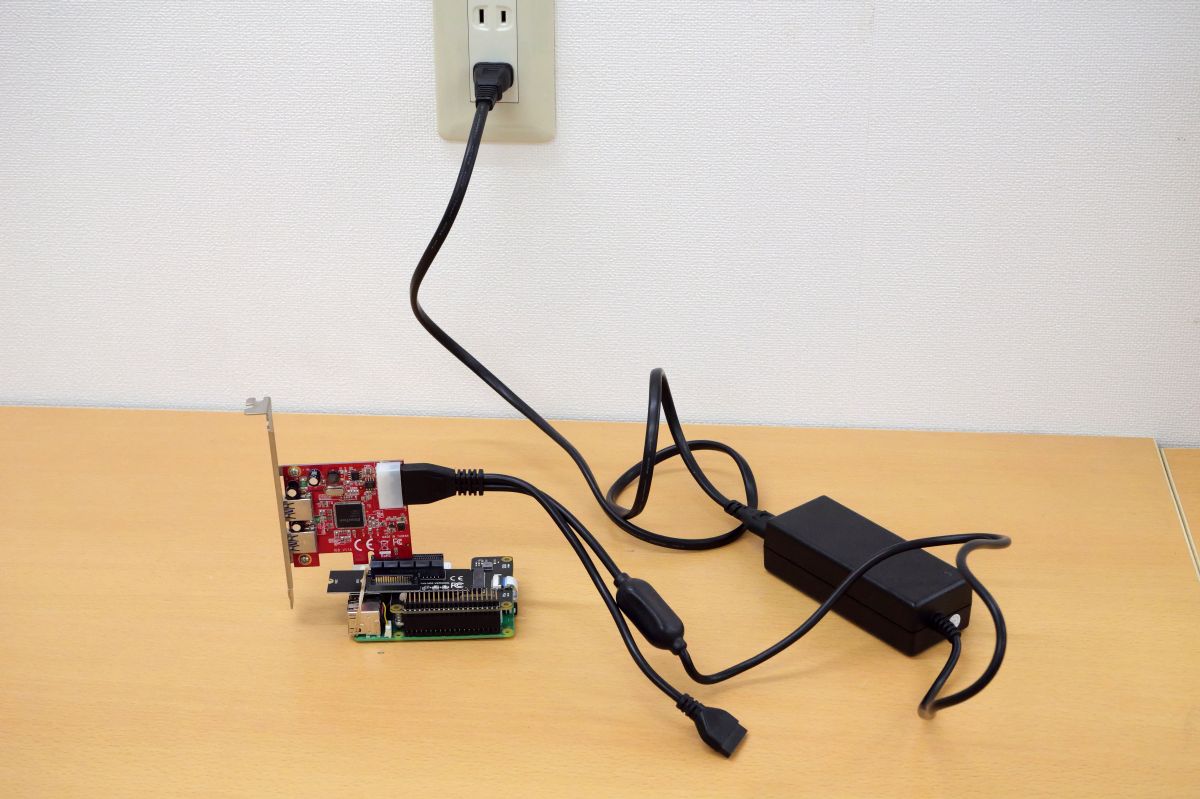
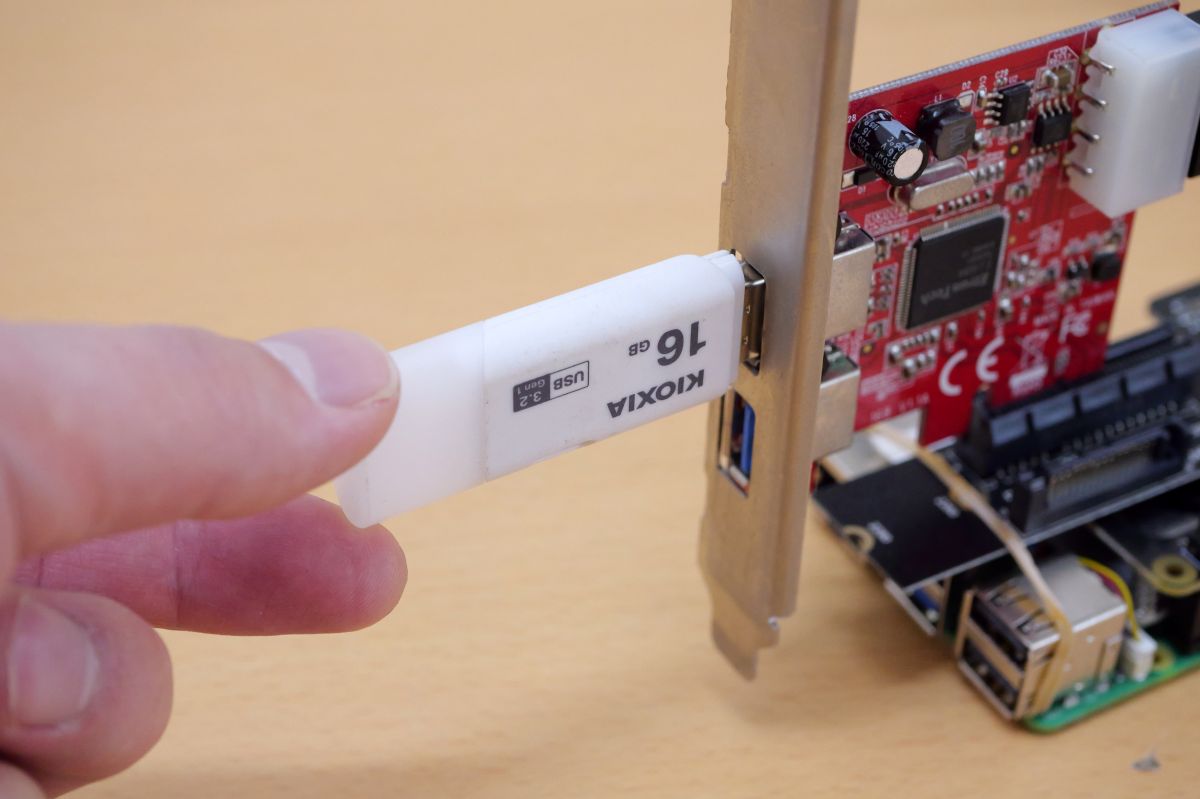
Connect your USB device.
Also connect peripherals such as displays.

Connect the power when you are ready.

The system boots without any problems.
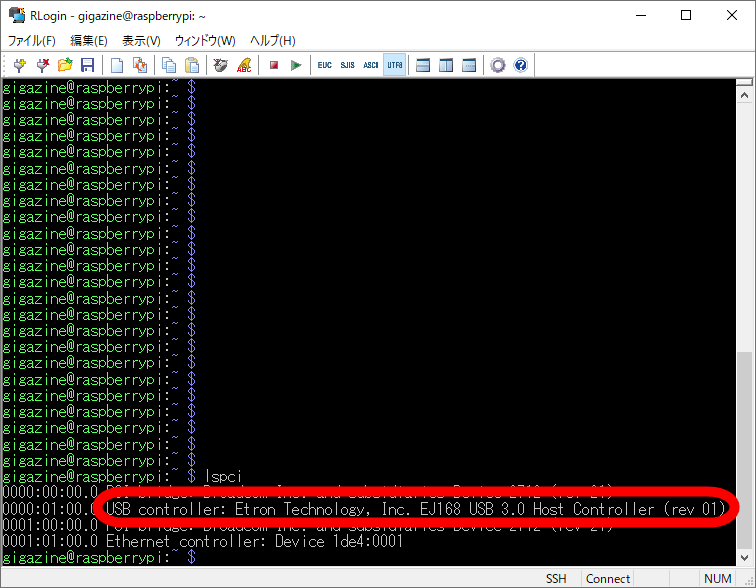
Execute the following command to check the connection status of the PCI device.
[code]lspci[/code]
The connected USB port expansion card was recognized.
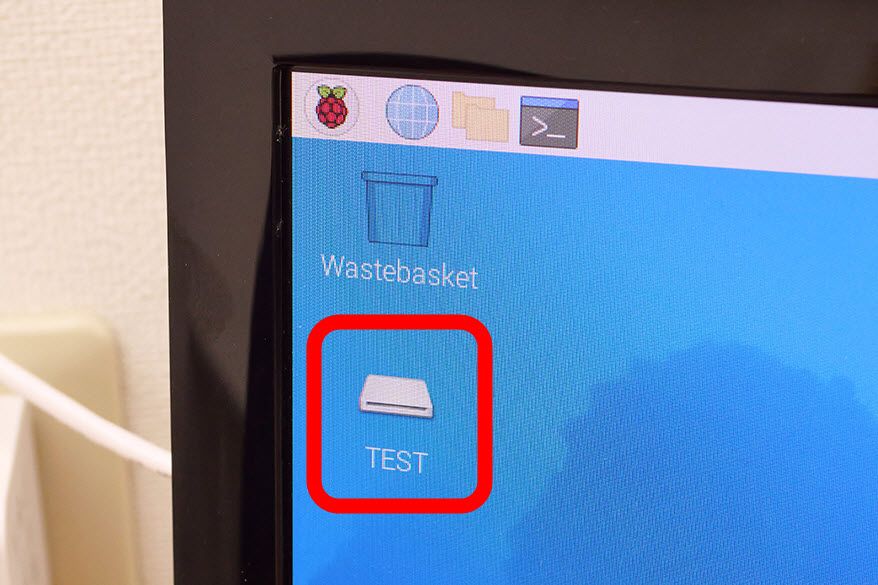
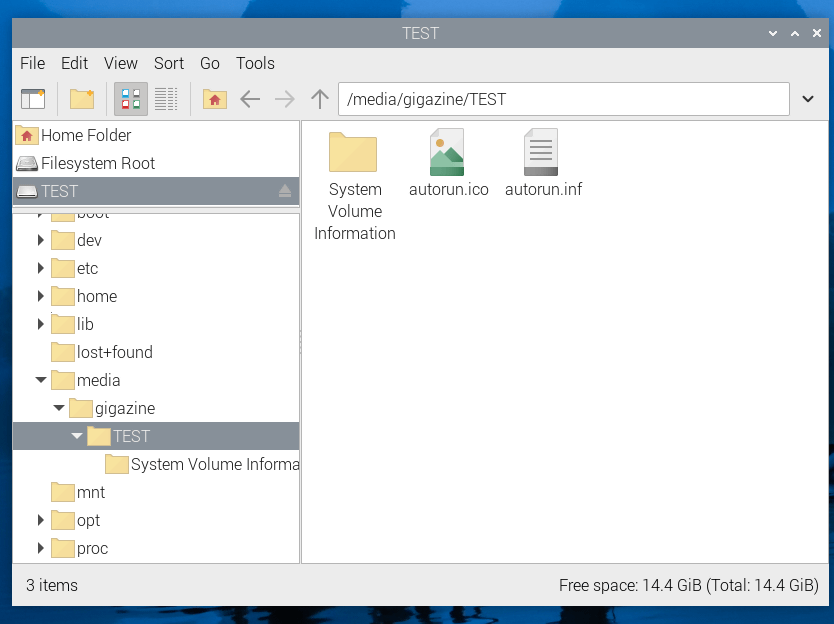
The USB memory connected to the USB port expansion card is also automatically mounted.
I was able to check the contents of the storage without any problems.
◆3-b: Patterns that can be recognized by kernel compilation
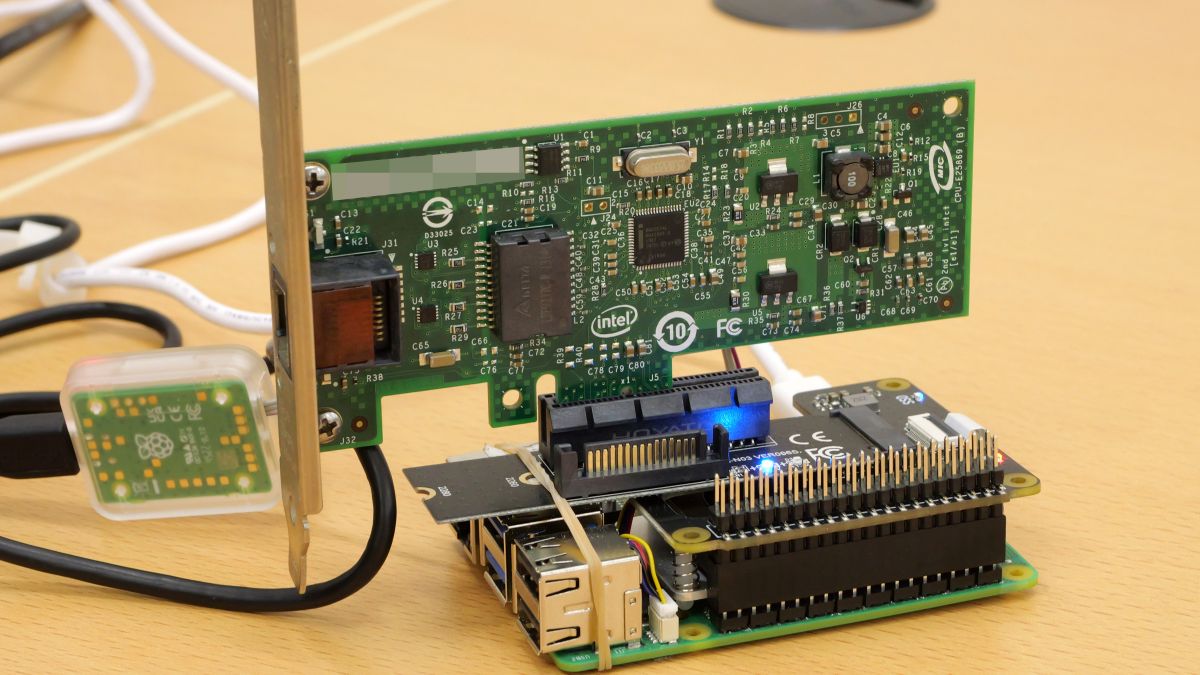
If the expansion card has a driver provided as a Linux kernel module, you may be able to make it recognized by compiling the kernel yourself. For example, the following Intel wired LAN port expansion card cannot be recognized by Raspberry Pi 5 in its standard state, but it can be recognized by enabling the Intel module and compiling the kernel.

The steps for kernel compilation are as follows. First, run the following command to install the required packages.
[code]sudo apt install git bc bison flex libssl-dev make libncurses5-dev[/code]
After installing the various packages, execute the following four commands in order.
[code]git clone --depth=1 https://github.com/raspberrypi/linux[/code]
[code]cd linux[/code]
[code]KERNEL=kernel_2712[/code]
[code]make bcm2712_defconfig[/code]
Next, run the following command to specify the enabled kernel module.
[code]make menuconfig[/code]
It is OK if a screen like this is displayed.
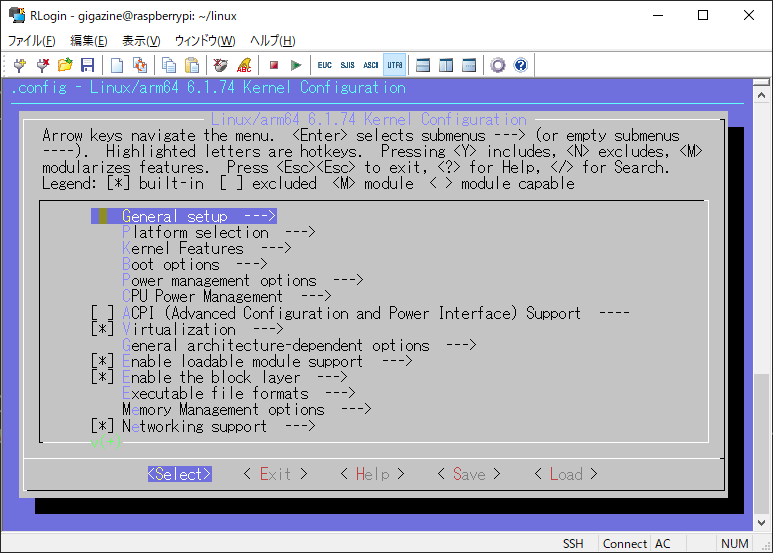
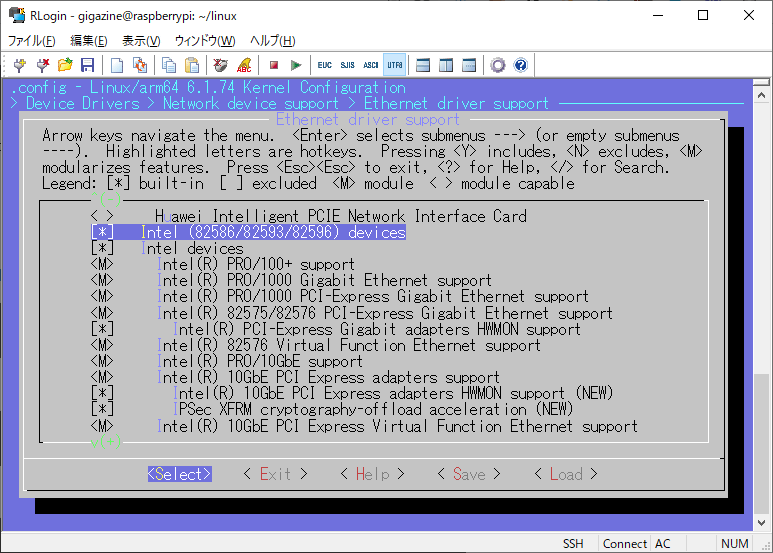
Find the kernel module you want to enable and enable it. This time, I enabled all Intel network-related modules just to be sure.
After enabling the module, edit '.config' in the current directory.
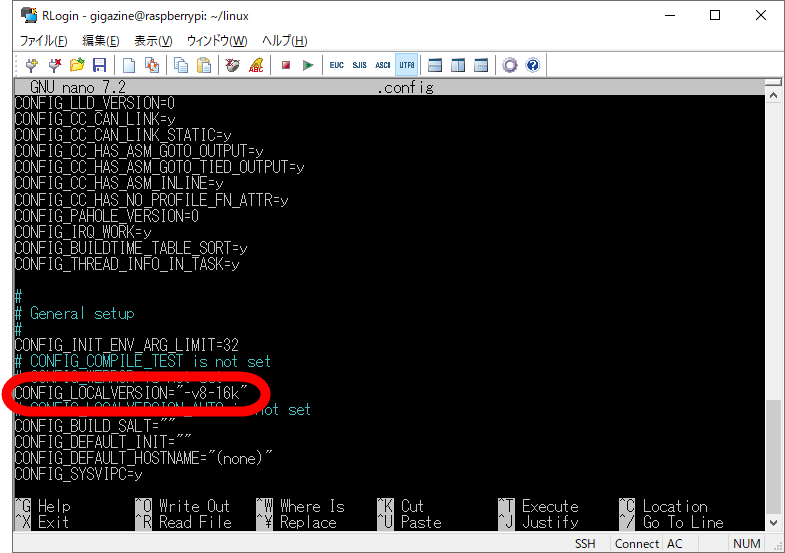
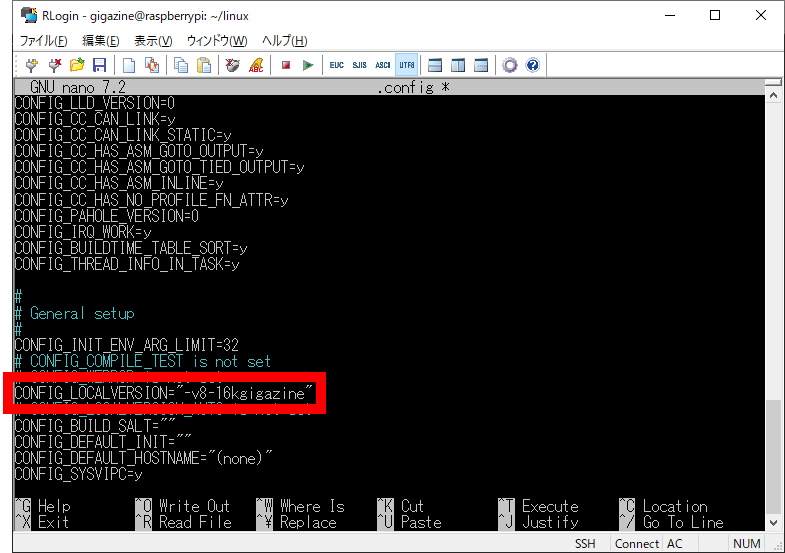
The edited part is the version name notation enclosed in the red frame below. If you don't edit this part, it will be indistinguishable from the existing kernel, so give it an arbitrary name. This time, it was written as 'CONFIG_LOCALVERSION='-v8-16k', so I changed it to 'CONFIG_LOCALVERSION='-v8-16kgigazine' and saved it.
After rewriting '.config', run the following command to compile the kernel.
[code]make -j4 Image.gz modules dtbs[/code]
Once the compilation is complete, run the following command to install the kernel module.
[code]sudo make modules_install[/code]
Next, run the following four commands to copy the necessary files.
[code]sudo cp arch/arm64/boot/dts/broadcom/*.dtb /boot/firmware/[/code]
[code]sudo cp arch/arm64/boot/dts/overlays/*.dtb* /boot/firmware/overlays/[/code]
[code]sudo cp arch/arm64/boot/dts/overlays/README /boot/firmware/overlays/[/code]
[code]sudo cp arch/arm64/boot/Image.gz /boot/firmware/$KERNEL.img[/code]
Reboot when the copy is complete.
[code]sudo reboot[/code]
Once rebooted, check the kernel version by running the following command:
[code]uname -a[/code]
This time it was displayed as follows. The fact that '-v8-16kgigazine' set in '.config' is included indicates that the compiled kernel installation was successful.

Shut down the system after kernel compilation and installation is complete.
[code]sudo shutdown -h now[/code]
After shutting down, install the wired LAN port expansion card and start up.
Once started, run the following command to check whether the wired LAN port expansion card is recognized.
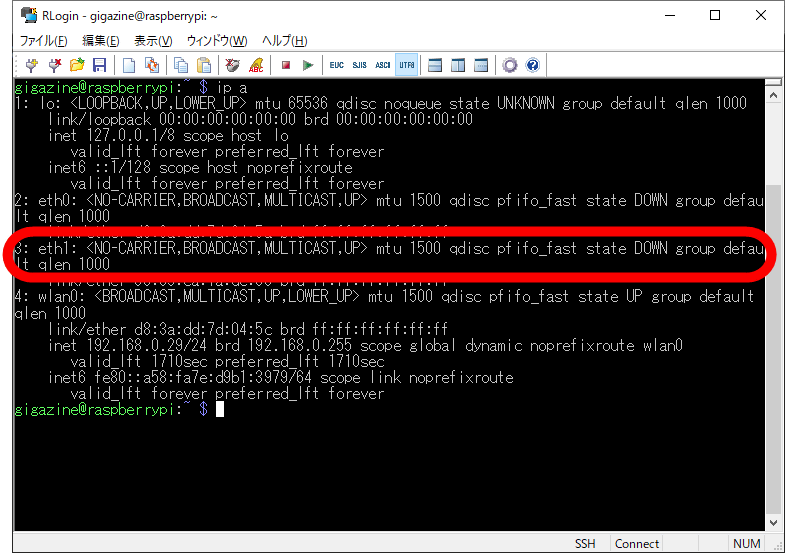
[code]ip a[/code]
The result looks like this. The newly added interface 'eth1' is displayed below the wired LAN interface 'eth0' that comes standard with Raspberry Pi 5.
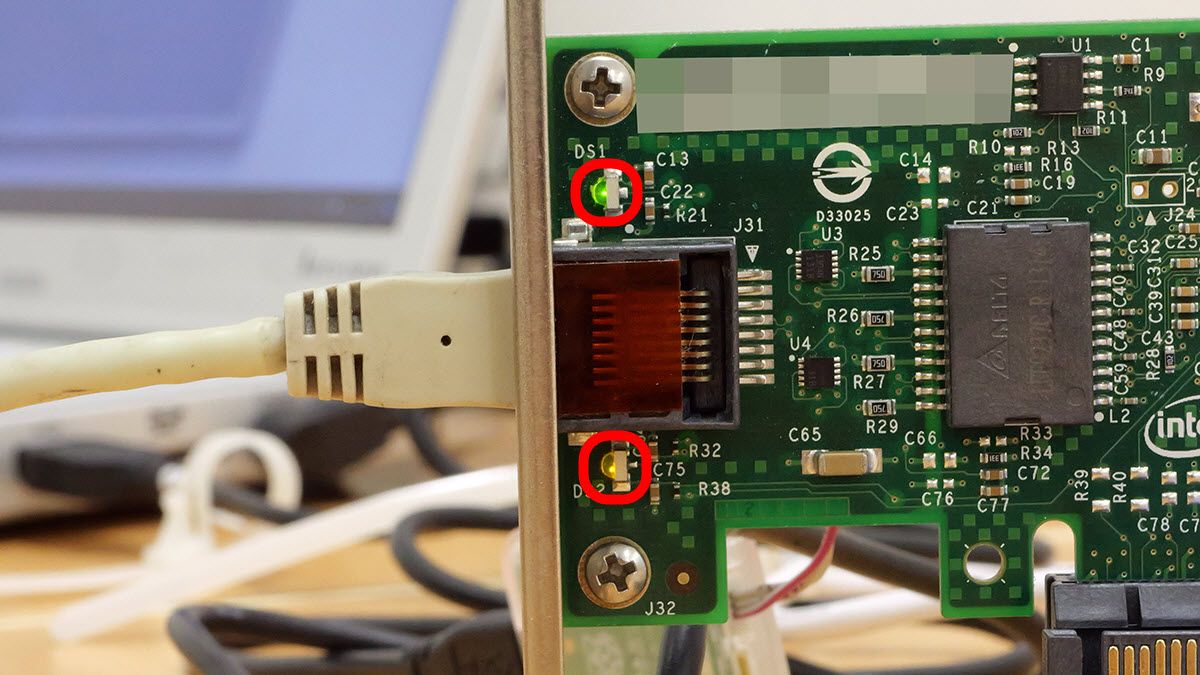
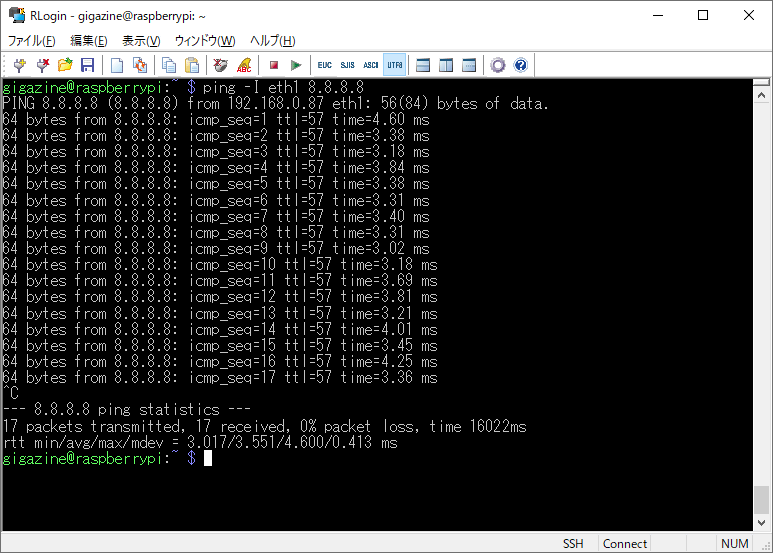
Connect the Ethernet cable to the added card and connect it to the Internet.

Then, the green lamp and orange lamp turned on, indicating that the link was up.
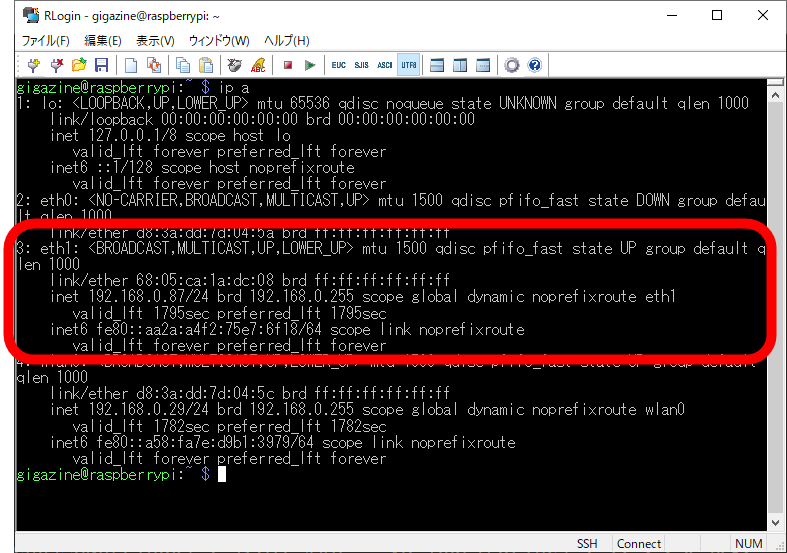
Run the following command to check the connection status.
[code]ip a[/code]
An IP address was assigned to the added interface 'eth1'. It seems that the connection to the Internet is successful.
I was also able to connect to Google's DNS server.
◆3-c: Pattern of connecting a recognizable card and then replacing it with another card
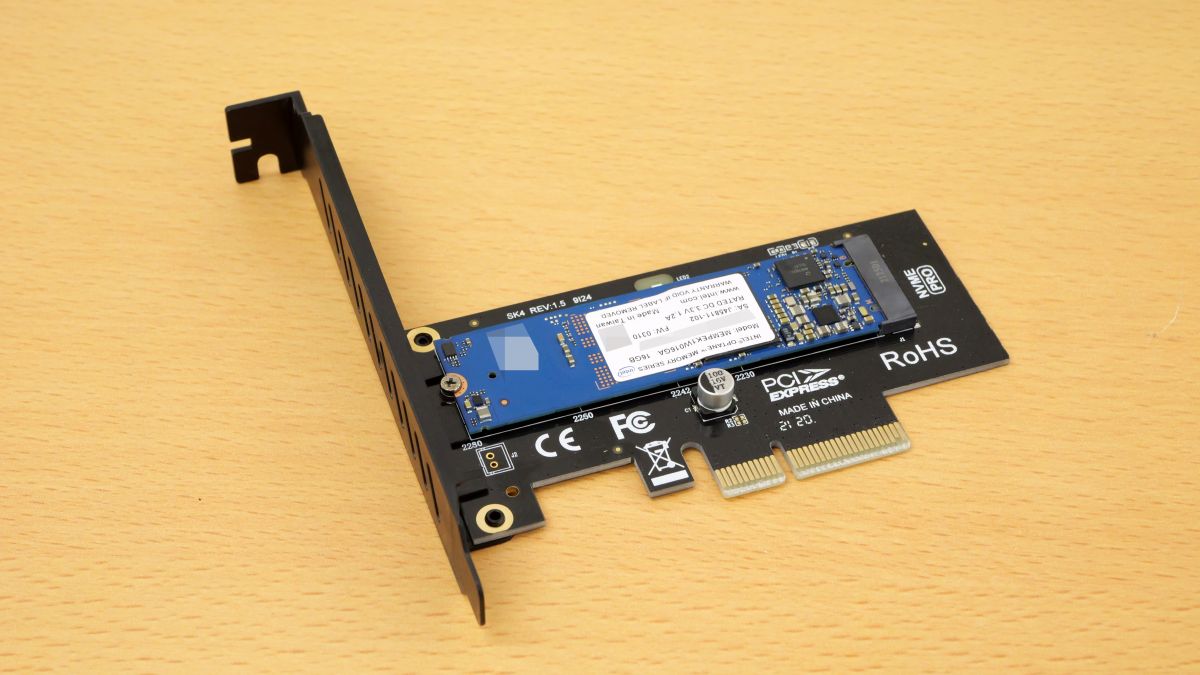
Even if a device cannot be recognized in its standard state and does not have a kernel module, it may be possible to recognize it by first recognizing an 'expansion card that can be recognized in its standard state' and then replacing it with the desired device. This time, we will try to recognize the M.2 SSD 'Intel Optane 16GB', which is not recognized in the standard state.

First, install Intel Optane 16GB on the PCIe-M.2 conversion card.
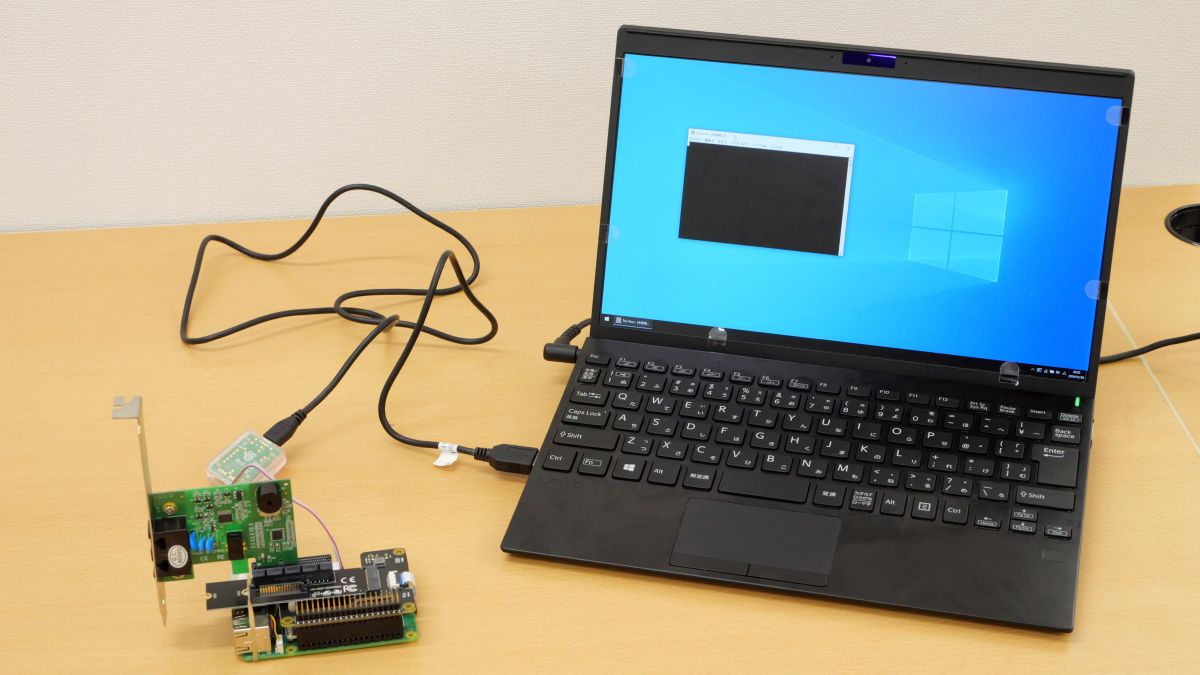
This time, we will connect a modem card (left) that can be recognized by the standard Raspberry Pi 5, then replace it with the PCIe-M.2 conversion card (right) and have it recognized.

First, connect X1000 and NGFFP4X-N03 to Raspberry Pi 5, connect the modem card to NGFFP4X-N03, and start it. In addition, a USB serial conversion module is also connected so that the system status can be monitored from a PC.
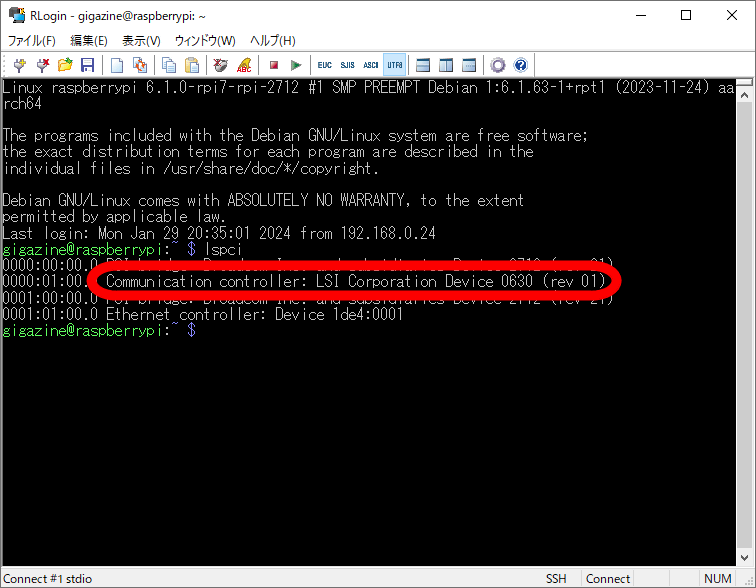
Once the system has started, run the following command to check the PCI interface information.
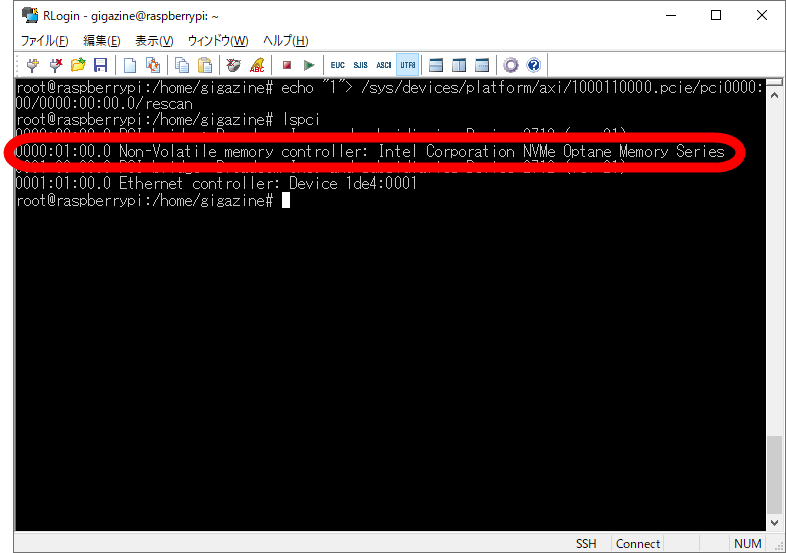
[code]lspci[/code]
This time, you can see that the interface 'Communication controller: LSI Corporation Device' is recognized.
Next, run the following command to check the connection information details.
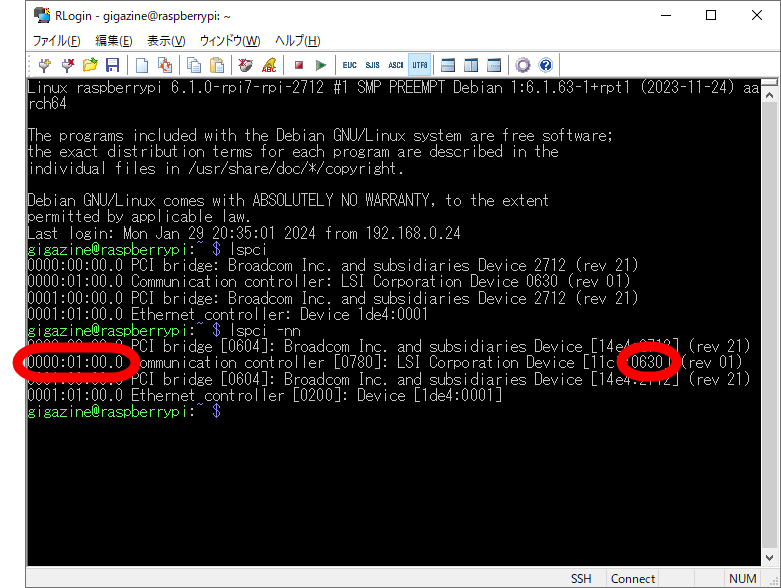
[code]lspci -nn[/code]
The result looks like this. Make a note of '0000:01:00.0' at the beginning of 'Communication controller: LSI Corporation Device' and '0630' at the end somewhere. '0000:01:00.0' indicates the location of the device from the PCI bus, and '0630' indicates the device ID.
Then run the following command.
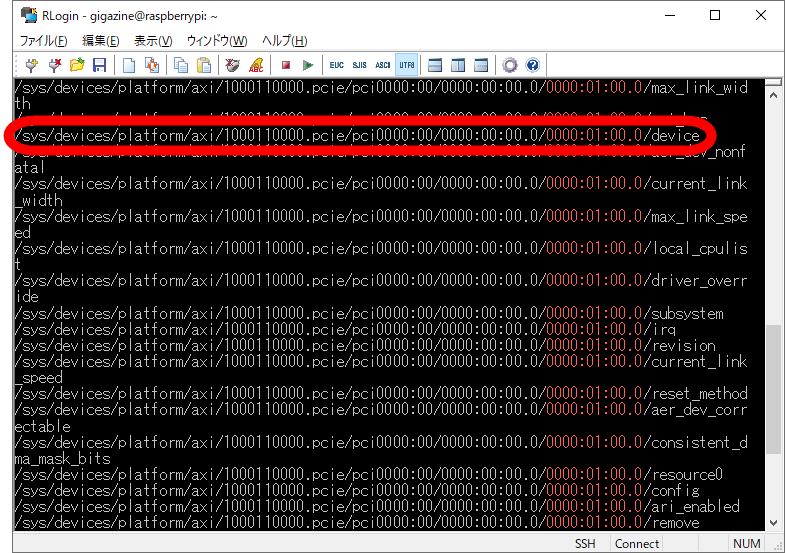
[code]find /sys/devices | grep 0000:01:00.0[/code]
Make a note of the file path that has 'device' written at the end of the search results. This time, '/sys/devices/platform/axi/1000110000.pcie/pci0000:00/0000:00:00.0/0000:01:00.0/device' is applicable.
Check the contents of the file saved in the file path you noted down using the command below.
[code]cat /sys/devices/platform/axi/1000110000.pcie/pci0000:00/0000:00:00.0/0000:01:00.0/device[/code]
This time, the following results were output. After confirming that the end of the output matches the device ID you noted earlier, proceed to the next step.
0/0000:01:00.0/device
0x0630
First, obtain administrator privileges using the command below.
[code]sudo su[/code]
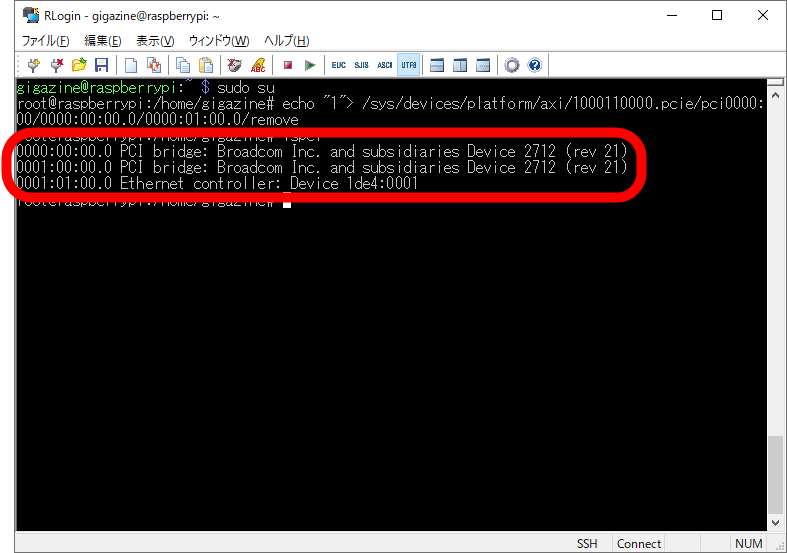
Next, write ``1'' to a file named ``remove'' in the same directory as the file path you noted down to remove the connected modem card from the system. This time, we want to write '1' to '/sys/devices/platform/axi/1000110000.pcie/pci0000:00/0000:00:00.0/0000:01:00.0/remove', so run the following command.
[code]echo '1'> /sys/devices/platform/axi/1000110000.pcie/pci0000:00/0000:00:00.0/0000:01:00.0/remove[/code]
Run the following command to check if the deletion was successful.
[code]lspci[/code]
The result looks like this. The deletion was successful because 'Communication controller: LSI Corporation Device' has disappeared.
Now that the modem card has been removed from the system, physically remove the modem card while the system remains booted.
Next, install the expansion card you want to recognize.
To rescan the PCI interface, write '1' to a file called 'rescan' located one directory above the file path you noted down. This time, it is OK to write '1' to '/sys/devices/platform/axi/1000110000.pcie/pci0000:00/0000:00:00.0/rescan', so execute the following command.
[code]echo '1'> /sys/devices/platform/axi/1000110000.pcie/pci0000:00/0000:00:00.0/rescan[/code]
The expansion card is now recognized. Run the following command to check if it is recognized.
[code]lspci[/code]
The result looks like this. You can see that Intel Optane memory is recognized because it says 'Non-Volatile memory controller: Intel Corporation NVMe Optane Memory Series'.
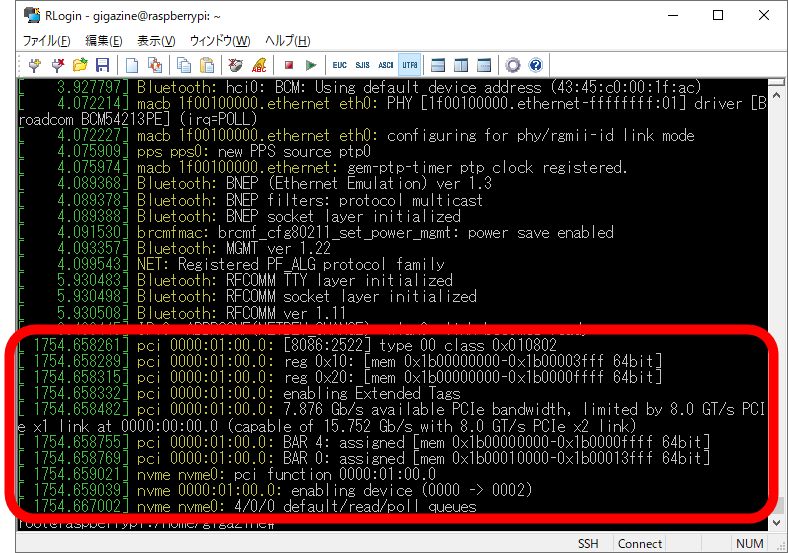
Run the following command to check the PCI device connection log.
[code]dmesg[/code]
The result looks like this. It was recognized without any error.
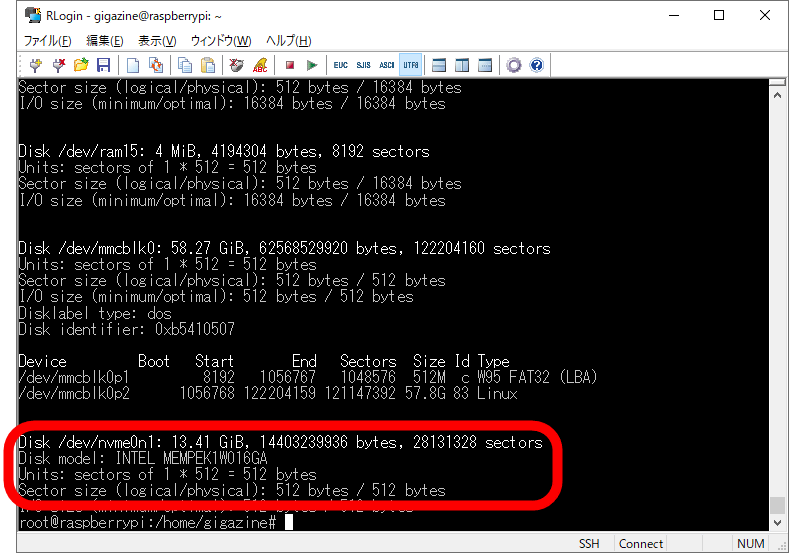
Next, run the following command to check whether it is correctly recognized as storage.
[code]fdisk -l[/code]
It was recognized without any problems.
The instructions for connecting a graphics board to Raspberry Pi 5 will be published soon, so stay tuned.
[to be continued]
◆Please let us know what you would like us to review about “Raspberry Pi 5”!
Please use the link below to tell us the points you would like us to try because you are actually using it, such as 'Try what happens when you do this!', 'Can you do this?', and 'What will happen in this situation?' It's okay if the content overlaps with someone else's, but the more you have, the more helpful it will be for you to understand that this is what you're concerned about. And it will be reflected in your next review article creation!
• Discord | 'Raspberry Pi 5 has arrived at the GIGAZINE editorial department, so I'm going to review it, but what do you want to know? ' | GIGAZINE

Related Posts: