'Creating a QR Code step by step' not only for generating QR code but also for understanding 'how to make'

QR code payments such as PayPay and LINE Pay are beginning to spread in Japan as the first cashless payment, but there are not many opportunities to know how QR codes are generated. 'Creating a QR Code step by step' is a web application that allows you to easily generate a QR code that represents your favorite character string and to understand the QR code generation process.
Creating a QR Code step by step
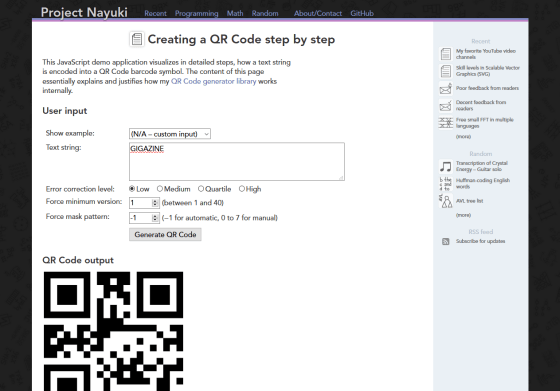
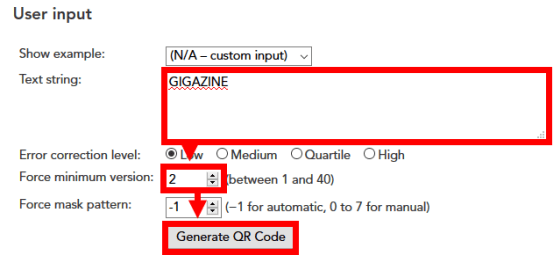
First, access 'Creating a QR Code step by step'. For the time being, leave the understanding of the options and enter 'GIGAZINE' in 'Text string', set 'Force minimum version' to '2' and click 'Generate QR Code'.
The generated QR code is this.

Scroll down the page to see the QR code generation process. First, determine which 'encoding method is available' for each character. 'NM' can be encoded in number mode, 'AM' in alphabet mode, 'BM' in byte mode, and 'KM' in kanji mode.

In the case of 'GIGAZINE', the alphabet mode and byte mode are available for all characters, and the alphabet mode that requires less data is selected.

When you enter a character string that contains a mixture of kanji and numbers, the byte mode corresponding to all characters is selected like this.

Then, convert each character into a bit string. In number mode and alphabet mode, consecutive characters are put together and converted to a bit string.

The QR code has an error correction function at four levels: 'Low', 'Medium', 'Quartile' and 'High' so that it can be read without problems even if part of the code is damaged or dirty. The higher the level of error correction, the greater the amount of damage that can be dealt with, but the amount of data that can be stored in the QR code will decrease accordingly.
There are also 40 versions of the QR code, the larger the version, the more black and white 'cells' and the more data that can be stored in the QR code. The amount of data that can be stored in a QR code depends on the version and the level of error correction.
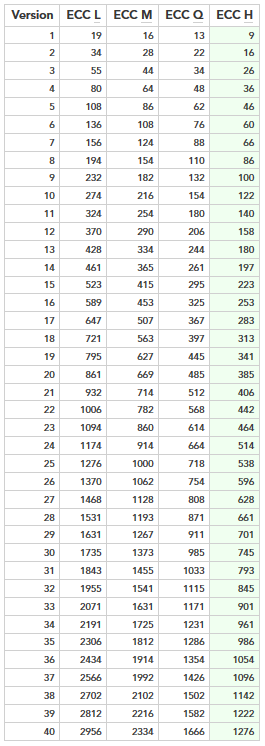
'Error correction level' and 'Force minimum version' that were selectable on the QR code creation screen of 'Creating a QR Code step by step' are options to select the error correction level and minimum version.

The bit string that is the source of the QR code has the following structure. 'Segment 0 mode' represents the encoding mode, 'Segment 0 count' is the number of characters, 'Segment 0 data' is the bit string of the input character string, and padding is performed by padding the remaining bits with 0 to build the bit string.

Finally, a Reed-Solomon code for error correction is added to complete the bit string expressed as a QR code.

It's finally time to start generating code. Each black and white block in the QR code is called a 'cell'.

First, draw a reference pattern called a 'timing pattern' in the cells in the 6th column and 6th row from the upper left.

Next, a 7x7 cell mark called 'position detection pattern', which can be said to be a characteristic pattern of the QR code, is drawn in the upper left, lower left, and upper right.

After drawing the position detection pattern, draw the 'positioning pattern'. The alignment pattern is a pattern for adjusting so that it can be read correctly even if the plane of the QR code is curved, and the number changes according to the size of the QR code.

Temporarily draw the format bits according to the position detection pattern. Now you are ready to store the data.

In order to find a place where data can be stored, scan from the lower right cell in zigzag.

Data is drawn for the undrawn cells detected by the zigzag scan. For example, the hexadecimal number 'C5' is a binary number '11000101', and it is drawn according to the rules such as 'black black white white black and white black and white'.

Then overwrite the QR code with a pattern called 'mask pattern'. Since the overwrite operation is performed by exclusive OR , the cells where black and black overlap each other are converted to white.

There are eight types of this mask pattern, which can be selected on the screen for generating the QR code.

The format bit that was previously drawn in the tentative state is now drawn correctly.

Also, there is something called a 'penalty pattern' in the QR code. If there are 5 or more cells of the same color in the horizontal direction, there is a penalty.

The vertical direction is the same as the horizontal direction. If 5 cells continue, 4 points will be added, if 6 cells, 5 points will be added, and if 7 cells, 6 points will be added penalty points.

There is also a penalty for making a 2 x 2 cell square. Here is a penalty of 3 points for each square.

There is a penalty if there is a pattern similar to the position detection pattern in the vertical and horizontal directions. Here, 40 points are added for each pattern.

In addition, 0% when the black cell ratio is 45% to 55%, 10 points when 40% to 60% is outside the range of 0 points, and 20 points when 35% to 65% is outside the range of 10 points. Points will be added as penalty points.
The above penalty points are used to determine the mask pattern. Of the eight mask patterns, the one with the lowest penalty point is used to generate the QR code.

QR code generation software that uses this algorithm is also available on Nayuki's GitHub.
GitHub-nayuki/QR-Code-generator: High-quality QR Code generator library in Java, TypeScript/JavaScript, Python, C++, C, Rust.
https://github.com/nayuki/QR-Code-generator
Related Posts:
in Software, Review, Web Application, Posted by darkhorse_log


