Toggl, a transcendent function that allows efficient time management by recording, aggregating and visualizing all the time spent on tasks
It is important to look back on how to use your time in order to efficiently do daily work. You can easily record how much time you spend and how much time you use from multiple devices, and a net service that enables high-spec time management using various functions is called "Toggl"is.
Toggl - Time Tracker & Employee Timesheet Software
https://toggl.com/
Basic tasks such as recording tasks and classifying them into projects can be found in a single shot from the following page.
"Toggl" - Easily record daily activities on PC and smartphone free of charge for aggregation - GIGAZINE
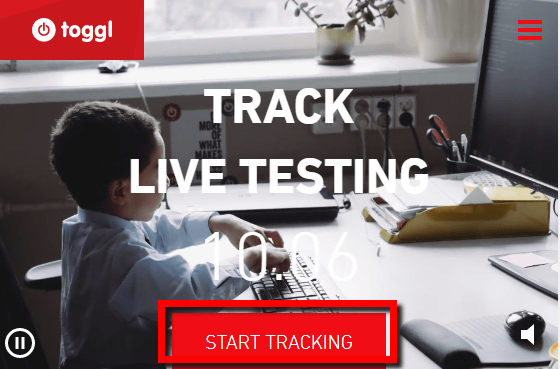
I will also use it from the beginning also as a way to review basic usage.Page of togglWhen you access, you will see "START TRACKING" at the bottom center, so click in the red frame.
You will be prompted to log in. Toggle can also sign up with a Google Account. Since I use Google Account easily this time, please click "SIGN UP WITH GOOGLE" at the bottom.

If you select and select an account, click the appropriate account.

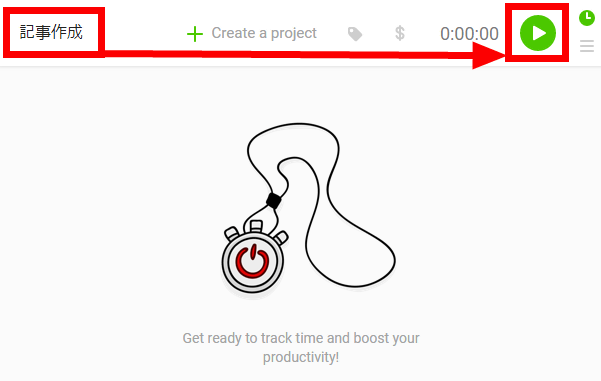
Toggl starts on the browser. Put the task name in the entry field on the upper left and press the start button on the right to start the counter.
Click the red stop button when the task is over.

These tasks will be added to the list below.

You can create a new project by clicking "+ Create a project" next to the task name. The project name is "Project A". Below that there is a column on which client you belong. The client is like a large categorization of projects. I tried to create and assign a client named "client a".
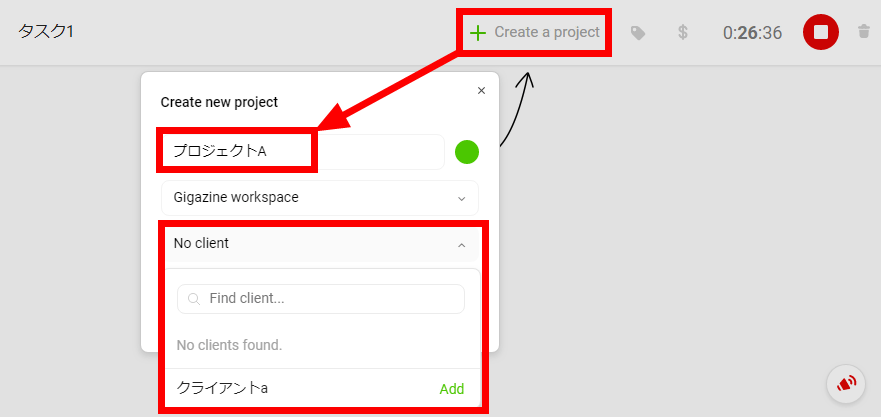
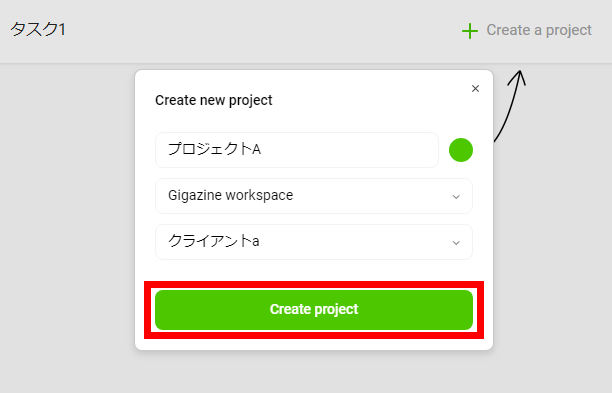
When the initial setting of the project is completed, click "Create project" to create the project.
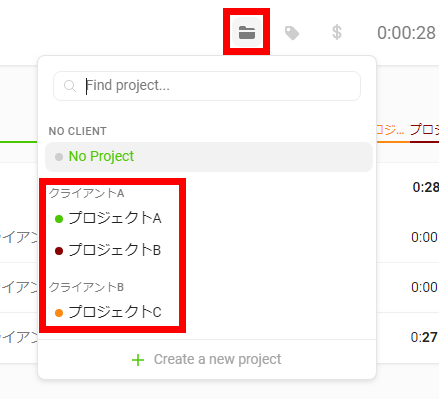
After clicking the folder mark button from the next, the projects are displayed for each client at once, so you can click on the project you want to assign and select it.
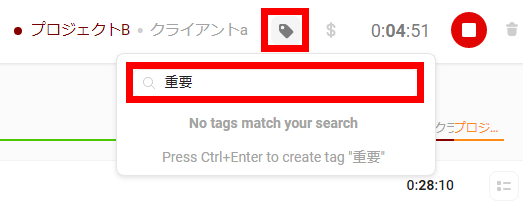
Next to the project there is a button that allows you to select tags. When you enter the tag you want to add to the search window above, tag candidates are displayed. I entered "important" this time, but since there is no tag "important", "No tags match your search" is displayed. You can also create a new tag by typing "Ctrl + Enter" while entering characters. More than one tag can be set.
If you want to edit the time of the registered task once, click on the time part on the right side of the list. In addition to entering the direct time, you can also change the start time and end time. By clicking on the calendar part you can change the date on which the task is registered.

If you do the same task again, press the start button at the right end of the list to automatically enter the information and start recording.
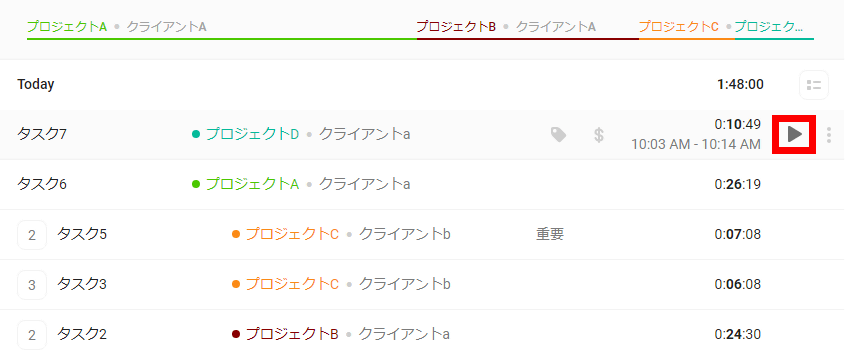
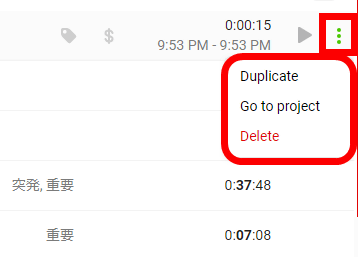
Furthermore, from the three marks to the right of the start button you can duplicate the task, open the project settings page, and clear the task.
In addition, you can edit and delete all at once by clicking the mark in the upper right of the task list column. Select the thing you want to edit and select "New task name" "New project to assign" "Tag" "Date", then click "Save".
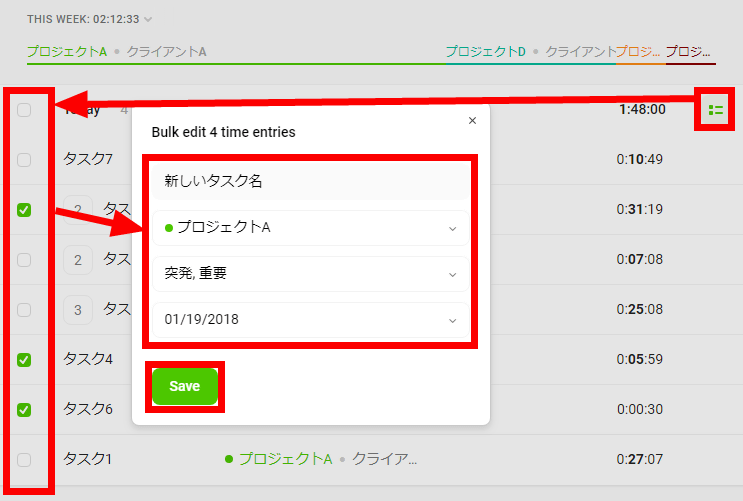
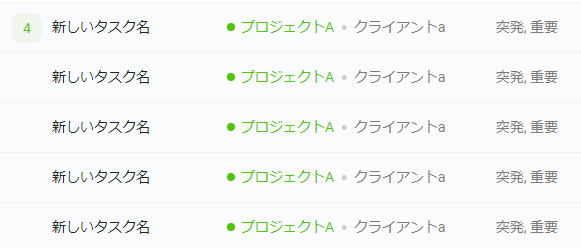
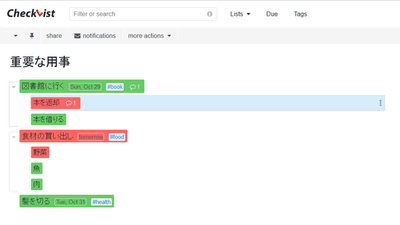
Then you can group multiple tasks like the image below.
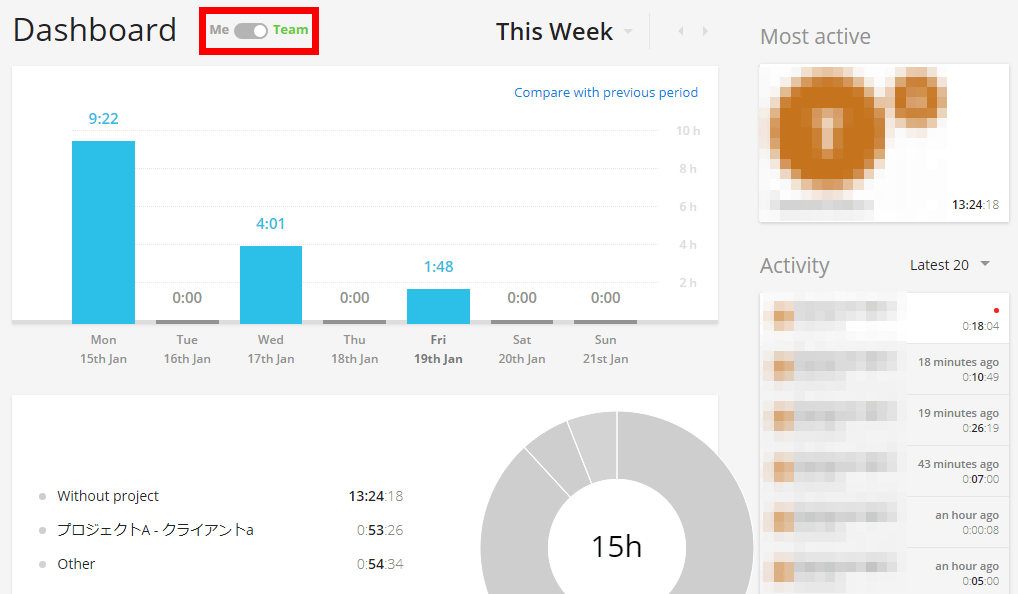
When you move to "Dashboard" from the left navigation bar, you can browse the recorded information collectively.

You can change the range to collect by clicking the "This Week" column on the dashboard. You can also choose from "Today" "Yesterday" "This Week" "Last Week" "This Month" "Last Month" "This Year" "Last Year".

Also, if you switch the switch to the right of "Dashboard" to "Team", you can check the total of all the people belonging to the same team if you have viewing authority.
In "Reports" you can narrow down the results by members, clients, projects, tags, task names.
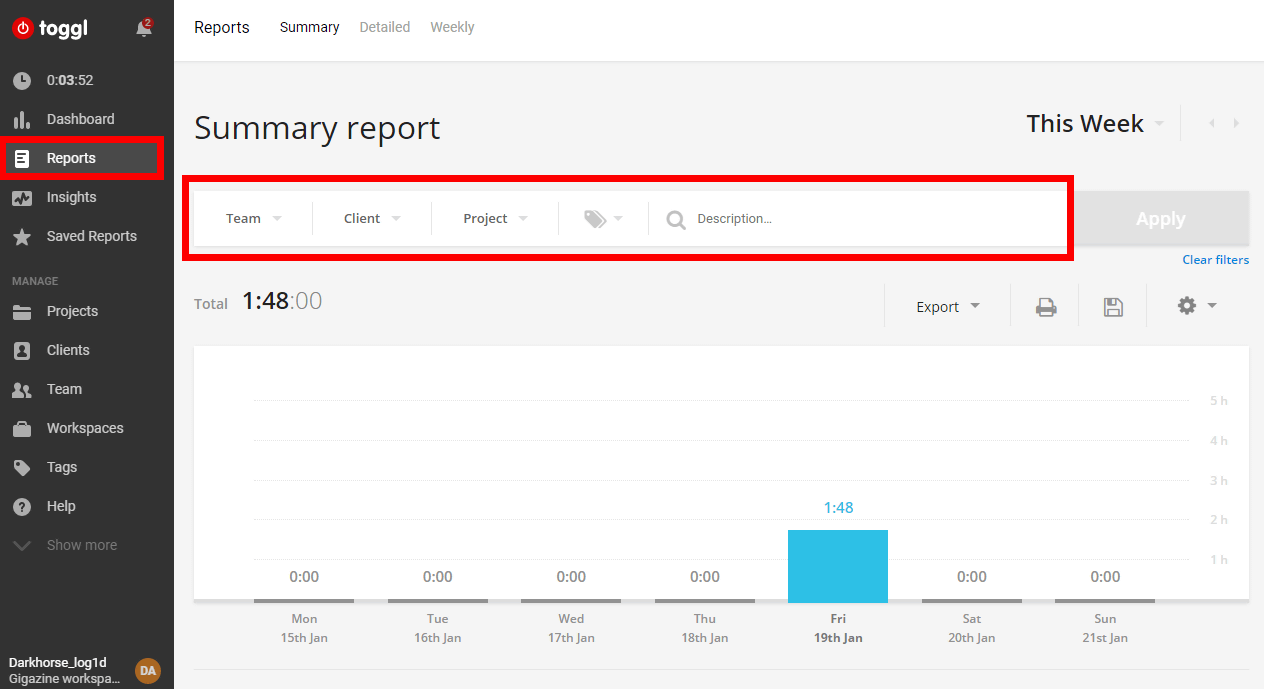
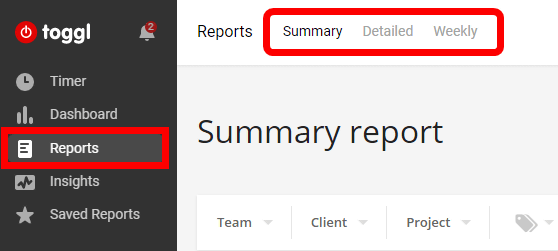
There are also three reports "Summary", "Detailed", "Weekly".
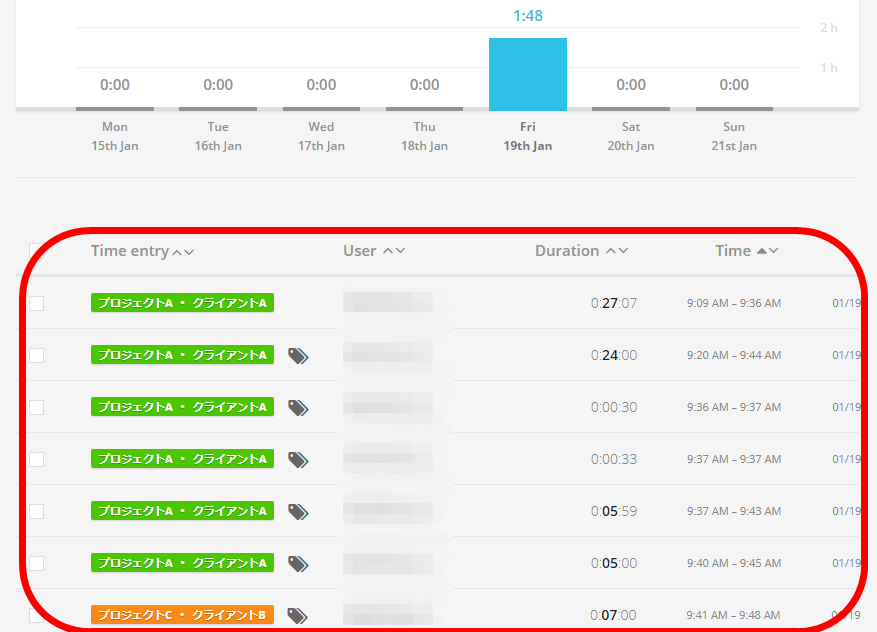
If you click "Detailed", all the tasks done will be listed.
For "Weekly", one week's worth will be output as a table. Also, by clicking "Export" ... ...
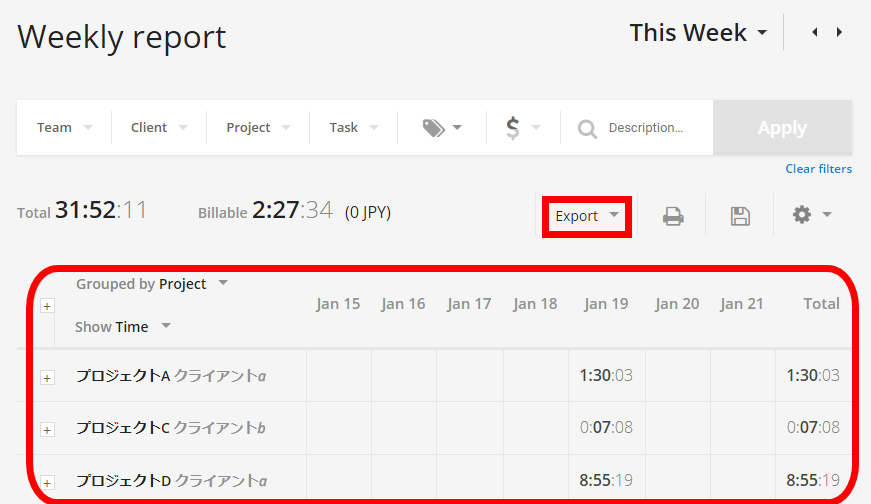
All reports can be exported by PDF or CSV.

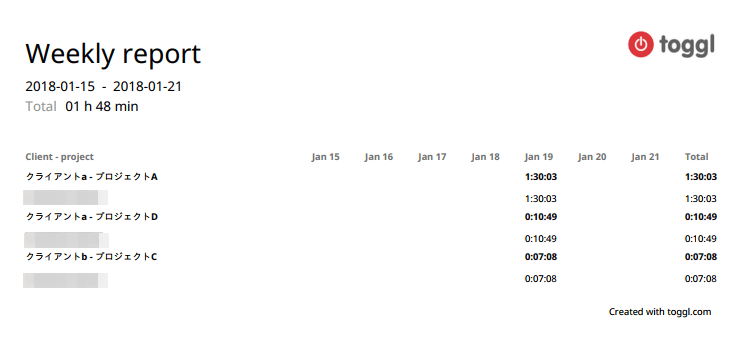
For example, if you write out a Weekly report in PDF, it looks like the image below.
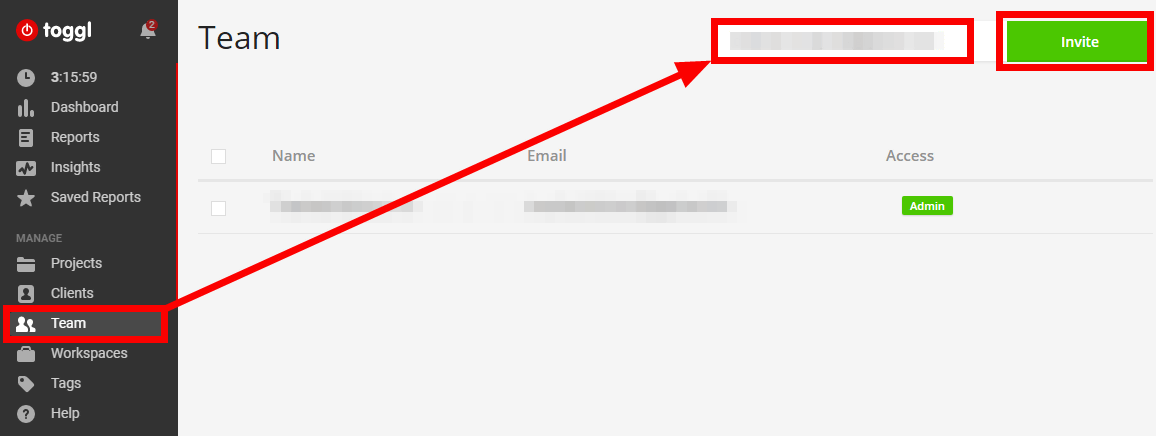
Also, you can invite your teammate to workspace and use it by more than one person. Open the "Team" tab, enter your email address in the upper right corner, and click "Invite".
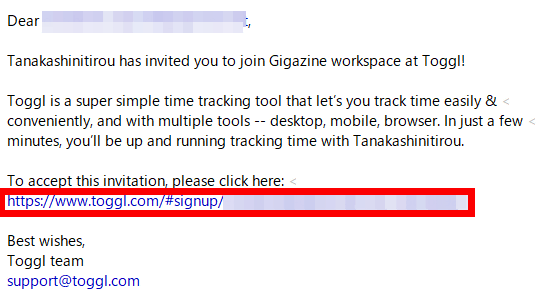
If you are invited, you will receive an email like the image below, so click on the link and sign up.
Please enter your e-mail address and password and click "JOIN THE TEAM" to complete the participation. Up to 5 people in the free version can participate in unlimited in the paid version.

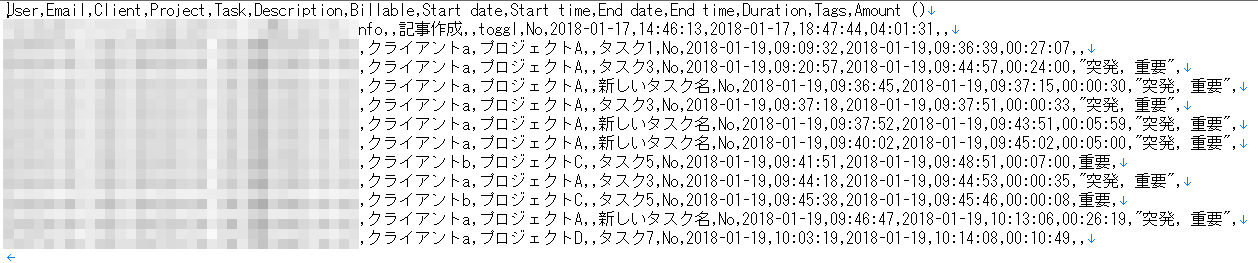
It also has a function to import CSV files.

The following image is a "Detailed" report written by CSV, but if you write it in the same format as this CSV file it will be readable.
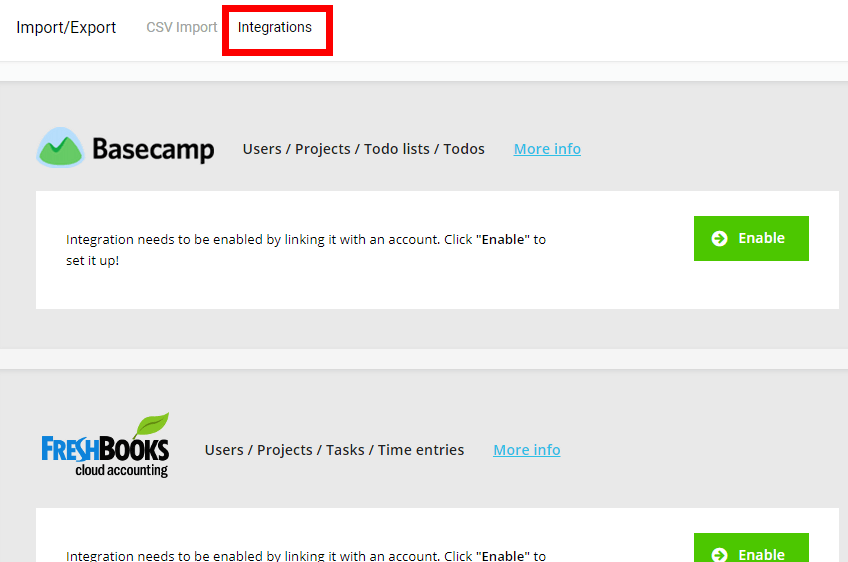
In addition, you can link users, projects, etc. with other services on the "Integrations" tab next to CSV Import. "Basecamp"FreshBooks"Teamweek"asana"GitHub"It corresponds to cooperation with.
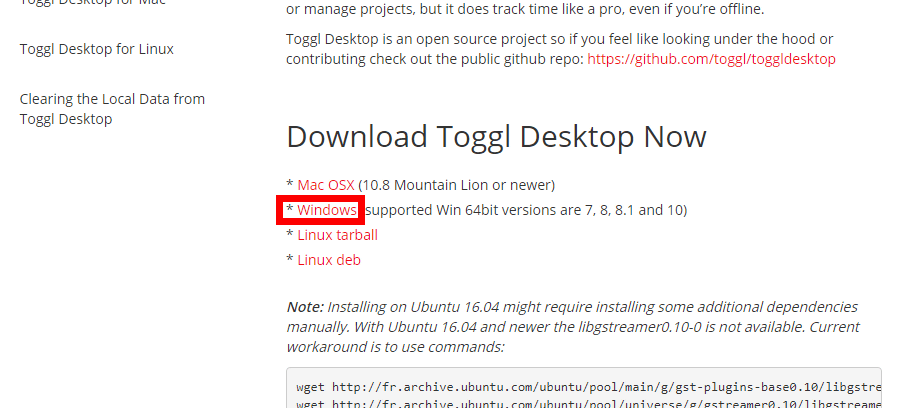
Up to this point we have used the browser version of Toggl, but Toggl has an application version with even more powerful features. "IOS" "Android" "Mac OSX" "Windows" "Linux tarball" "Linux deb" to support. Applications for smartphone can be downloaded from the link below.
"Toggl" on the App Store
https://itunes.apple.com/jp/app/id1291898086
Toggl Time Tracker, Timesheet - Android application on Google Play
https://play.google.com/store/apps/details?id=com.toggl.timer
Desktop version isToggl's siteYou can download from. I will try using the Windows version this time.
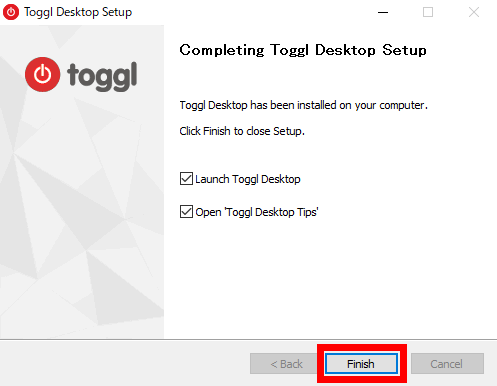
Launch the downloaded installer.

Installation is completed in no time. Click "Finish" to start Toggl.
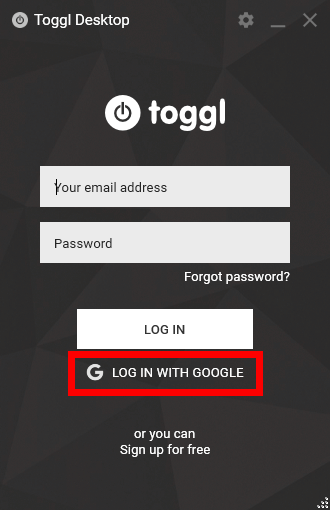
Since I am using a Google Account this time, click "LOG IN WITH GOOGLE".
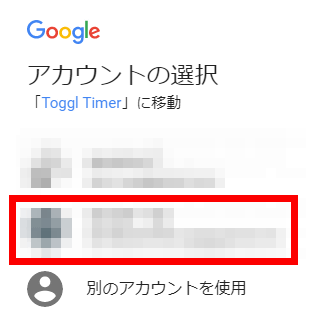
The browser opens, "Select account" is displayed, so click on the account to use for login.
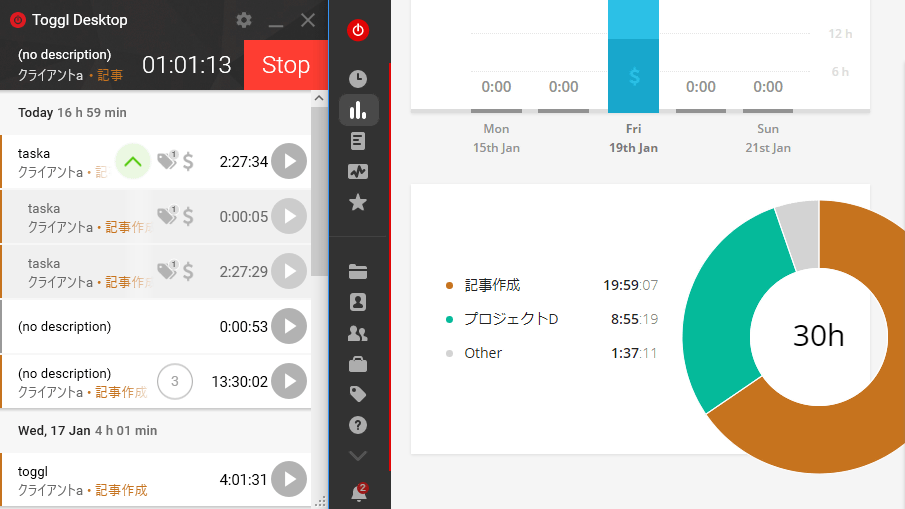
The login is completed and the task registered by the browser is automatically displayed.

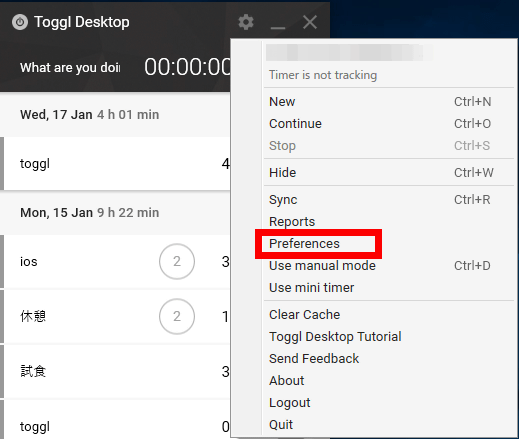
You can access various settings by clicking "Preferences" from the gear mark menu in the upper right of the application.
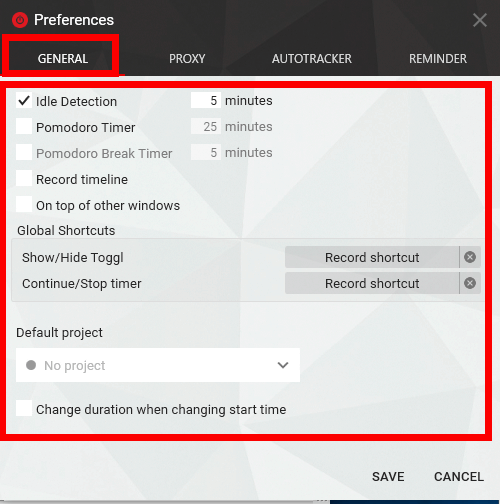
On the "GENERAL" tab, "Idle Detection" to detect abandonment, "Pomodoro Timer" to tell us when to take a break, "Record timeline" to keep track of open websites, etc. Always Toggl on top You can set functions such as "On top of other windows" which will be displayed on the screen. You can also set shortcuts to open and close Toggl, shortcuts to move and stop timers, and set projects assigned as standard when recording new tasks. If you check the "Change duration ~" at the bottom, the time spent on the task when changing the start time of the task is automatically changed. If there is no check, the end time will automatically move according to the start time.
When "Idle Detection" function is turned on, if you leave the PC for a while, a pop-up like the image below appears. "KEEP TIME" means "leave time to count", "DISCARD TIME" to "stop the timer at the start of neglect", "ADD TIME AS NEW ENTRY" to "record the leave time as a separate entry", "DISCARD TIME AND CONTINUE "means" stop the timer at the beginning of leaving and start a new timer again from now. "

On the "AUTOTRACKER" tab, you can set the auto tracker. Check "Enable autotracker", enter the name of the application to track in the left blank space, enter the project name in the middle, click "ADD", and press "SAVE" to save the setting.
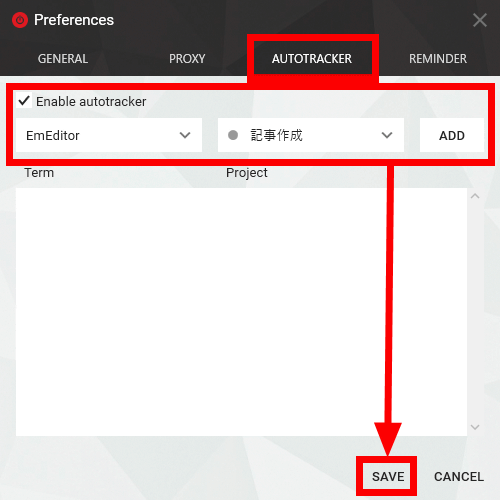
Then, if you focus on the app set for tracking, you will receive a notification urging recording to the lower right. Pressing "START" ... ...

Time recording started. Although the project is assigned, you must enter the task name yourself.

This is a function that can be used with all the free version so far. Toggl includes a "STARTER" version that can be used at 9 dollars a month (about 1000 yen) per user, a "PREMIUM" version that can also be used for 18 dollars (about 2000 yen), a version that can be used at 49 dollars (about 5400 yen) ENTERPRISE "version exists and you can use further functions. A detailed comparison of functionsToggl's pageIn can be confirmed. Since one month 's free trial was prepared, I actually tried using ENTERPRISE version which can use all functions.
"Workspaces" allows you to set up workspaces. Upload logo or change workspace name ... ....
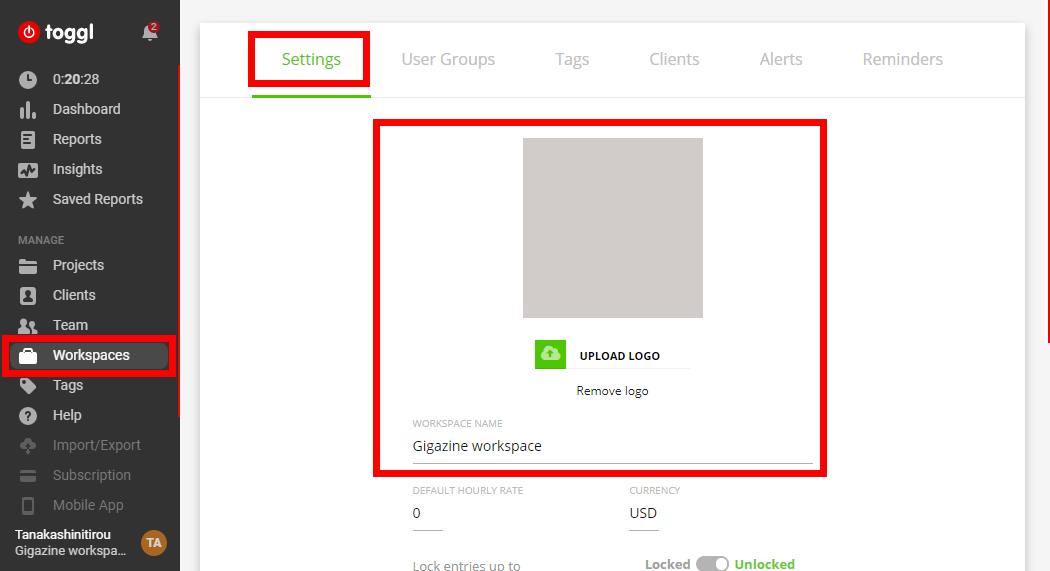
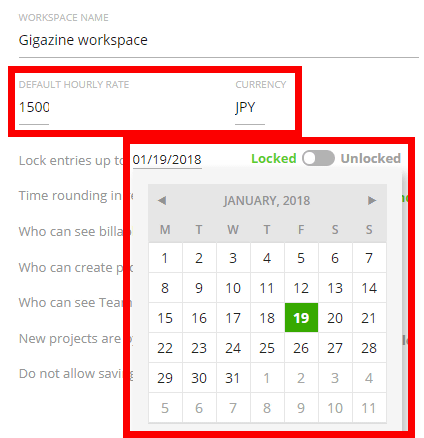
You can set the standard hourly cost, make it impossible to change entries before a specific date ... ....
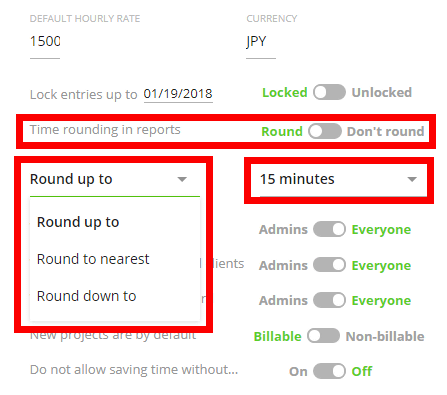
You can also crowd the time well. The setting on the left is "rounding up", "rounding off", "devaluation" setting, the right is how long it will be rounded. It can be set from 1, 5, 6, 10, 12, 15, 30 minutes, 1 hour, 4 hours.
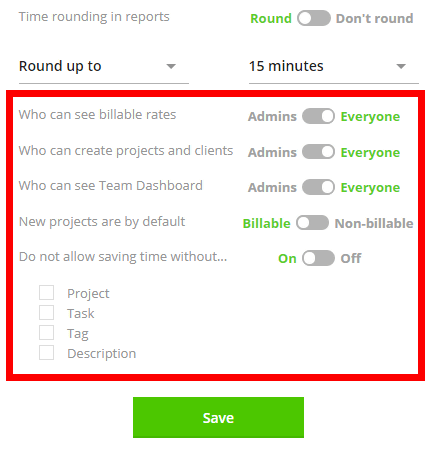
"Limit administrators to view billing rates" "Limit administrators to create projects and clients" "Allow administrators to view team dashboards" "New projects are standard You can make settings such as "Make requestable," "Make project, tag, task name mandatory to measure time" and so on. Although it is the second in the last item, "Task" is cautioned, checking this will make it impossible to measure time, so be careful.
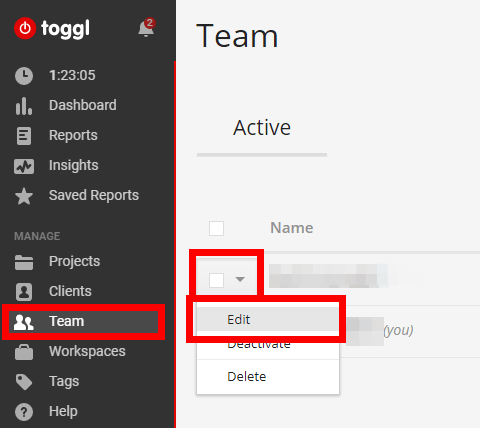
Also, click the button to the left of the member from the "Team" tab and click "Edit" ......
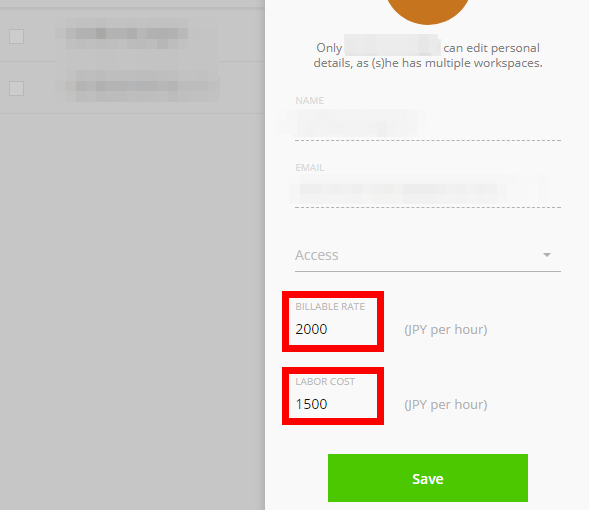
For each member you can change "BILLABLE RATE" and "LABOR COST (hourly wage)". Billing rate is the income incoming when this member works for one hour and hourly wage is the wage paid to this member.
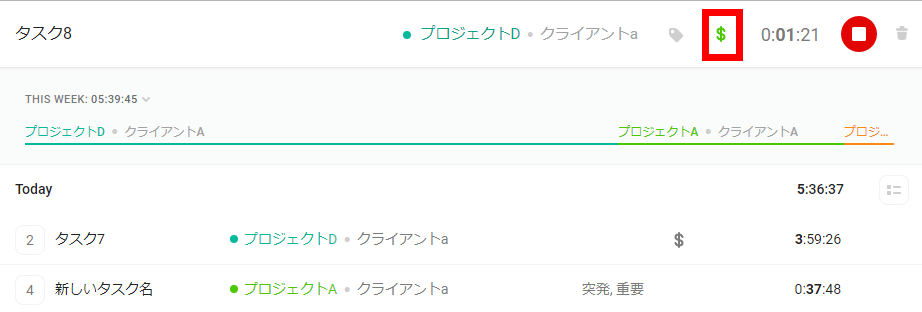
Clicking the "$" mark when adding a task turns on billing.
Looking at the "Insights" tab, you can check the money you can charge elsewhere and the salary you have to pay to the members.

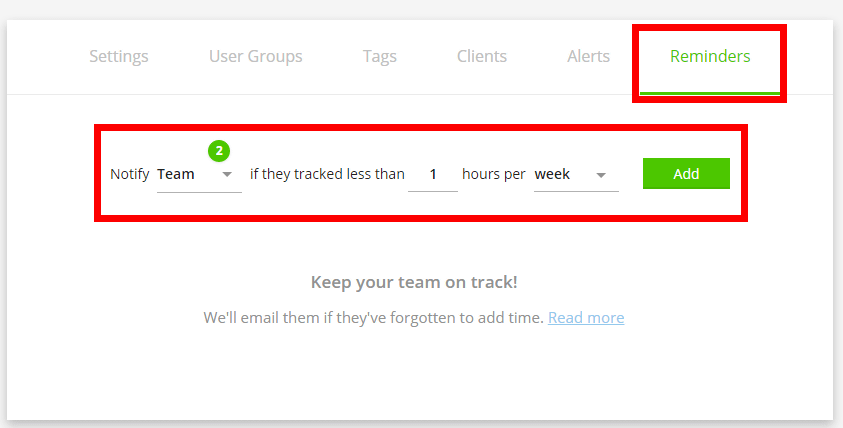
Also, on the "Reminders" tab, you can set it so that notifications will be sent by e-mail when the recording time within a certain period is not more than a certain amount.
In the "Alerts" tab, you can set it to notify by e-mail if project or task has exceeded a certain time of planned time.

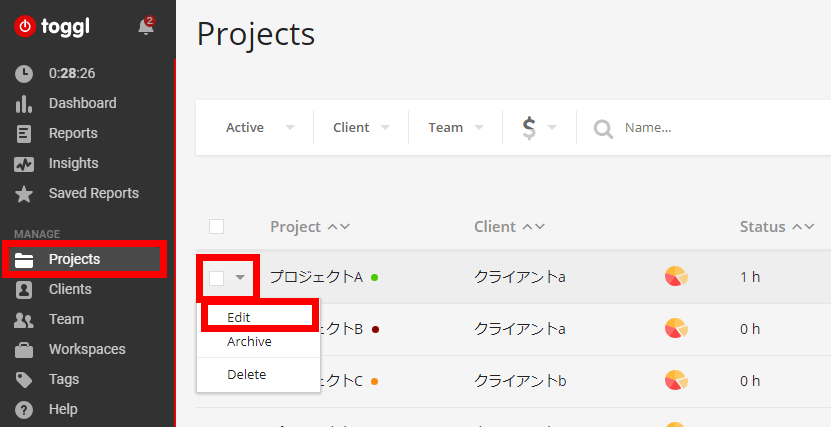
Open the "Projects" tab for scheduled time, click "Edit" from the left of the project ... ...
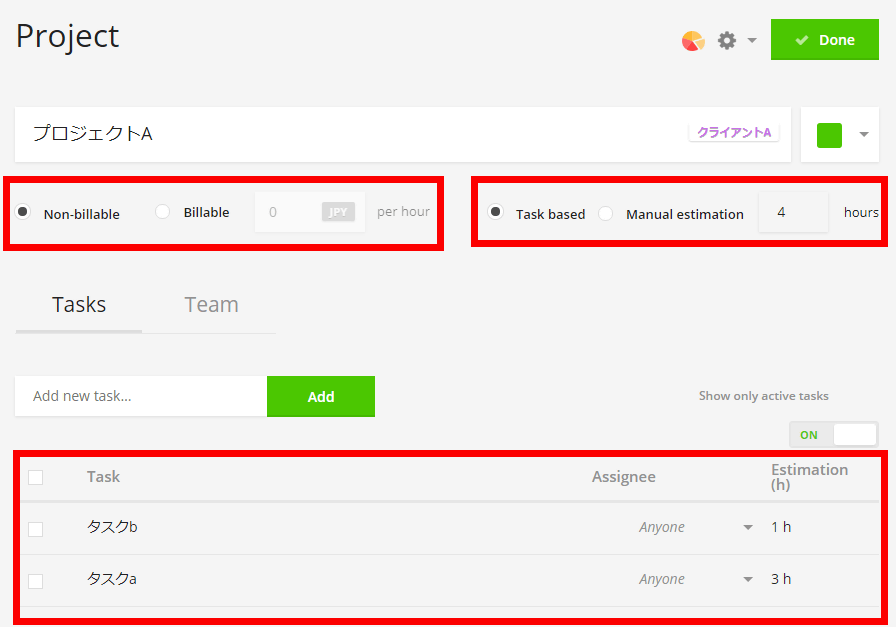
It appears in the top right item. There are "Task based" to enter the scheduled time for each task and "Task based" to calculate the total, and "Manual estimation" to decide the scheduled time at the project collective, but it is only Manual estimation that you can use the alert function. In addition, you can set whether the project can be billed, how much it can be billed as soon as you can, and so on at the top left.
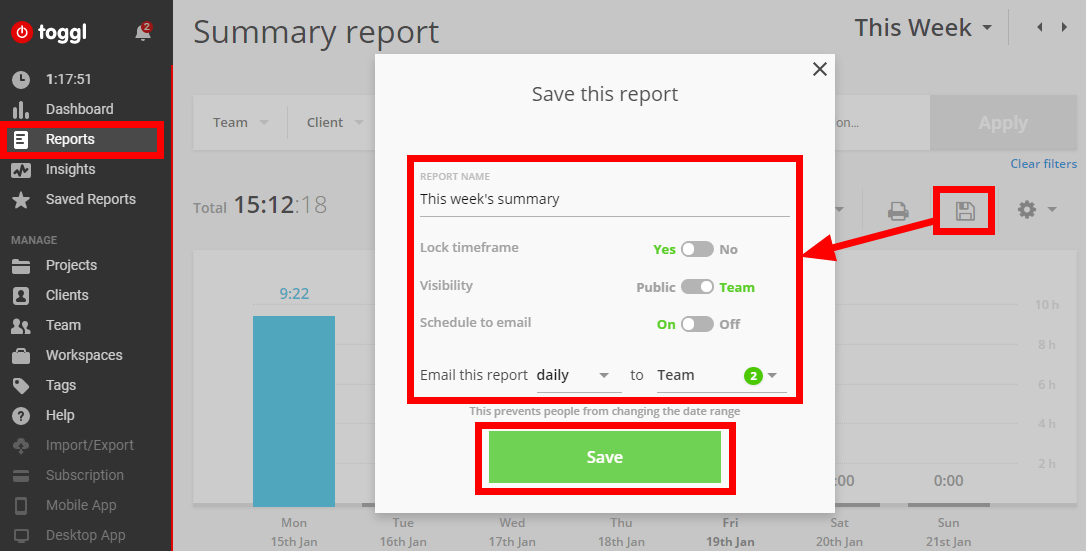
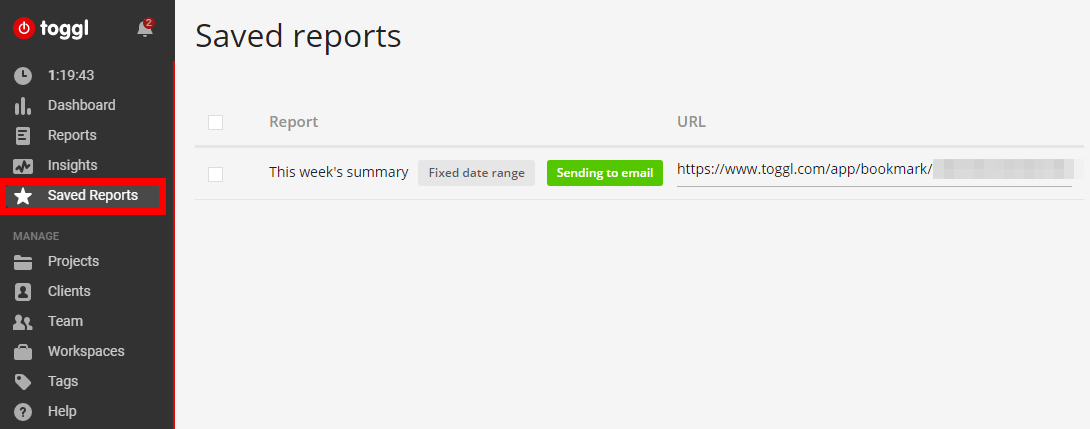
In the paid version, by pressing the floppy disk mark button from the "Reports" screen,snap shotYou can save. If "Lock timeframe" is set to No, the display period can be changed later.
Saved reports can be accessed from "Saved reports" tab.
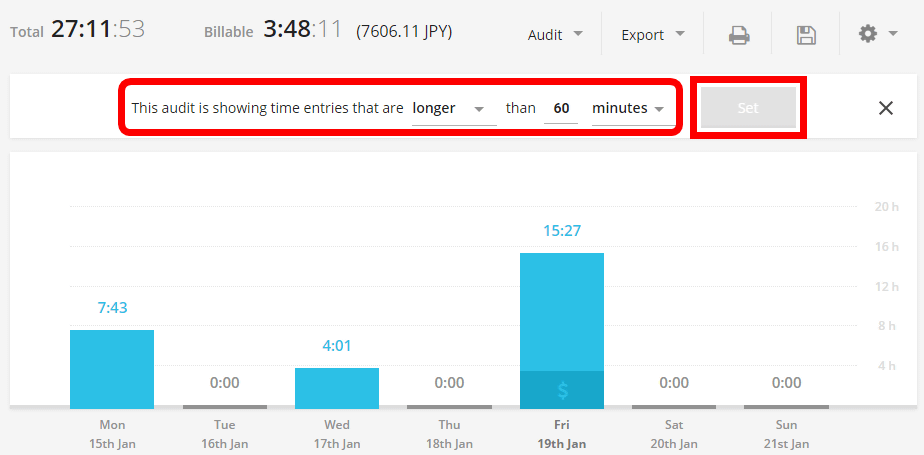
Also, the "Audit" part is added to "Detailed" in the "Reports" tab ... ...

You can remove "no projects", "no tasks", "suspicious times" from the report.
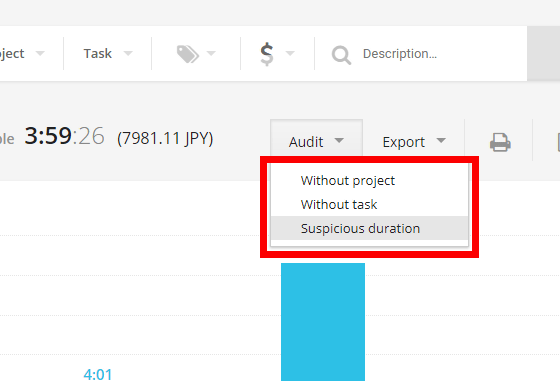
"Suspected time" can be set individually, and it is possible to limit the items to be included in the aggregation to those with a certain time or more or less than a certain time.
Because it has a lot of functions, it seems that time management that fits various situations can be done if it can master it. Even with only the free version, all the basic functions can be used, and since it synchronizes automatically between smartphone and PC, it became very high performance time management service such as it can be used even at the destination.
Related Posts:


in Review, Software, Web Service, Posted by log1d_ts