I actually tried using the open source Slack-like chat tool "Mattermost"
Slack, which SOFTBANK has also invested, is a famous chat tool as "E-mail killer", but "Slack clone" is said to be "Slack clone" Mackmost as an open source chat tool that looks exactly like Slack. When it was Mattermost, I could set up a server by myself, so I actually tried using Mattermost by setting up my own server.
Mattermost Private Cloud Messaging
https://about.mattermost.com/
This time we set up an instance on Google Compute Engine and place Mattermost server there. Since the introduction procedure is long, I will lightly summarize the feeling of use first.
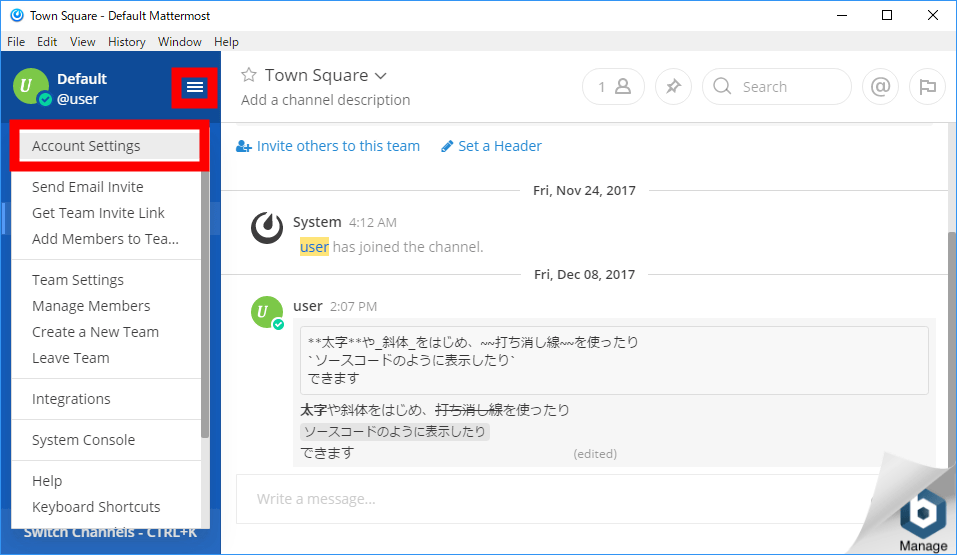
The screen of "Mattermost" looks something like this. Chat can be decorated with markdown notation. Although it is English when installing, it can be Japaneseized. Click "Account Settings" from the hamburger menu in the upper left ... ...
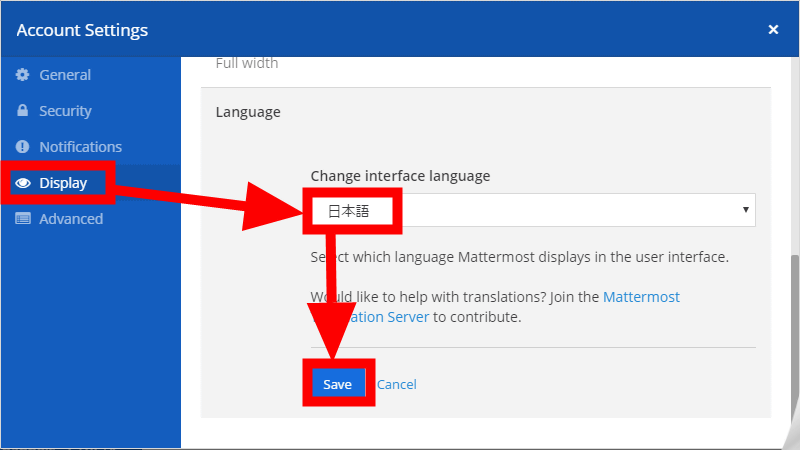
Choose "Japanese" from the menu on the left and click "Save" OK.
You can also connect from an application for smartphone. Although separate setting is necessary, it also supports push notifications.
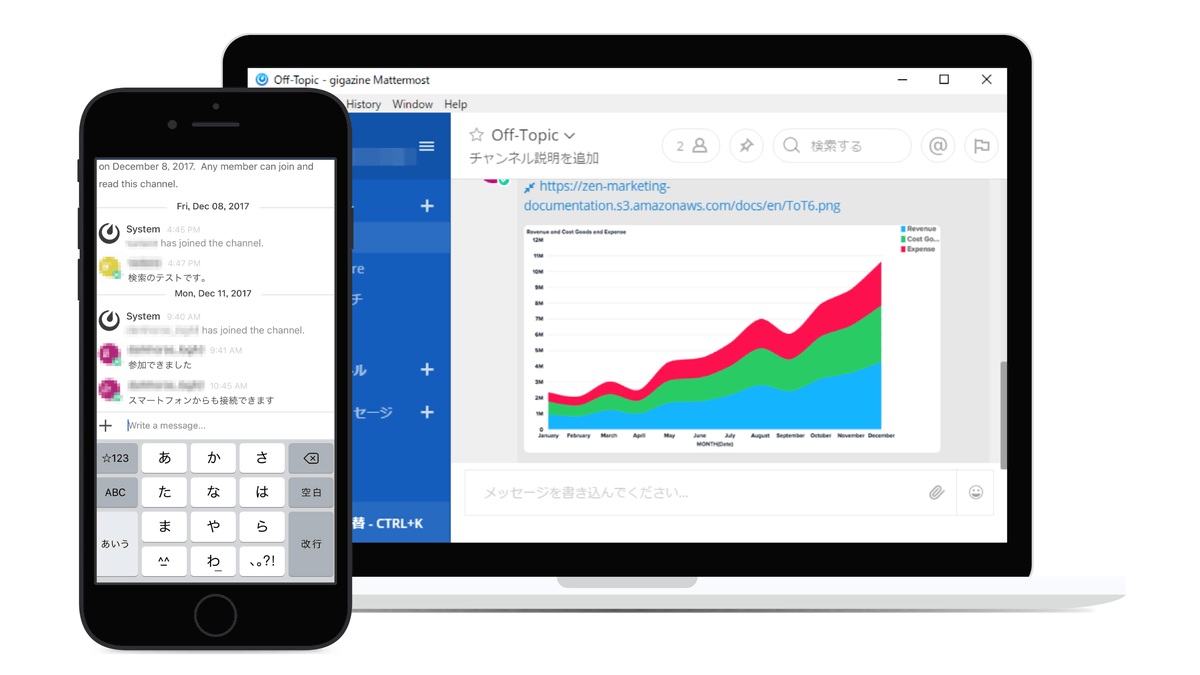
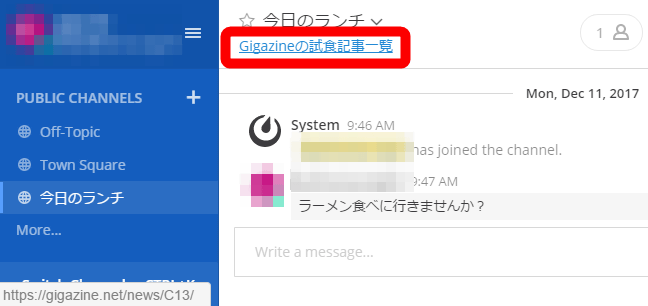
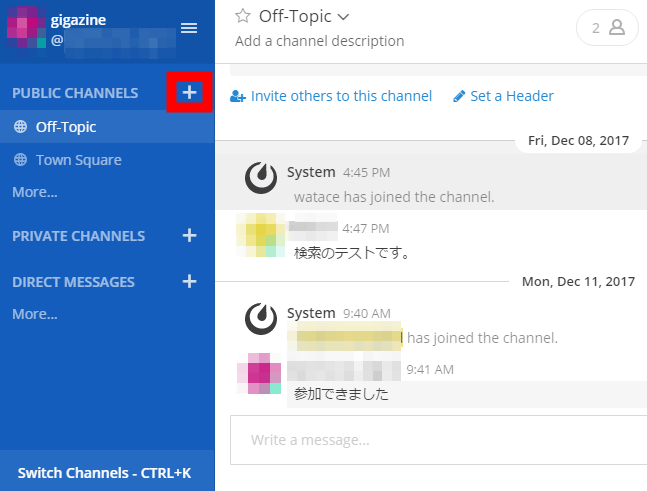
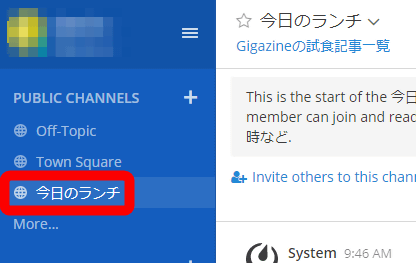
Each topic has its own channel, which allows you to proceed with more than one story at the same time. On the left side of the image below you can see three channels "Off-Topic", "Town Square", "Today's Lunch". The right side is the place where the chat flows, now the content of "Today's lunch" channel is displayed. The red frame is a place called header and is always displayed with the channel name. Since this also corresponds to the markdown notation, it is also possible to create a link like this.
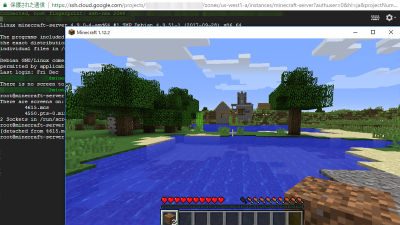
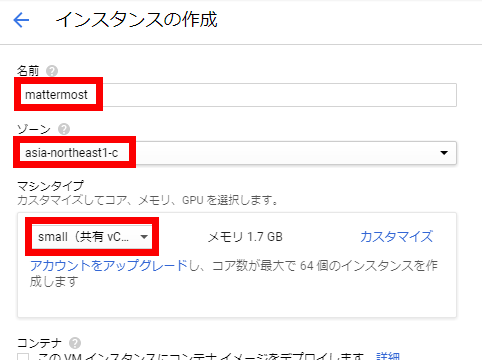
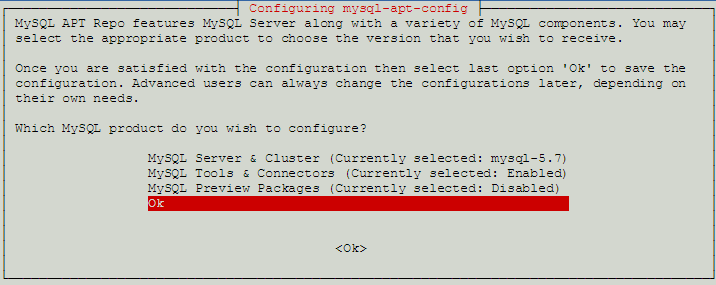
Well, I will actually prepare a server. This time we will use the instance prepared on the Google Cloud platform. From the first access to the Google Cloud platform to the part of creating an instanceHow to Multiplayer with Multiple People at Minecraft Server Free on Google's Cloud"Please refer to. Determine the name, zone, machine type. This time I made the name "mattermost", the zone "asia-northeast 1-c", and the machine type "small".
Scroll down as it is and click "Create".

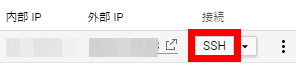
Click "SSH" from the "Instance list" screen.
If you can connect with SSHManual of MattermostWe will install according to. First, update the package.
[code]sudo apt-get update
sudo apt-get upgrade
[/ code]
In order.


When you are asked "Do you want to continue?" On the way, enter "y" and press the enter key.

Download MySQL repository package.
[code]wget https://dev.mysql.com/get/mysql-apt-config_0.8.6-1_all.deb[/code]
And press the Enter key.

[code]sudo dpkg -i mysql-apt-config*[/code]
To install the repository. I set the MySQL repository, but as it seemed to be OK as it was, select the bottom "OK" with the cursor keys and press the enter key.
continue
[code]sudo apt-get update[/code]
Enter to update the package list.
further
[code]sudo apt-get install mysql-server -y[/code]
And press the enter key to install the MySQL server.

Since you are prompted to decide the root password on the way, decide an arbitrary password and enter it. Make a note as it will be used in the next step.
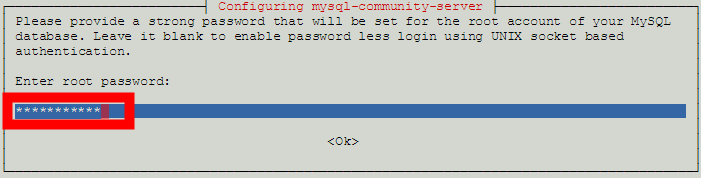
You will be prompted to enter it again, so enter the same password as before and hit the Enter key.

Next, configure the database on MySQL.
[code]mysql -u root -p[/code]
Then press the Enter key, then enter the password for the root user you just decided.

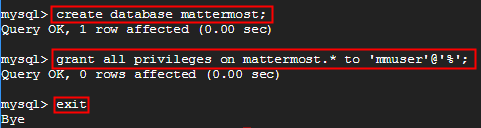
If the display on the left side of the screen is "mysql>", the login is successful. Create a user that functionsmost will use to access the database.
[code]create user 'mmuser'@'%' identified by '********';[/code]
And press the Enter key. Please replace "********" with the password string generated by yourself.

Next, create a database to be used by mattermost.
[code]create database mattermost;[/code]
In addition, grant the authority of "mattermost" database to the user who created earlier.
[code]grant all privileges on mattermost.* to 'mmuser'@'%';[/code]
Finally
[code]exit[/code]
To log out from MySQL.
MySQL configuration is complete. Next we will install the mattermost server.
[code]wget https://releases.mattermost.com/4.4.3/mattermost-4.4.3-linux-amd64.tar.gz[/code]
Enter the mattermost server to download. The latest version at the time of article creation is "4.4.3", but if there is an update in the future, since the part of "4.4.3" where there are two places should be changed,A page that can check the latest version of mattermostPlease see and replace as appropriate.

Unzip it if you can download it.
[code]tar -xvzf mattermost*.gz[/code]
And press the Enter key.

Move the decompressed mattermost to the opt folder and create a data folder under it. All files and images submitted to Mattermost are included in this data folder.
[code]sudo mv mattermost /opt
sudo mkdir / opt / mattermost / data [/ code]
Create the mattermost user and its user group in the system and grant the rights of the featuresmost folder.
[code]sudo useradd --system --user-group mattermost
sudo chown - R mattermost: mattermost / opt / mattermost
sudo chmod - R g + w / opt / mattermost [/ code]

Since anything is OK, open "/opt/mattermost/config/config.json" with a text editor and set up access to MySQL. I will use vim this time.
[code]sudo vi /opt/mattermost/config/config.json[/code]

Look for the part titled "mmuser: mostest @ tcp (dockerhost: 3306) / mattermost_test? ~ ~".

Press "i" key to insert mode, replace "mostest" with the password of user "mmuser" created by logging in to MySQL earlier. Next, replace "dockerhost" with the address of the MySQL server. Furthermore, delete the last "_test" from the "mattermost_test" part. When you finish editing, press the Esc key to exit Insert mode and press "Shift + Z" twice to exit vim.

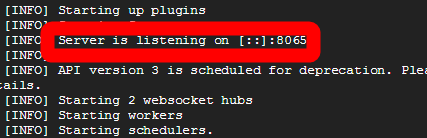
Go to "/ opt / mattermost / bin" and run Mattermost server as "mattermost" user.
[code]cd /opt/mattermost/bin
sudo -u mattermost ./platform [/ code]

When "Server is listening on [::]: 8065" is displayed, booting is completed.
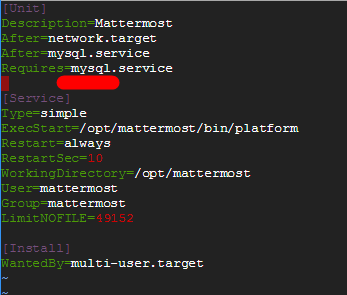
Finally, set systemd.
[code]sudo touch /lib/systemd/system/mattermost.service
sudo vi /lib/systemd/system/mattermost.service[/code]
And open mattermost.service with vim.

Push "i" to insert mode, copy and paste the lower [Unit] ~. Target and press the Esc key to exit insert mode and then press "Shift key + Z" twice to close vim. When copying from the manual of the official page, please do not forget to rewrite the part of "postgresql" in 2 places to "mysql".
[code][Unit]
Description = Mattermost
After = network.target
After = mysql.service
Requires = mysql.service
[Service]
Type = simple
ExecStart = / opt / mattermost / bin / platform
Restart = always
RestartSec = 10
WorkingDirectory = / opt / mattermost
User = mattermost
Group = mattermost
LimitNOFILE = 49152
[Install]
WantedBy = multi-user.target [/ code]
Have systemd load the new unit created earlier and check the status.
[code]sudo systemctl daemon-reload
sudo systemctl status mattermost.service [/ code]
OK if the output is as follows.
[code]● mattermost.service - Mattermost
Loaded: loaded (/lib/systemd/system/mattermost.service; disabled; vendor preset: enabled)
Active: inactive (dead) [/ code]

[code]sudo systemctl start mattermost.service[/code]
To start the service.
[code]curl http://localhost:8065[/code]
Please input and html sentence like "! DOCTYPE ~" is output OK.

[code]sudo systemctl enable mattermost.service[/code]
And set Mattermost server to start at the same time the instance starts up.

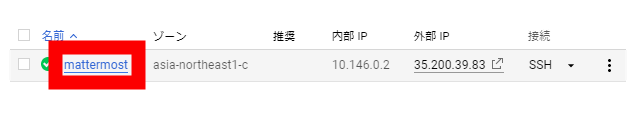
Next, configure the firewall. In order to access the Mattermost server from the outside it is necessary to open TCP port 8065. First, click the instance name "matter most" from the instance list.
Enter "mattermost - server" in the setting of "network tag" on the way.
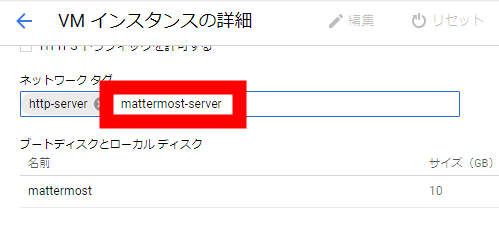
Scroll to the bottom and click "Save".

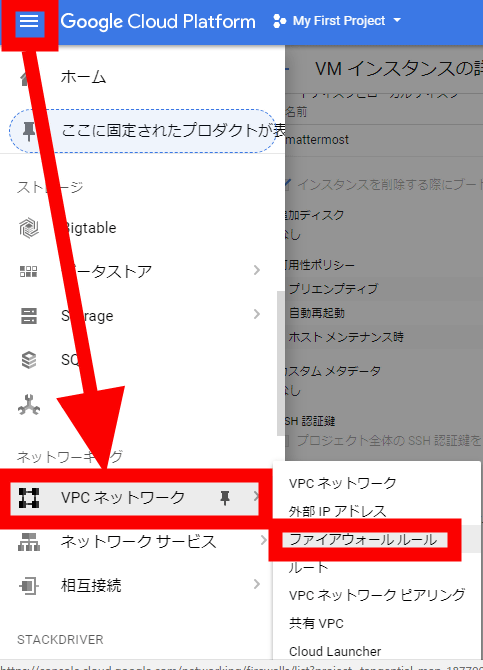
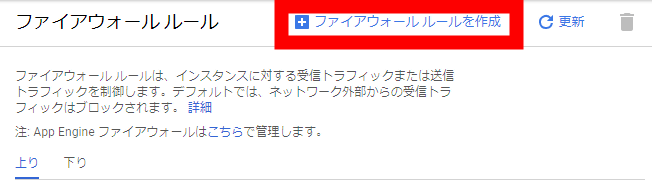
Select "VPC network" from the hamburger menu in the upper left and click "Firewall rule".
Click "Create Firewall Rule" above.
I will keep the name easy to understand such as "mattermost".
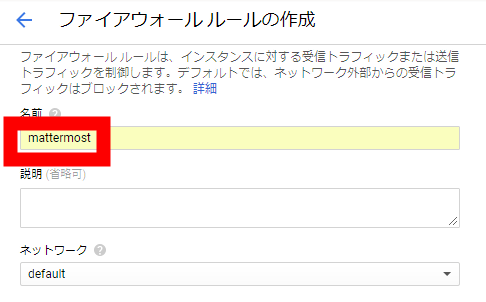
Scroll down and enter "mattermost-server" for "target tag", "0.0.0.0/0" for "source IP range", "tcp: 8065" for "protocol and port", and "save" Click.

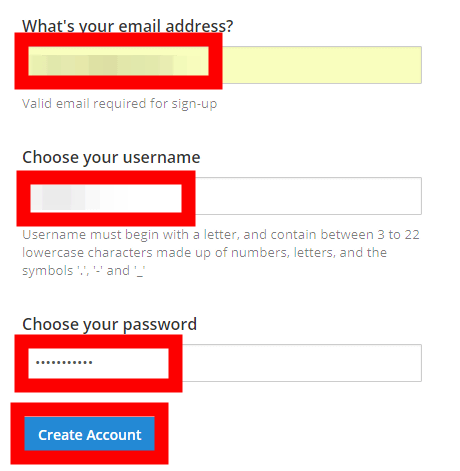
Launch the browser, enter the external IP address of the instance, and add ": 8065" to the back to access it.

Decide mail address, user name, password and click "Create Account".
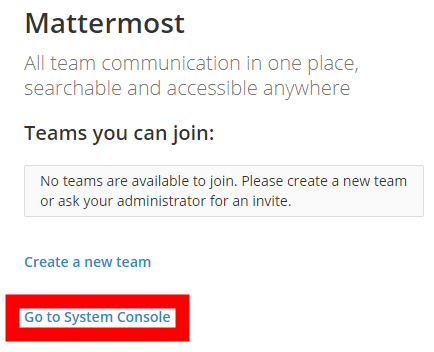
Click "Go to System Console".
左のメニューから「Configuration」を選び、「Site URL:」に「http://インスタンスの外部IPアドレス:8065/」と入力します。
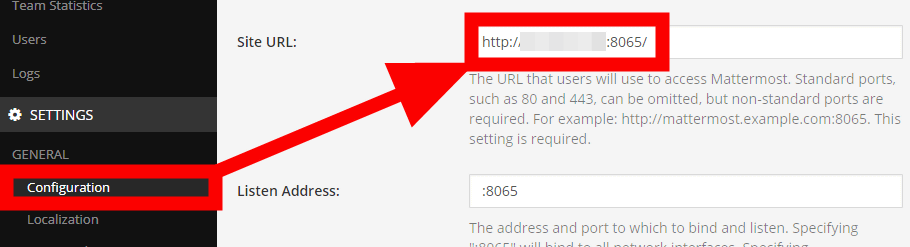
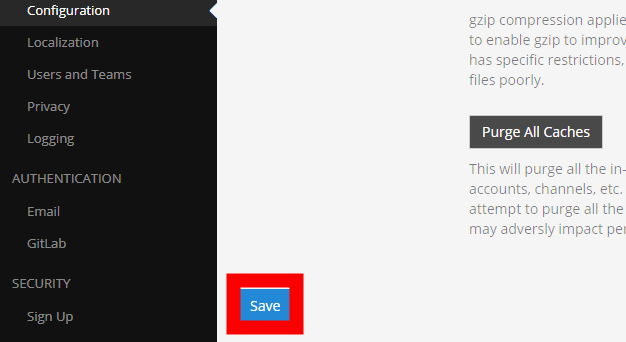
Scroll down and click Save.
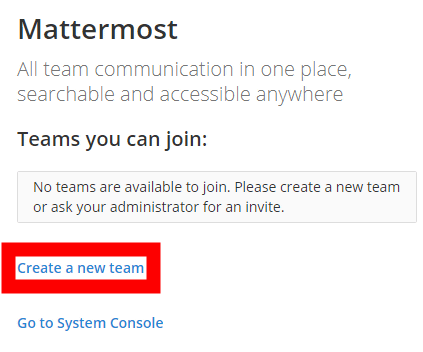
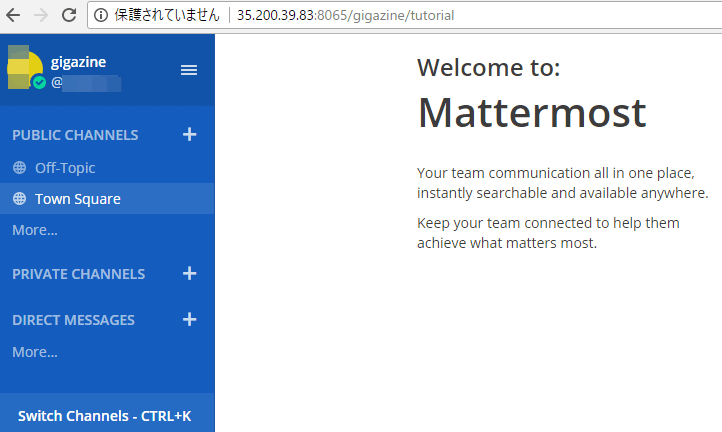
もう一度「http://インスタンスの外部IPアドレス:8065/」へ移動し、今度は「Create a new team」をクリックします。
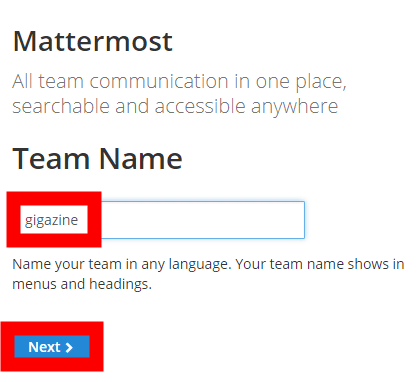
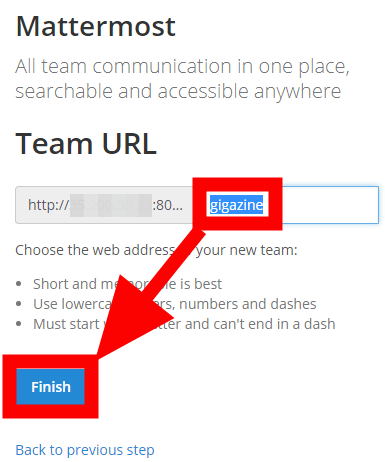
I will decide the name of the team. This time it was "gigazine". When you have entered, click "Next>".
Decide the URL to access the team's page. Here we chose the same "gigazine" as the team name. When you enter, click "Finish".
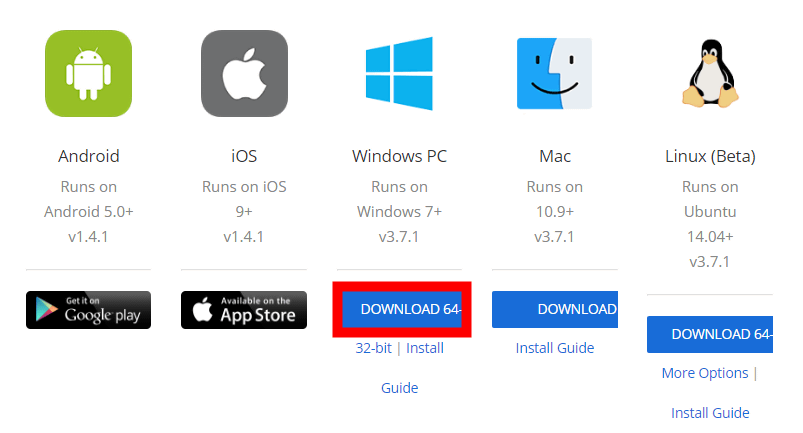
All the settings are complete with this. I was accessing with the browser now, next time I try to access with dedicated software.
Software for Android, iOS, etc., various terminals are available. In this time, click "DOWNLOAD 64-bit" under Windows PC.
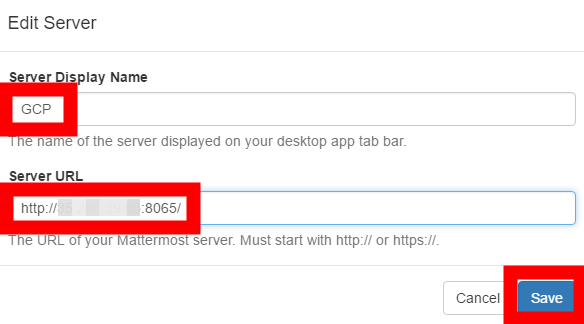
Double click on the downloaded executable file to start Mattermost.

Enter the name and URL of the server and click "Save".
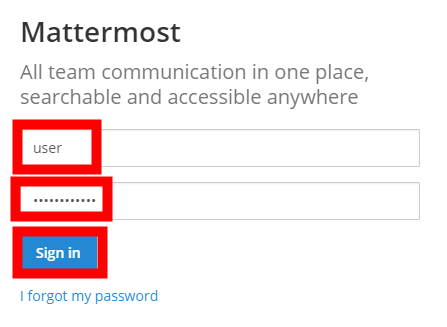
Enter ID and password and click "Sign in" ......
Access is completed. The tutorial begins, but click "Skip tutorial" here.

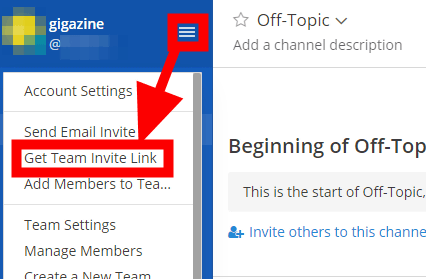
To invite others to the same server, click "Get Team Invite Link" from the hamburger menu in the upper left.
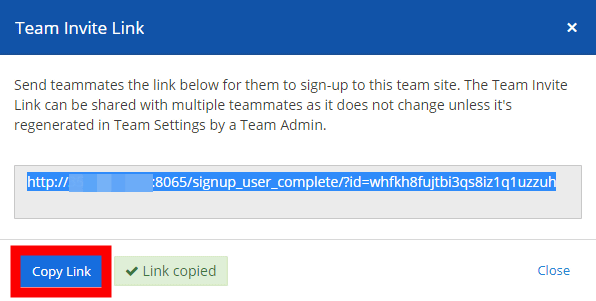
Click "Copy Link" to copy the link and send it to the people you want to invite.
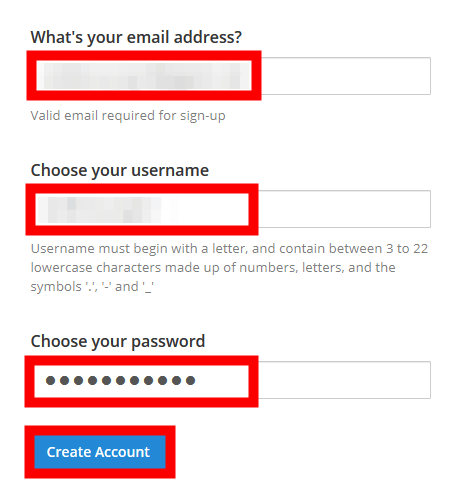
By accessing this link you can create a new account. Please decide mail address, user name, password and click "Create Account".
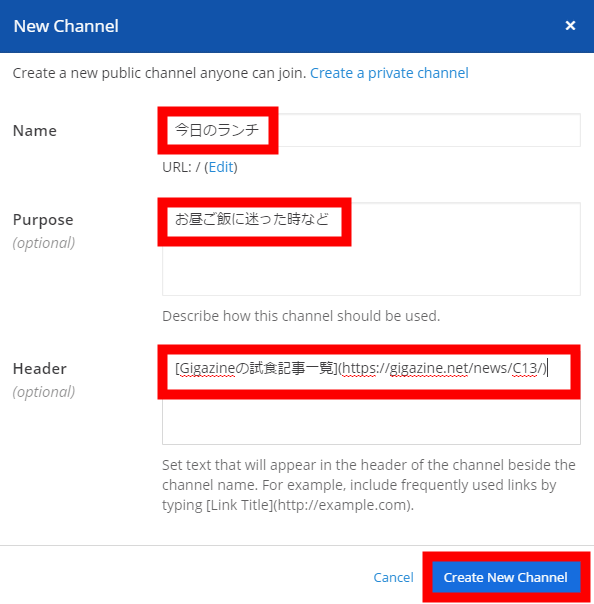
You can join with your new account soon. Let's create a new channel as it is. Click the "+" button next to "PUBLIC CHANNELS" on the left.
As "New Channel" screen appears, enter "Channel name" "Channel purpose" "Header" and click "Create New Channel". Markdown notation can be used for the header.
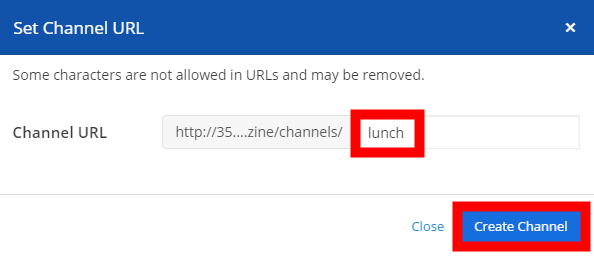
Because the channel name was Japanese, I was instructed to decide the URL of the channel separately. In this example, enter "lunch" and click "Create Channel".
A new channel was created. It can be confirmed that the header is properly linked.
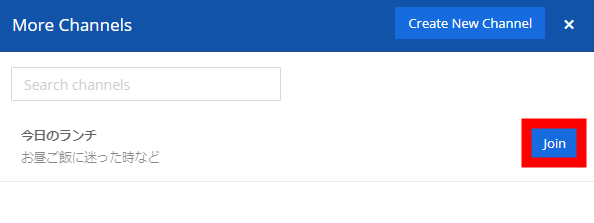
If another person joins this "lunch for today" channel, click the "More ..." part under "PUBLIC CHANNELS" on the left menu ... ...
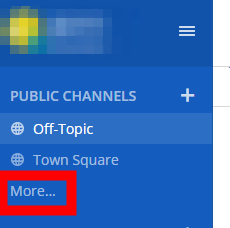
If you click "Join" of "Today's lunch", it is OK.
The participating channels are displayed in the left channel list, and you can receive notifications when someone posts. In this way, it is the advantage of the chat tool that you can proceed with multiple topics simultaneously using many channels.
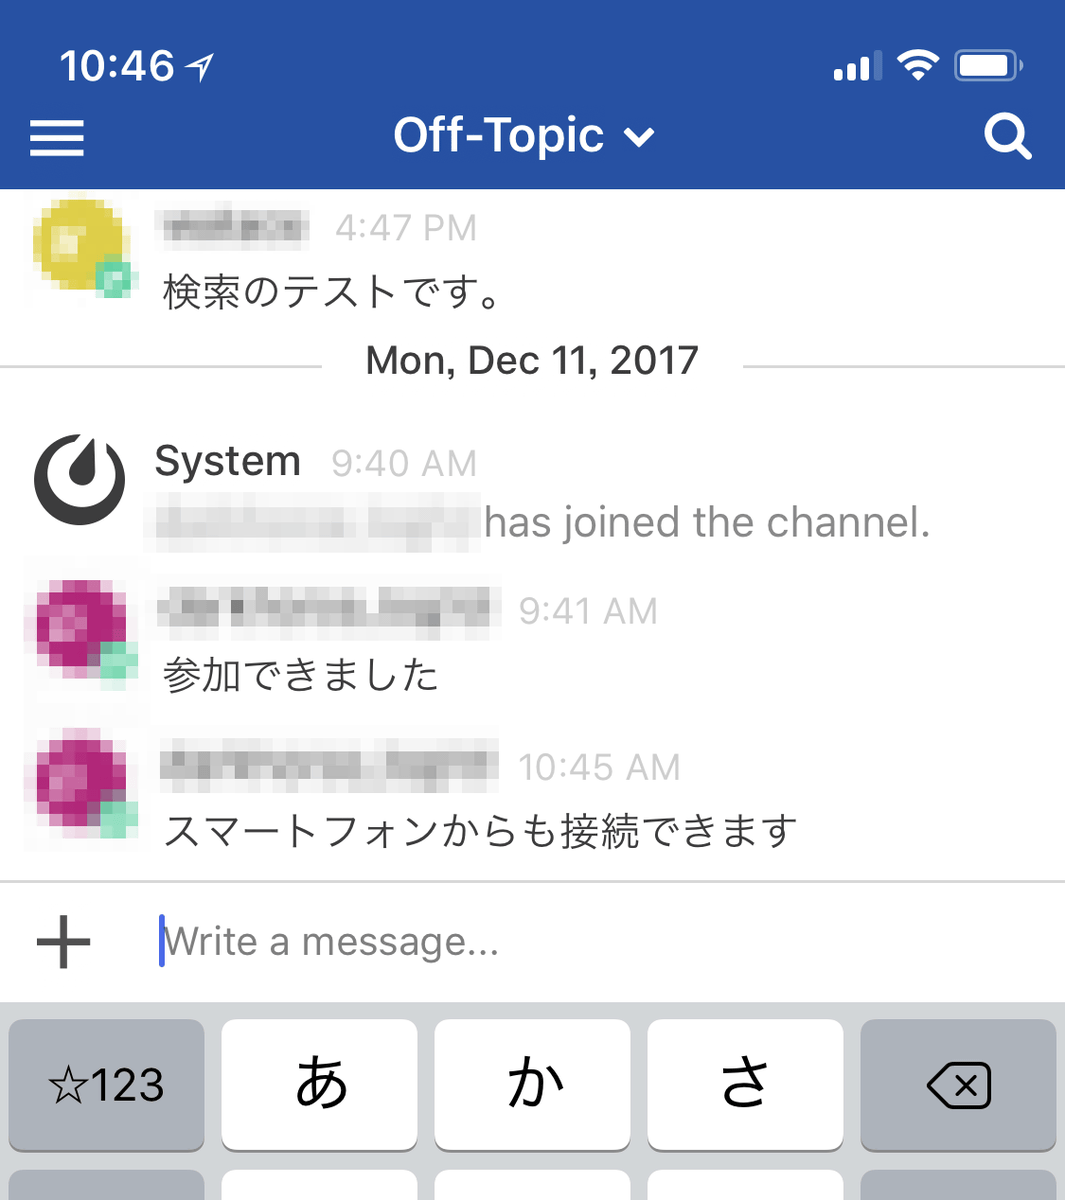
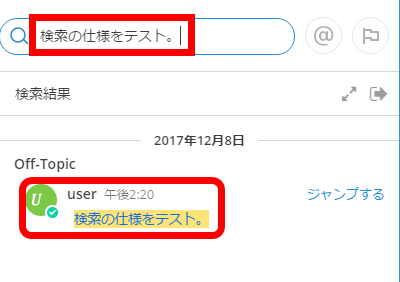
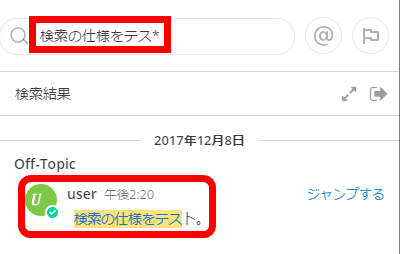
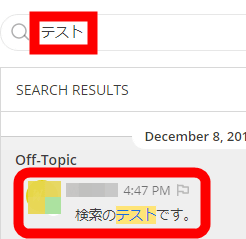
Successful completion of installation ... ... I thought that, I found a problem here. If you type the full text of the sentence in the search field it will hit ... ...
As in the image below, if I cut the sentence halfway, I got stuck.
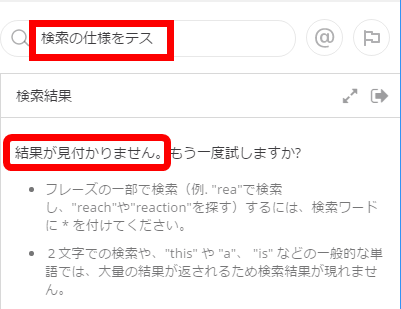
Last match search was done by adding "*" at the end.
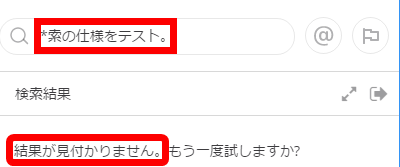
However, even if "*" is added first, it will not be a backward match search.
Try looking at GugHow to support Japanese full-text search with Mattermost's MySQL"There is a site that has exactly the information that you wanted, say. I will fix it carefully with reference to this site.
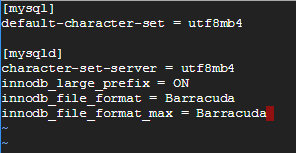
[code]sudo vi /etc/my.cnf[/code]
And open my.cnf.

Depending on the environment, perhaps a new file has been created, put it in insert mode with "i" key, copy and paste the code below.
[code][mysql]
default-character-set = utf8mb4
[mysqld]
character-set-server = utf8mb4
innodb_large_ prefix = ON
innodb_file_format = Barracuda
innodb_file_format_max = Barracuda [/ code]
After pasting, exit insert mode with Esc key, and press "Shift key + Z" twice to close vim.
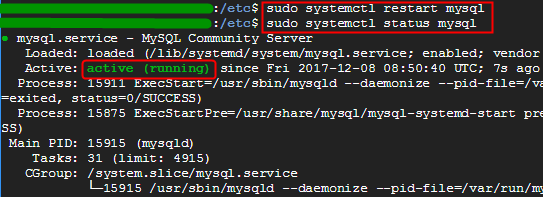
Restart MySQL to reflect the setting.
[code]sudo systemctl restart mysql[/code]
Next, it checks whether the rebooting is completed.
sudo systemctl status mysql [/ code]
If it is displayed as "active (running)" with a green letter on the way as in the image below, it is OK.
Then log in to MySQL.
[code]mysql mattermost -u mmuser -p[/code]
Then enter the password of the user you are using to access MySQL from Mattermost.

When the display shows "mysql>"
[code]ALTER TABLE Posts DROP INDEX idx_posts_message_txt;[/code]
And input.

Next, also enter the following statement.
[code]ALTER TABLE Posts ADD FULLTEXT INDEX idx_posts_message_txt (`Message`) WITH PARSER ngram COMMENT 'ngram reindex';[/code]

That's all there is to it. When I tried it in practice, I was able to do a partial match search properly.
Related Posts: